
This post contains affiliate links. Please see our disclosure policy.
Mastering Big Green Egg Mixed Grill: The Ultimate Family-Style Feast provides a way for you to serve a bountiful meal that satisfies every palate at the table. You must move beyond the limitation of cooking one protein at a time to experience the true efficiency of your ceramic grill. This process ensures that your chicken, shrimp, and sausage all reach the platter at their absolute peak of flavor and temperature. Because the Big Green Egg maintains a steady 400°F environment, it remains the most effective tool for coordinating this diverse range of ingredients. You will find that the strategic use of a multi-level rack and cast iron is a mechanical necessity for a professional-grade result.
To achieve the best results, you should focus on the specific timing milestones that allow varied proteins to finish simultaneously. This technique ensures that your bone-in chicken thighs develop a crispy exterior while the delicate shrimp stay succulent and tender. You will discover that creating distinct heat zones within the dome is the most reliable way to manage a large-scale family meal. Now, you should prepare your mise en place to ensure a smooth workflow once the charcoal is stabilized and the grate is hot. Because the Big Green Egg excels at heat retention and convection, you are ready to produce a massive spread of meat and vegetables in under forty minutes. Once you present this ultimate family-style feast to your guests, you will understand why mastering the mixed grill is the hallmark of a seasoned pitmaster.
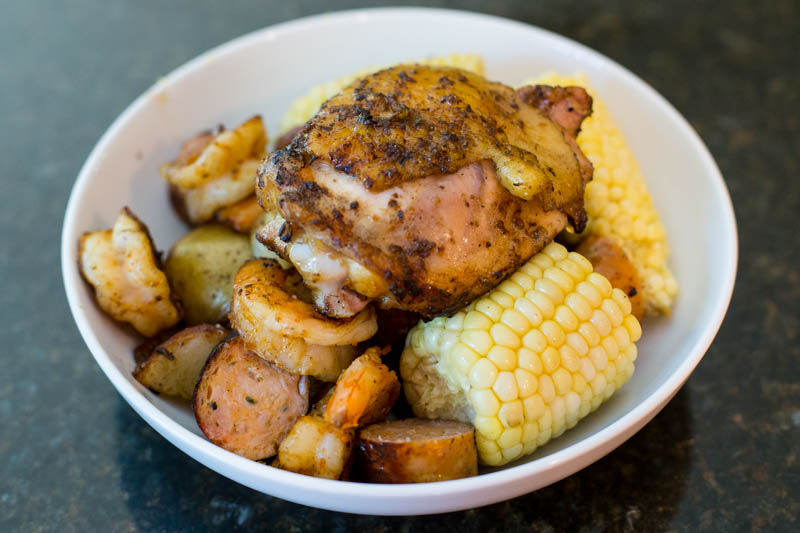
Table of Contents
- Step 1: BGE Setup and Multi-Tiered Options
- Step 2: Protein Preparation and Rub Selection
- Step 3: Rendering the Chicken Fat and Crisping the Skin
- Step 4: Managing the Multi-Tiered Grate
- Step 5: Roasting the Garlic Red Skin Potatoes
- Step 6: Butter-Poached Basil Corn in Foil
- Step 7: Timing the Bountiful Spread
- Step 8: The Masterful Assembly and Presentation
- Big Green Egg Mixed Grill: The Ultimate Family-Style Feast Recipe
Get My NEW Book
The Ultimate Big Green Egg Cookbook

Step 1: BGE Setup and Multi-Tiered Options
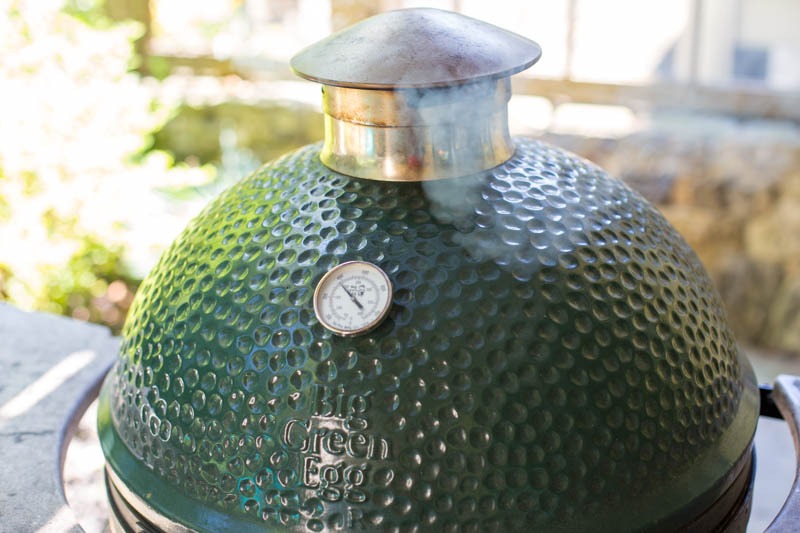
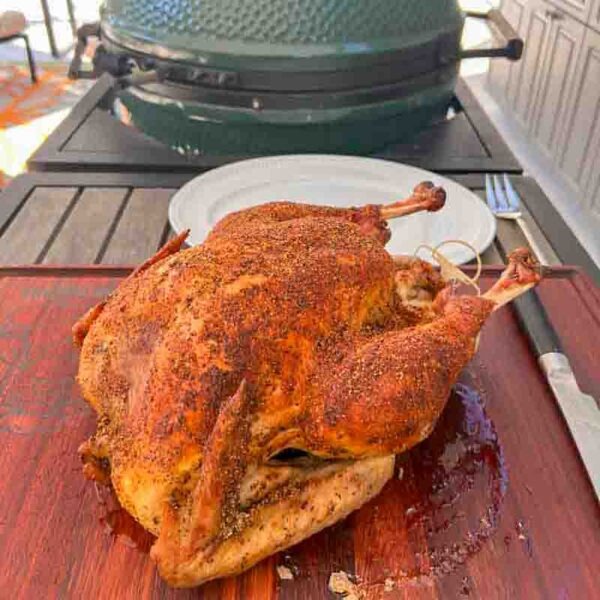
Mastering Big Green Egg Mixed Grill: The Ultimate Family-Style Feast begins with stabilizing your ceramic grill at a steady 400°F measured at the dome. You must ensure your charcoal is burning cleanly to provide a consistent heat source for the diverse proteins and vegetables. This process provides a way for the cast iron and the raised grates to reach their target temperature simultaneously. Because this cook involves five different ingredients, utilizing the vertical space of your dome is a mechanical necessity for success. You will find that modern hardware makes managing these different heat zones much easier than the basic tiered racks of the past.
To achieve the best results, you should choose a rack system that allows you to move delicate items further from the charcoal. This technique ensures that your chicken thighs can render their fat over the direct fire while the shrimp and sausage finish on a cooler, elevated level. You will discover that having multiple cooking surfaces is the most reliable way to prevent overcrowding the primary grate. Now, you should consider these specific hardware configurations to maximize your cooking area:
- The EGGspander System: This official Big Green Egg accessory uses a “pro-grade” rack to allow for simultaneous direct and indirect cooking across two levels.
- The Adjustable Rig: This versatile system from The Ceramic Grill Store allows you to customize the height of your grates to find the exact “sweet spot” in the dome.
Because the Big Green Egg excels at high-heat convection, you are ready to manage a complex cook with ease once your tiers are in place. Once the dome reaches a stable temperature and your rack is installed, you have set the stage for an efficient and professional-grade mixed grill.
Step 2: Protein Preparation and Rub Selection
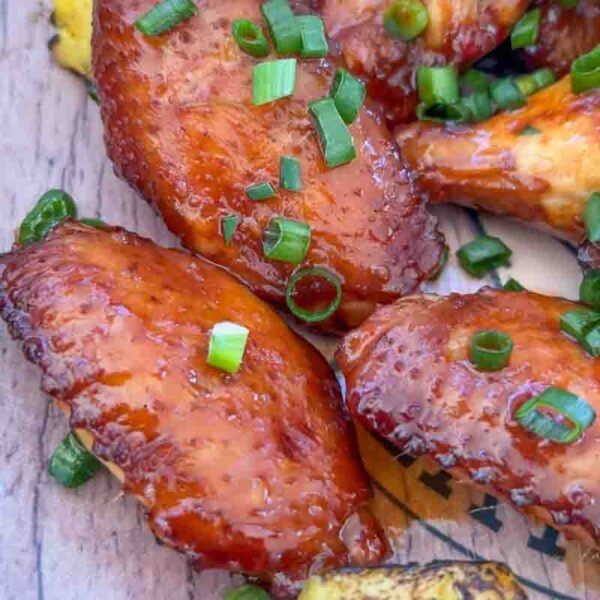
Mastering Big Green Egg Mixed Grill: The Ultimate Family-Style Feast requires a systematic approach to seasoning your various proteins. You must prepare four bone-in, skin-on chicken thighs, one pound of medium shrimp, and four links of chicken sausage for the grill. This process provides a way for the spices to adhere to the different textures of poultry and seafood simultaneously. Because the flavor profile needs to remain cohesive across the platter, using a versatile seasoning like Dizzy Pig Tsunami Spin is vital for a professional-grade result. You will find that the hints of ginger and sesame in this rub complement both the rich chicken fat and the delicate sweetness of the shrimp.
To achieve the best results, you should apply a light coating of olive oil to the chicken and shrimp before adding the rub. This technique ensures that the spices stay in place during the high-heat transition from the prep table to the Big Green Egg. You will discover that skewering the shrimp is the most reliable way to manage small pieces on the raised rack without losing them through the grate. Now, you should allow the seasoned proteins to sit at room temperature for a few minutes while the grill stabilizes. Because the skin-on thighs require the most time to render, you are ready to build a flavor foundation that will stand up to the wood fire. Once your proteins are prepped and the shrimp are safely skewered, you have set the stage for an efficient and organized cook.

Step 3: Rendering the Chicken Fat and Crisping the Skin
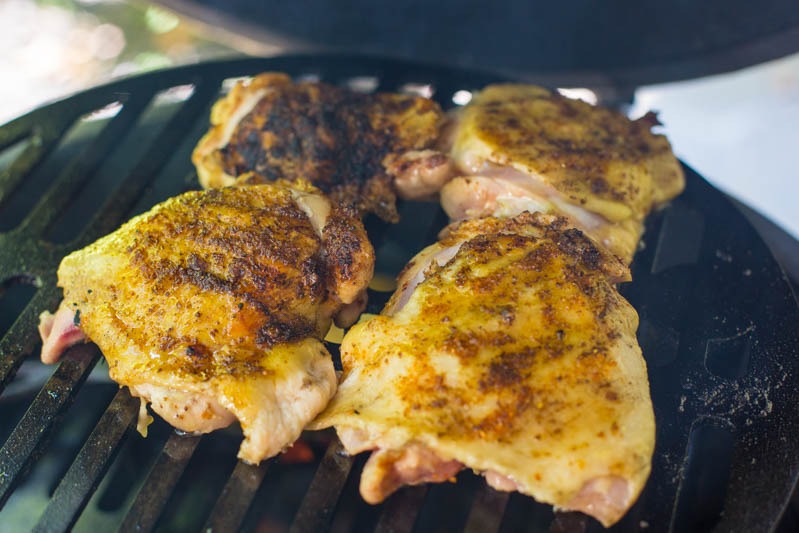
Mastering Big Green Egg Mixed Grill: The Ultimate Family-Style Feast requires you to prioritize the chicken thighs as they have the longest cook time. You must place the bone-in, skin-on thighs face down directly over the hot coals to begin the rendering process. This process provides a way for the intense heat to transform the fat into a thin, crispy layer of golden skin. Because the Big Green Egg is stabilized at 400°F, a four-minute sear is essential for achieving a professional-grade texture without burning the rub. You will find that this initial face-down cook is the most effective way to build a deep flavor profile before moving the poultry to a higher tier.
To achieve the best results, you should keep the dome closed as much as possible to harness the convective power of the ceramic grill. This technique ensures that the heat remains consistent even as you briefly open the lid to check for flare-ups. You will discover that the direct contact with the cast iron or stainless steel grate creates a beautiful char that seals in the juices. Now, you should prepare to move the thighs to the upper level of your rack system once the skin is sufficiently rendered. Because the chicken requires more thermal energy than the seafood or sausage, you are ready to transition into the multi-level phase of the cook. Once the four minutes have elapsed and the skin is perfectly crispy, you have successfully completed the first critical milestone of this mixed grill.
Step 4: Managing the Multi-Tiered Grate
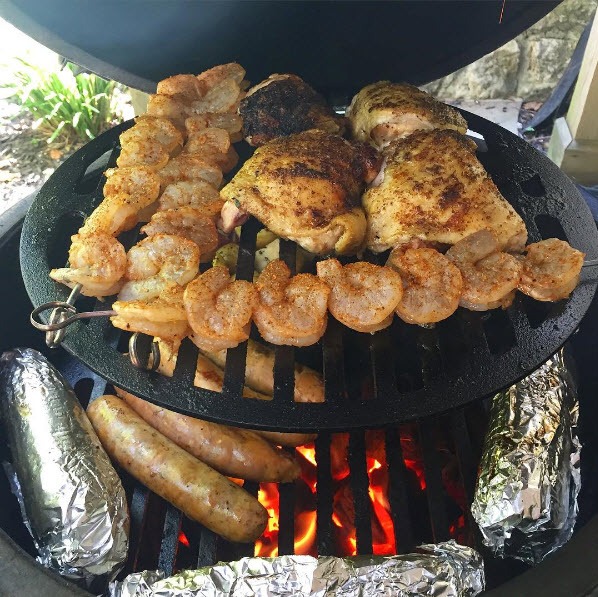
Mastering Big Green Egg Mixed Grill: The Ultimate Family-Style Feast depends on your ability to utilize vertical space for different temperature requirements. You must move the chicken thighs to the top tier of your rack system once the skin reaches your desired level of crispiness. This process provides a way for the thighs to finish cooking through via indirect heat while making room on the bottom grate for your secondary proteins. Because the Big Green Egg dome traps heat at the top, this elevated position is ideal for maintaining a safe internal temperature without over-charring the skin. You will find that this arrangement is essential for keeping the poultry succulent while you focus on the quicker-cooking items.
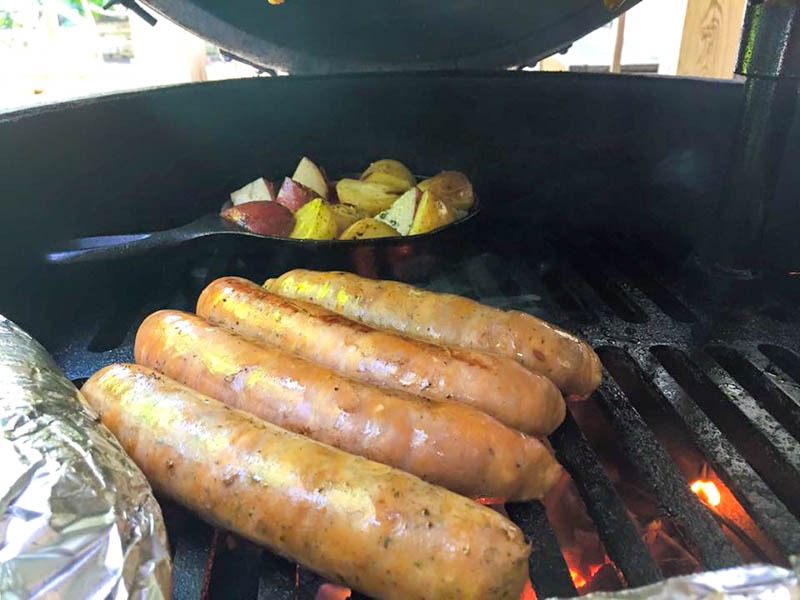
To achieve the best results, you should place the shrimp skewers on the top tier alongside the chicken for a gentle, even sear. This technique ensures that the delicate seafood stays tender while the sausage, potatoes, and corn take advantage of the direct heat on the bottom tier. You will discover that placing the heavier items closer to the coals is the most reliable way to achieve a deep, wood-fired crust on the vegetables. Now, you should arrange your bottom grate to maximize airflow around the sausage links and the cast iron pan of potatoes. Because the ceramic grill distributes heat with incredible efficiency, you are ready to manage five distinct ingredients without crowding the cooking surface. Once every item is positioned on its respective level, you have successfully synchronized the final phase of this family-style feast.
Step 5: Roasting the Garlic Red Skin Potatoes
Mastering Big Green Egg Mixed Grill: The Ultimate Family-Style Feast requires a side dish that can withstand the high heat of the lower grate. You must quarter one pound of red skin potatoes and toss them thoroughly in a mixture of extra virgin olive oil and freshly minced garlic. This process provides a way for the aromatics to coat every surface of the starch before the pan hits the heat. Because the Big Green Egg functions like a high-end convection oven, a small Lodge Cast Iron Pan is the most effective vessel for achieving a deep golden crust. You will find that the cast iron retains thermal energy far better than a standard baking sheet, which is vital for getting that signature exterior crunch.
To achieve the best results, you should place the potato pan directly on the bottom tier where the heat is most intense. This technique ensures that the oil sizzles immediately, effectively frying the bottom of the potatoes while the dome heat roasts the tops. You will discover that the combination of wood fire and garlic creates a flavor profile that far exceeds anything made in a traditional kitchen. Now, you should use a set of long tongs to occasionally turn the potatoes to ensure they brown evenly on all sides. Because the ceramic walls of the grill radiate heat so consistently, you are ready to produce potatoes that are creamy on the inside and perfectly crispy on the outside. Once the edges begin to turn a dark mahogany and the garlic is fragrant, you have reached the ideal texture for your family-style platter.
Step 6: Butter-Poached Basil Corn in Foil
Mastering Big Green Egg Mixed Grill: The Ultimate Family-Style Feast requires a vegetable side that stays juicy and flavorful amidst the high-heat environment. You must prepare each ear of corn by smearing the kernels with unsalted butter and freshly chopped basil before wrapping them tightly in heavy-duty aluminum foil. This process provides a way for the corn to steam in its own moisture while infusing it with the bright, herbal notes of the basil. Because the Big Green Egg is running at 400°F, the foil acts as a protective barrier that prevents the sugars from scorching too quickly on the bottom grate. You will find that this method produces incredibly tender kernels that provide a sweet contrast to the spicy grilled proteins.
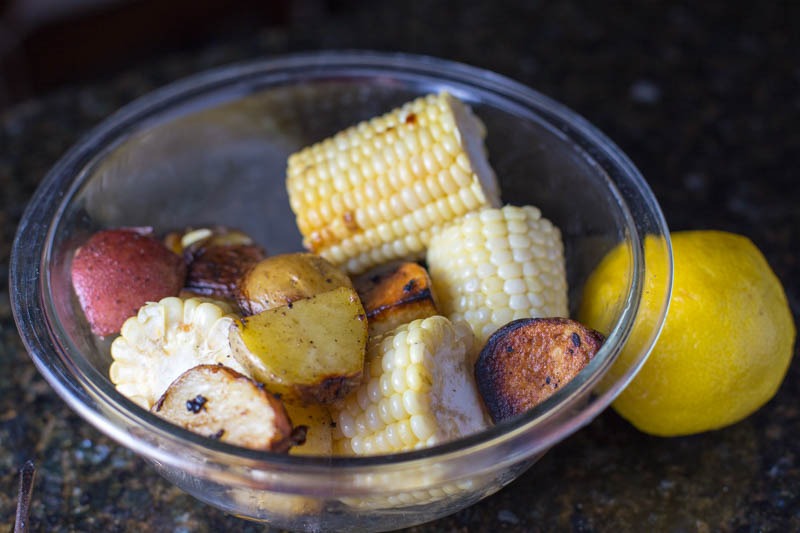
To achieve the best results, you should place the foil-wrapped cobs directly alongside the cast iron potato pan for the duration of the cook. This technique ensures that the corn receives consistent thermal energy while you focus on rotating the chicken and shrimp on the upper tier. You will discover that the steam trapped inside the foil effectively poaches the corn in the basil butter for a professional-grade finish. Now, you should carefully remove the cobs from the heat and allow them to rest briefly before unwrapping the foil. Because the flavors are so concentrated, you are ready to slice the ears in half and toss them into the bowl with your garlic-roasted potatoes. Once the corn is mixed with the crispy red skins, you have created a cohesive and savory foundation for your family-style platter.
Step 7: Timing the Bountiful Spread
Mastering Big Green Egg Mixed Grill: The Ultimate Family-Style Feast requires a keen eye for the clock to ensure every ingredient reaches the finish line together. You must monitor the progression of your proteins and sides over the course of approximately thirty minutes. This process provides a way for the slower-cooking chicken thighs to reach an internal temperature of 165°F while the shrimp and sausage stay hot and juicy. Because the Big Green Egg excels at maintaining a steady thermal environment, you can trust the convection to do the heavy lifting while you manage the timing milestones. You will find that this efficient window of time is ideal for producing a massive quantity of food without drying out the delicate seafood.
To achieve the best results, you should use an instant-read thermometer to verify the doneness of the meat during the final five minutes. This technique ensures that you pull the shrimp skewers and sausage links the moment they reach their peak texture. You will discover that the synergy between the wood fire and the various ingredients creates a sensory experience that defines the “Grilling by Feel” philosophy. Now, you should prepare a large serving platter to receive the diverse collection of meats and charred vegetables. Because you managed the tiers effectively, you are ready to present a bountiful display that looks as professional as it tastes. Once the final component is removed from the grate, you have successfully executed a complex multi-protein cook in a single half-hour session.

Step 8: The Masterful Assembly and Presentation
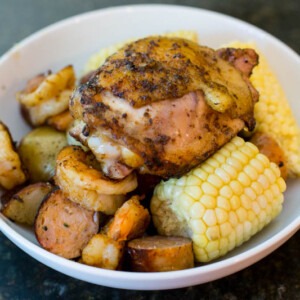
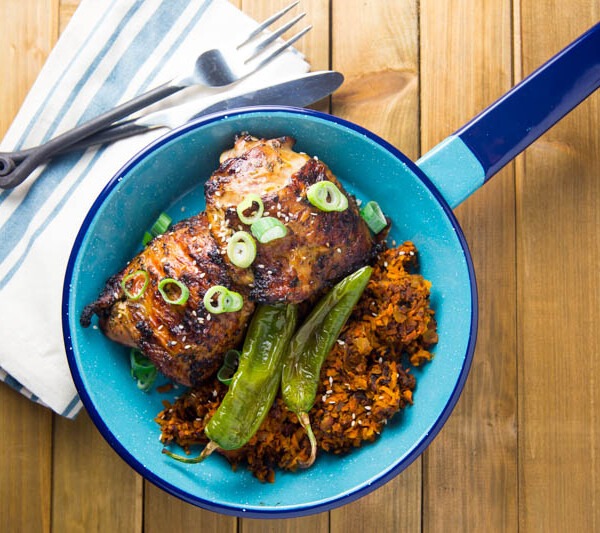
Mastering Big Green Egg Mixed Grill: The Ultimate Family-Style Feast culminates in a strategic assembly that highlights the diverse textures of your cook. You must allow the proteins to rest for a few minutes to ensure the juices redistribute within the fibers of the meat. This process provides a way for the chicken thighs to remain succulent while you slice the sausage links into bite-sized rounds. Because the Big Green Egg has infused every component with a deep wood-fired essence, a simple combined presentation is the most effective way to showcase the meal. You will find that mixing the smaller proteins with the vegetables creates a cohesive and professional-grade platter.
To achieve the best results, you should toss the sliced sausage, succulent shrimp, and basil corn together in the bowl with your crispy garlic potatoes. This technique ensures that the savory fats from the meat lightly coat the vegetables, enhancing the overall flavor profile of the feast. You will discover that serving this mixture as a base allows the star of the show to stand out at the top of the dish. Now, you should crown the bountiful pile of meat and vegetables with the perfectly rendered, skin-on chicken thighs. Because the high-heat convection of the dome has created a variety of textures, you are ready to serve a meal that feels like a true celebration. Once you place this massive family-style display in the center of the table, you have successfully mastered the complexity of a multi-tiered mixed grill.
Big Green Egg Mixed Grill: The Ultimate Family-Style Feast
Equipment
- Cast Iron Pan small
- Skewers for shrimp
Ingredients
Protein Components:
- 2 pounds Bone-in, Skin-on Chicken Thighs
- 4 Sausage Links, Chicken is what I used
- 1 pound Medium Shrimp, Peeled and deveined
Vegetable Base:
- 1 pound Red Skin Potatoes, quartered
- 4 Ears of Corn, on the Cob
- 4 cloves Garlic
The Flavor Drivers:
- 4 tbsp BBQ Rub
- 2 tbsp Olive Oil
- 4 tbsp Butter, unsalted
- 1/4 cup Fresh Basil, sliced
Instructions
- Preheat the Big Green Egg to 400°F
- Rub the chicken thighs with olive oil and coat with BBQ rub
- Rub the shrimp with olive oil and coat with BBQ rub then skewer
- Toss the potatoes in olive oil and minced garlic
- Put a small cast iron pan on the grilling surface to preheat
- Rub the corn on the cob with butter and sliced fresh basil, wrap in foil, place on grill
- Add the potatoes to the preheated cast iron pan
- Cook the chicken thighs skin side down for 4 minutes until fat is rendered and skin is crispy
- Move the thighs to a raised grill skin side up
- Continue to turn the corn and potatoes as you cook throughout
- After 5 minutes add the sausages to the bottom tier and shrimp to the top tier
- Cook both for another 10 minutes turning the sausages and shrimp occasionally to cook through
- Pull the shrimps and sausages and let rest
- Pull the potatoes and corn, chop the corn in half and mix together in a bowl
- Check temp on chicken thighs and pull them when they hit 165°
- Slice the sausage, pull the shrimp off the skewers, and toss in the bowl with potatoes and corn
- Serve a scoop of the potatoes, corn, shrimp, and sausage in a bowl then top with a chicken thigh
- enjoy
Nutrition information is automatically calculated, so should only be used as an approximation.


I am drooling now! I really do wish I could afford a green egg…. There is a guy named Ian that does a sport radio show in Tampa and swears by his Green Egg when he does his Ribs and everything else he cooks. One day I will have one. If you have a Green Egg you don’t need anything else!
Thanks Lew! Ian is correct… once you get an Egg you don’t need anything else!