
This post contains affiliate links. Please see our disclosure policy.
Mastering How to Make an Authentic Philly Cheesesteak on the LoCo Griddle provides a way for you to celebrate a culinary icon with professional precision. You must move beyond the limitations of a standard stovetop to harness the expansive power of the LoCo 36″ SmartTemp 3 Burner Griddle. This process ensures that you can manage a massive pile of steak and onions without ever losing the heat required for a perfect sear. Because this sandwich remains the definitive choice for a championship-level game day feast, it is the perfect addition to any backyard menu. You will find that the specialized temperature sensors on this griddle are a functional requirement for achieving restaurant-quality results at home.
To achieve the best results, you should focus on the classic trio of thinly sliced ribeye, diced onions, and plenty of melted cheese. This technique ensures that every bite contains the ideal ratio of savory beef to soft, translucent aromatics. You will discover that the three separate burners allow you to toast your rolls on low heat while the steak sizzles on a high-heat zone. Because the LoCo Griddle recovers heat so quickly, you are ready to feed a hungry crowd of fans in just minutes. Once the cheese is melted and the meat is chopped to perfection, you will understand why this is the ultimate way to enjoy a Philly classic. Now sit back, grab yourself a Yuengling Traditional Lager, and enjoy this recipe for my Authentic Philly Cheesesteak.
Table of Contents
- Step 1: Selecting and Slicing the Beef
- Step 2: Prepping the Aromatics and Bread
- Step 3: Zonal Griddle Setup and Initial Heat
- Step 4: Caramelizing the Onions
- Step 5: Searing and Seasoning the Beef
- Step 6: Integrating the Onions and Portioning the Meat
- Step 7: Toasting the Mayo-Smeared Rolls
- Step 8: Melting the Provolone Cheese
- Step 9: The Final Scoop and Assembly
- Step 10: The Foil Wrap and Final Rest
- How to Make an Authentic Philly Cheesesteak on the LoCo Griddle Recipe
Get My NEW Book
The Ultimate Big Green Egg Cookbook

Step 1: Selecting and Slicing the Beef
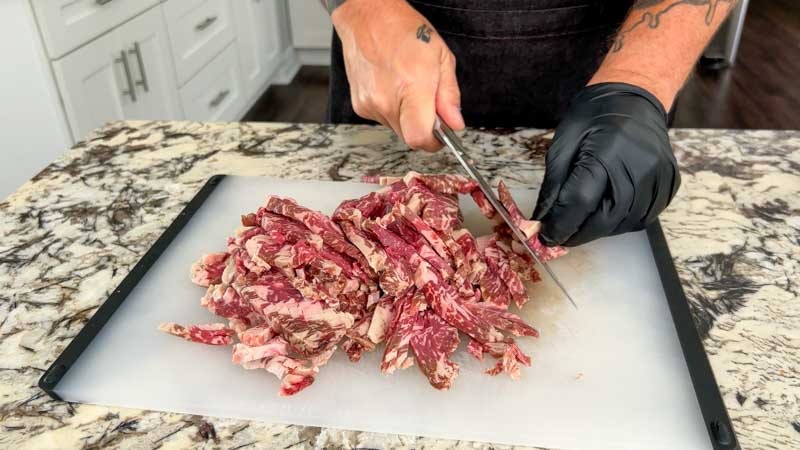
Mastering this classic sandwich requires starting with a high-quality cut featuring excellent marbling. You must choose a steak that balances tenderness with rich flavor to withstand the high heat. This process provides a way for the fat to render quickly, which creates a succulent and traditional mouthfeel. Because I appreciate superior marbling, I often utilize Snake River Farms American Wagyu Strip Slices for this specific cook. You will find that having the beef pre-sliced lengthwise gives you a significant advantage when prepping for a crowd.
To achieve the best results locally, you should look for well-trimmed ribeye or top sirloin at your butcher shop. This technique ensures that you can produce a professional-grade sandwich using readily available ingredients. Placing the steak in the freezer for thirty minutes is the best way to firm the muscle. Now, you should slice the chilled beef into paper-thin strips using a very sharp chef’s knife. Because cold meat is easier to manage, you are ready to produce an authentic result with minimal effort. Once your beef is sliced and set aside, you have completed the most critical preparation milestone.
- Boneless Chuck Roast: A hearty option that works well if you take the time to remove any heavy connective tissue.
- Snake River Farms American Wagyu Strip Slices: Pre-sliced for convenience and packed with intense flavor.
- Ribeye Steak: The traditional choice for many enthusiasts because of its high fat content and tenderness.
- Top Sirloin Roast: An excellent budget-friendly alternative that provides a clean beefy flavor when sliced thin.
Step 2: Prepping the Aromatics and Bread
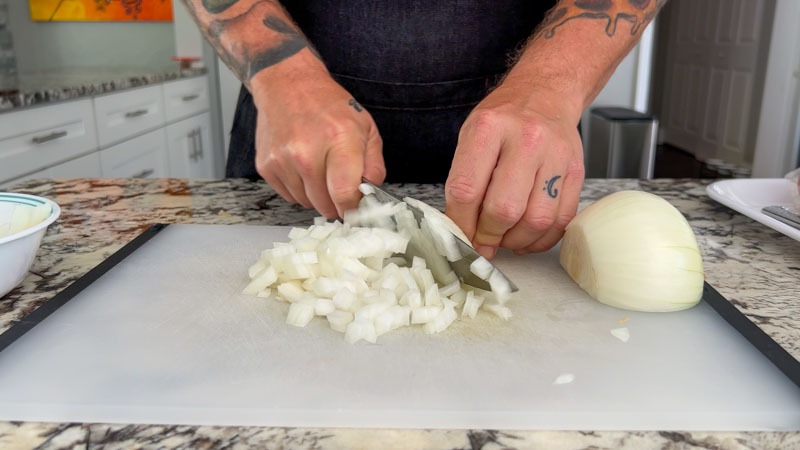
This sandwich assembly requires precise knife work before the first burner is even lit. You must dice one large yellow onion into uniform pieces and set them aside in a prep bowl. This is a way for the onions to cook evenly and caramelize at the same time as the beef. Using a sharp chef’s knife is a requirement for clean cuts that won’t bruise the onion. You will find that prep organization is the most effective way to manage the fast-paced nature of griddle cooking.
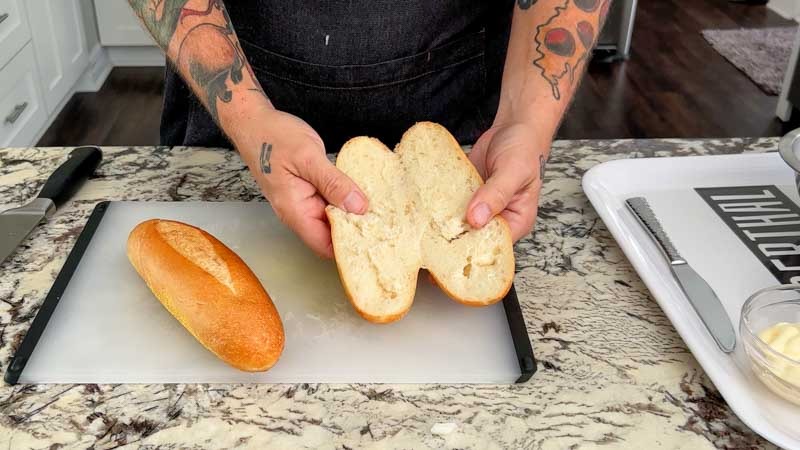
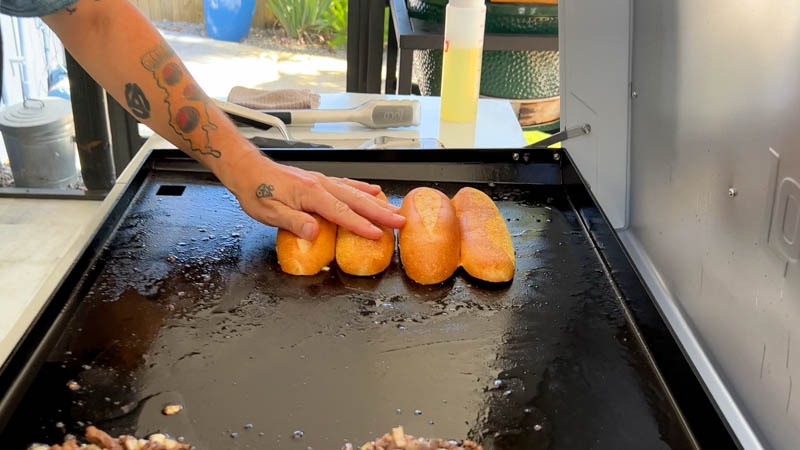
To achieve the best results, you should split your hoagie rolls down the center. You must be careful not to cut all the way through the hinge. This technique ensures that the bread opens like a book. It creates a secure vessel for the heavy meat and cheese filling. You will discover that a high-quality roll prevents your sandwich from falling apart. Now, you should keep the bread covered until it is time for toasting. Use the cool zone of your griddle to warm the bread. Because the structural integrity is paramount, you are ready to move to the cooking surface. Once your rolls are prepped, you have established the necessary mise en place. You are now ready to create a professional-grade cheesesteak.
Step 3: Zonal Griddle Setup and Initial Heat
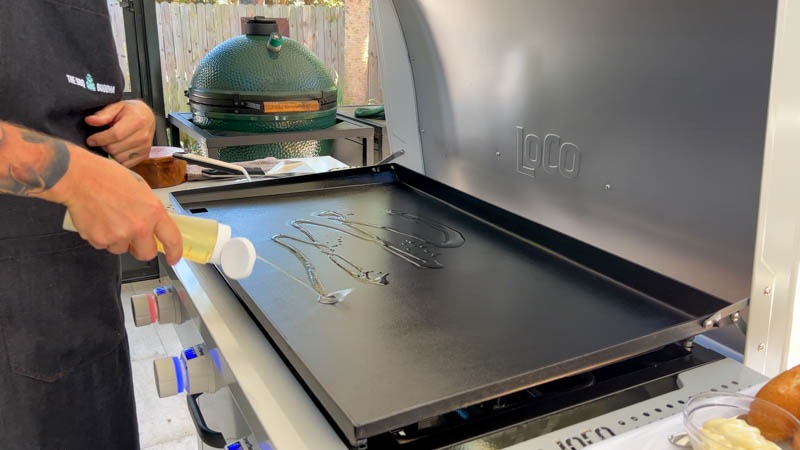
Mastering How to Make an Authentic Philly Cheesesteak on the LoCo Griddle requires a strategic thermal layout. You must preheat your LoCo 36″ SmartTemp Griddle using three specific zones. This process provides a way for you to sear the beef at maximum temperature. You can also keep your bread and finished ingredients warm. Because the SmartTemp technology regulates heat precisely, set the far left burner to high. You will find that setting the middle zone to 400°F is most effective. Keep the far right burner on low to organize your workflow.
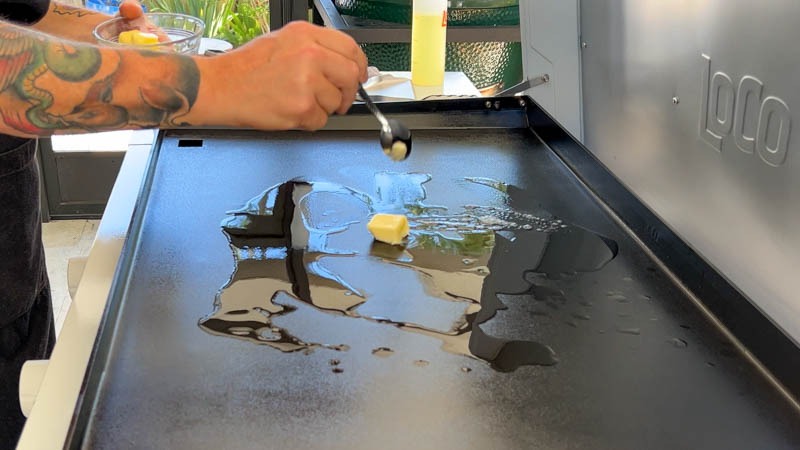
To achieve the best results, you should wait for the digital display signals. This technique ensures that you do not drop meat onto a cold surface. You will discover that adding vegetable oil and unsalted butter enhances the flavor. Now, you should move the fat around with your spatula. This step creates a non-stick environment for the onions and steak. Because the butter provides a rich finish, you are ready to begin the active cooking phase. Once the oil is shimmering and foamy, you have successfully prepped the surface. You are now ready for a professional-grade sear.
Step 4: Caramelizing the Onions
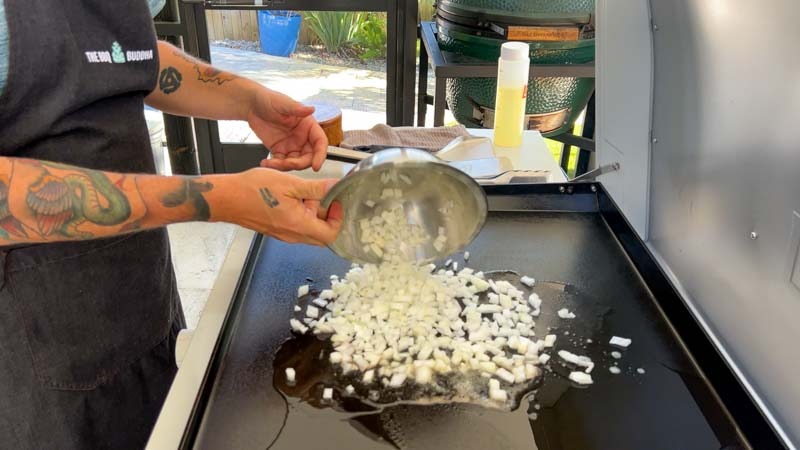
Mastering How to Make an Authentic Philly Cheesesteak on the LoCo Griddle requires patience when developing aromatics. You must place the diced onions directly onto the seasoned middle zone. This process provides a way for the natural sugars in the onion to release slowly. Because you are using precise temperature control, you can maintain a steady heat. This ensures the onions remain tender without burning. You will find that cooking the onions for five to six minutes is most effective. This technique allows you to reach a translucent state with slightly charred edges.
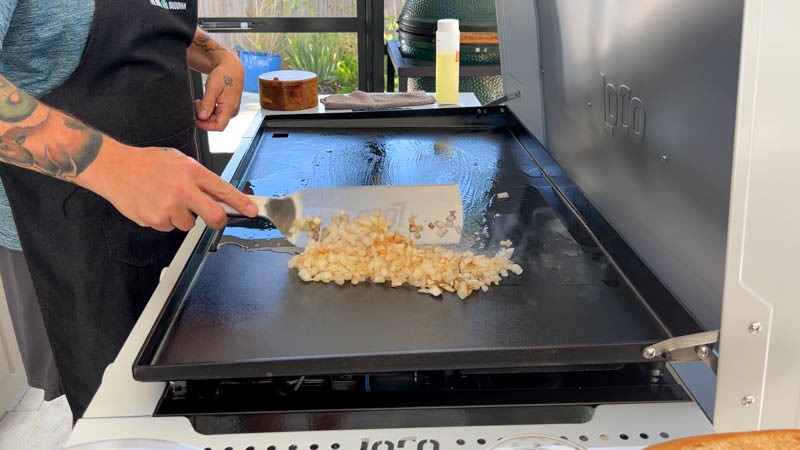
To achieve the best results, you should use your metal spatulas to toss the onions frequently. This technique ensures that every piece is evenly coated. It also provides consistent contact with the hot griddle surface. You will discover that the wide cooktop allows you to spread the onions out thinly. This method speeds up the caramelization process significantly. Now, you should move the cooked onions over to the far right zone. This keeps them warm while you focus on the steak. Because this zone is set to low, the aromatics stay at the perfect serving temperature. Once the onions have reached a deep golden hue, you have cleared the stage. You are now ready for the high-heat beef sear.
- Cool Zone Transition: Keeps the onions warm and ready for the final assembly phase.
- Cooking Time: 5 to 6 minutes until the onions are soft and translucent.
- Middle Zone: Utilized for steady caramelization at a consistent 400°F.
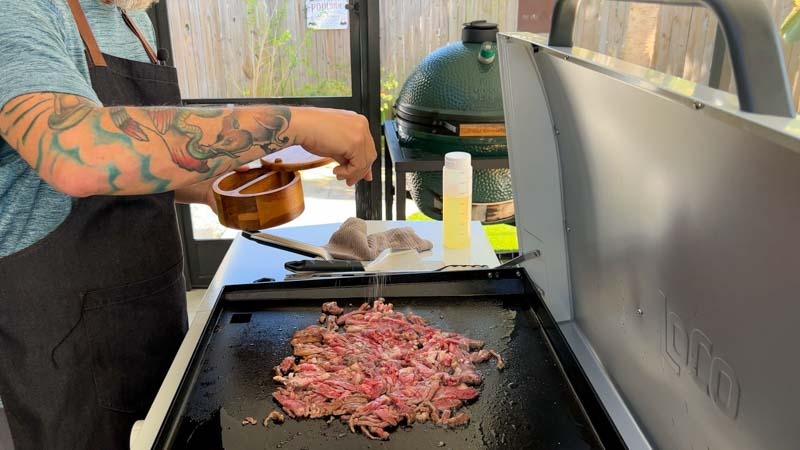
Step 5: Searing and Seasoning the Beef
Mastering How to Make an Authentic Philly Cheesesteak on the LoCo Griddle requires maintaining a high surface temperature to develop a deep, savory crust on the meat. You must add a fresh layer of vegetable oil and unsalted butter to the high-heat zone before introducing the steak. This process provides a way for the thinly sliced beef to sear instantly rather than steaming in its own juices. Because the LoCo Griddle maintains such consistent heat recovery, you can add the entire pound of steak without seeing a significant drop in surface temperature. You will find that using a generous amount of fat is a requirement for achieving the authentic, juicy texture found in professional sandwich shops.
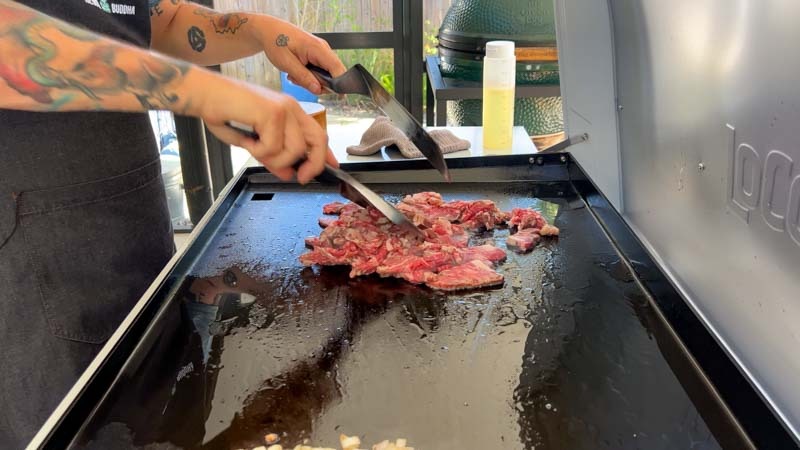
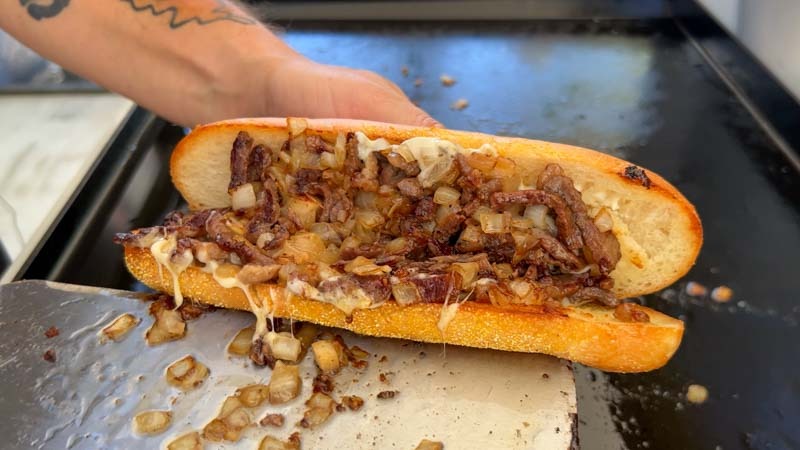
To achieve the best results, you should season the meat immediately with kosher salt and freshly cracked black pepper. This technique ensures that the seasoning bonds with the rendering fat to create a flavorful crust as the beef browns. You will discover that cooking the steak for approximately ten minutes while stirring occasionally is the most reliable way to ensure every strip is fully cooked. Now, you should use your metal spatulas to chop the meat into smaller pieces as it sears on the hot steel. Because the high-heat zone is set to maximum, you are ready to produce a rich, caramelized finish that defines a championship-level cheesesteak. Once the meat is thoroughly browned and fragrant, you have built the primary flavor foundation for your family-style meal.
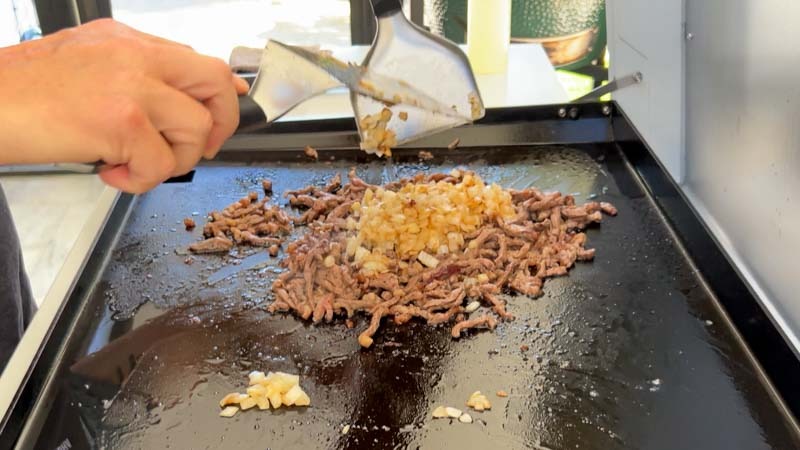
Step 6: Integrating the Onions and Portioning the Meat
Mastering How to Make an Authentic Philly Cheesesteak on the LoCo Griddle involves a seamless transition from individual components to a unified filling. You must use your LoCo spatula to scoop the caramelized onions from the cool zone and incorporate them directly into the browned beef. This process provides a way for the savory meat juices and the sweet aromatics to meld into a single, cohesive flavor profile. Because the onions are already tender, this brief secondary cook ensures they are fully integrated without becoming mushy. You will find that the wide surface of the griddle is the most effective tool for folding these ingredients together quickly and efficiently.
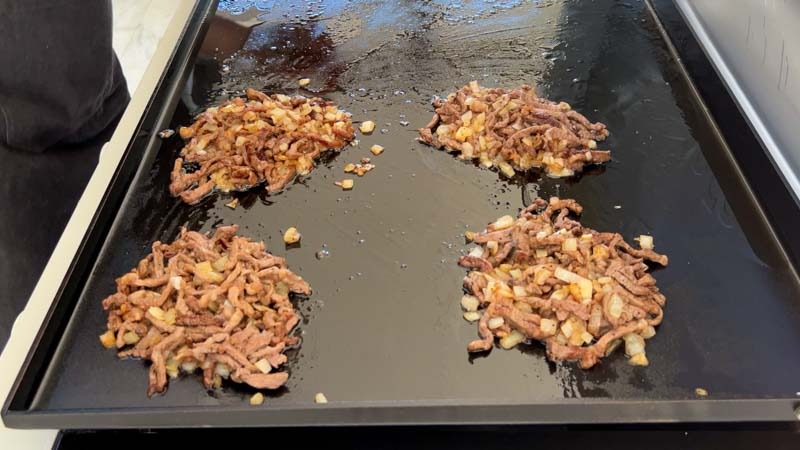
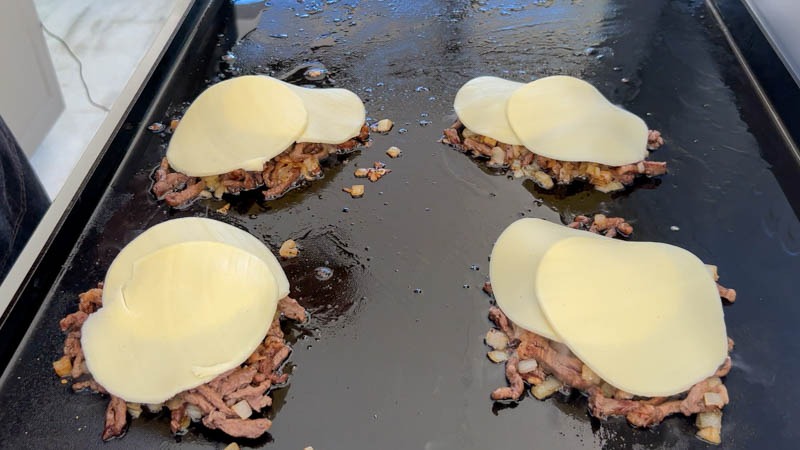
To achieve the best results, you should slide the combined mixture toward the middle or cooler side of the cooking surface before dividing it. This technique ensures that the meat does not overcook or become dry while you prepare the cheese and rolls. You will discover that creating four equal, rectangular portions is the most reliable way to match the size and shape of your hoagie rolls. Now, you should use the edge of your spatula to cleanly separate the piles so each sandwich receives a generous amount of filling. Because you have organized the griddle into thermal zones, you are ready to manage these portions without the risk of scorching the beef. Once the mixture is divided and neatly arranged, you have successfully set the stage for the final melting of the cheese.
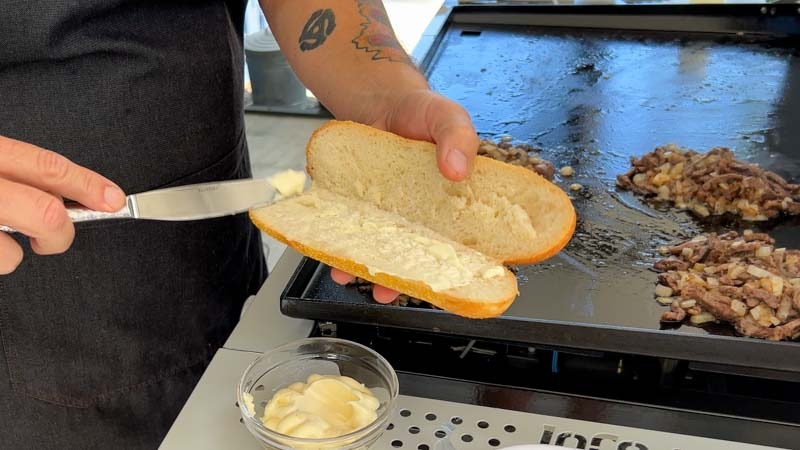
Step 7: Toasting the Mayo-Smeared Rolls
Mastering How to Make an Authentic Philly Cheesesteak on the LoCo Griddle requires a toasted bun that can support the weight of the savory filling. You must apply a thin layer of mayonnaise to the inside of each split hoagie roll before they touch the cooking surface. This process provides a way for the bread to develop a uniform, golden-brown crust that stays crisp despite the moisture from the meat. Because mayonnaise is an emulsion of oil and egg, it serves as a more effective browning agent than plain butter or dry heat. You will find that this step is a functional requirement for achieving the professional texture found in high-end sandwich shops.
To achieve the best results, you should place the rolls cut-side down on the low-heat zone of the griddle for a few minutes. This technique ensures that the bread toasts slowly and deeply without burning the edges or drying out the exterior. You will discover that the gentle heat of the right-side burner is the most reliable way to create a warm, pillowy roll with a distinct crunch. Now, you should monitor the color of the bread closely by lifting the edge of one roll with your spatula. Because the LoCo Griddle maintains such a steady temperature, you are ready to produce perfectly toasted buns for all four portions simultaneously. Once the interior of the rolls is nicely browned and fragrant, you have prepared the ideal vessel for your championship-level cheesesteak.
Step 8: Melting the Provolone Cheese
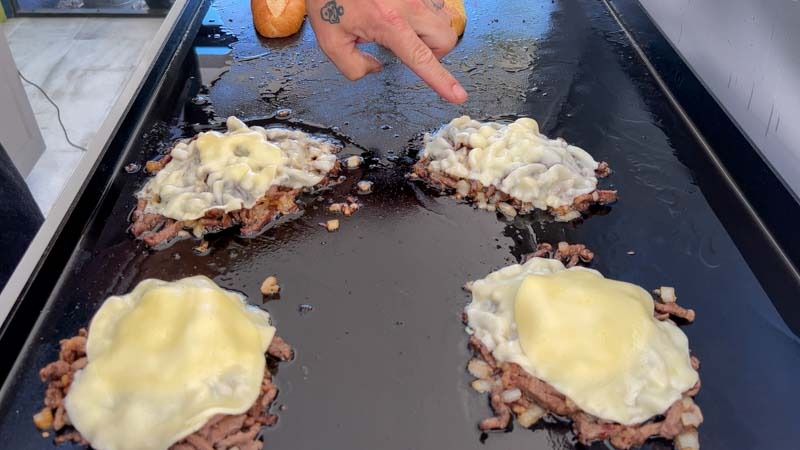
Mastering How to Make an Authentic Philly Cheesesteak on the LoCo Griddle requires a perfect melt to bind the steak and onions together. You must place two slices of high-quality provolone cheese directly on top of each of the four meat piles. This process provides a way for the cheese to drape over the edges of the beef and integrate with the savory juices. Because provolone has a mild and creamy profile, it is the most effective choice for a traditional sandwich that lets the ribeye shine. You will find that the heat from the griddle surface begins the melting process almost instantly as the fat renders.
To achieve the best results, you should lower the lid of your LoCo Griddle for about sixty seconds to create a convection effect. This technique ensures that the ambient heat traps the steam, which melts the cheese from the top down for a professional finish. You will discover that using the griddle top is the most reliable way to achieve a gooey consistency without overcooking the meat below. Now, you should keep an eye on the edges of the cheese to ensure they are beginning to bubble and turn translucent. Because the SmartTemp burners maintain such steady energy, you are ready to move to the final assembly without worrying about temperature fluctuations. Once the provolone is fully melted and clings to the steak, you have reached the peak of the cooking process for your cheesesteak feast.
Step 9: The Final Scoop and Assembly
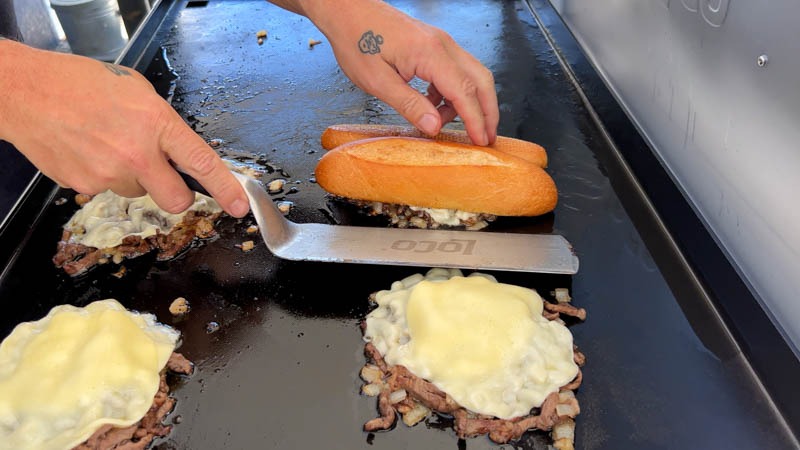
Mastering How to Make an Authentic Philly Cheesesteak on the LoCo Griddle concludes with a precise physical maneuver to unite the filling with the bread. You must place one toasted hoagie roll directly on top of a single cheesy meat pile while the griddle is still warm. This process provides a way for the bread to catch any rising steam and flavorful aromas just before the sandwich is served. Because the LoCo Spatula is designed with a wide and sturdy blade, it serves as the most effective tool for supporting the entire weight of the ribeye. You will find that this “top-down” method is a functional requirement for keeping the filling neatly contained within the hinged roll.
To achieve the best results, you should slide the blade of your spatula completely under the meat pile while holding the top of the roll with your other hand. This technique ensures that you can flip the entire assembly in one fluid motion to keep the melted cheese and onions from spilling. You will discover that the structural integrity of the toasted bread is the most reliable way to maintain a clean presentation for your guests. Now, you should give the sandwich a firm squeeze to ensure the provolone binds the steak to the interior of the bun. Because the LoCo Griddle offers such an expansive workspace, you are ready to repeat this motion for all four portions with professional efficiency. Once the mixture is safely inside the roll, you have successfully transformed your ingredients into a world-class Philly classic.
Step 10: The Foil Wrap and Final Rest
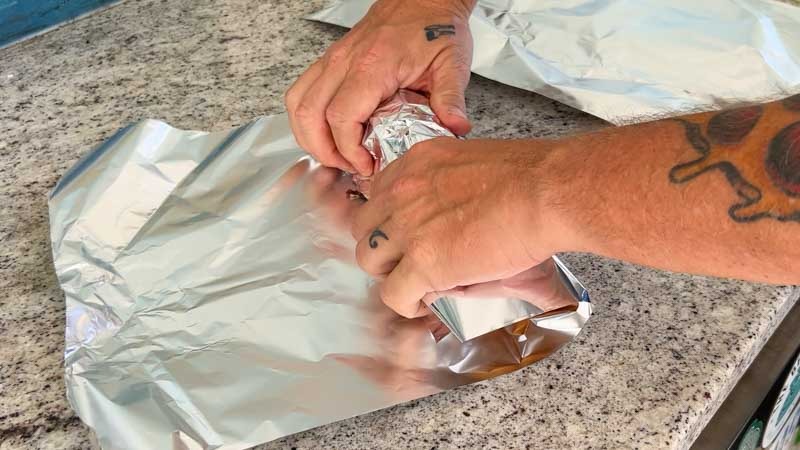
Mastering How to Make an Authentic Philly Cheesesteak on the LoCo Griddle requires a final rest to achieve a signature steamy texture. You must wrap each finished sandwich tightly in aluminum foil to trap the residual heat and moisture. This process provides a way for the toasted hoagie roll to soften until it becomes perfectly pliable. Because the foil creates a concentrated heat envelope, you will find that the cheese permeates every crevice of the ribeye. You will discover that this steaming technique is the most effective way to deliver a unified, restaurant-quality bite.
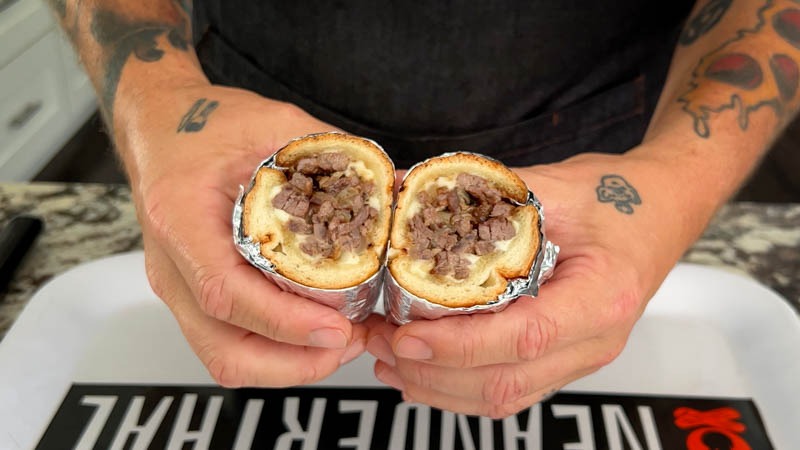
To achieve the best results, you should let the wrapped sandwiches rest for five minutes before slicing. This technique ensures that the savory juices settle into the bread without making the roll soggy. Now, you should use a sharp serrated knife to cut the warm sandwich at a diagonal angle. Because you allowed the steam to work its magic, you are ready to serve a cohesive and balanced meal. Once you unwrap the foil and see the melted provolone, you have mastered the ultimate griddle-top feast.
Mastering How to Make an Authentic Philly Cheesesteak on the LoCo Griddle transforms a simple collection of ingredients into a professional-grade backyard experience. You must trust the zonal cooking method to provide the distinct textures that separate a standard sandwich from a championship-level meal. This process ensures that you maintain total control over the searing of the beef and the caramelization of the onions simultaneously. Because the LoCo Griddle offers such a stable and expansive surface, it remains the most effective tool for feeding a hungry crowd without sacrificing quality. You will find that the final step of steaming the sandwich in foil is the secret to achieving that authentic, unified bite.
Serving Suggestions for a Championship Spread
To achieve the best results for your guests, you should pair these heavy sandwiches with sides that offer a bright or crispy contrast. This technique ensures that the richness of the ribeye and provolone cheese is balanced by lighter, more acidic flavors. You will discover that a side of crispy crinkle-cut fries or a pile of spicy pickled cherry peppers provides the ideal accompaniment for a “Grilling by Feel” feast. Now, you should consider serving a side of warm au jus or even a small bowl of extra Cheez Whiz for those who prefer a “Whiz Wit” experience. Because the cheesesteak is such a hearty main course, you are ready to round out the meal with a cold beverage and simple finger foods. Once you present the platter of foil-wrapped halves, you have successfully delivered a world-class Philly tradition.
- Yuengling Traditional Lager: The classic Pennsylvania pairing that cuts through the rich fat of the ribeye.
- Pickled Peppers: Offer a sharp, vinegary snap to refresh the palate between savory bites.
- Potato Chips or Fries: Provide a salty crunch that complements the pillowy texture of the steamed hoagie roll.
People Also Ask (PAA)
- What is the best cut of meat for a Philly Cheesesteak? The most authentic and flavor-rich choice is ribeye because of its high fat content and tenderness. You can also use top sirloin or flank steak if they are sliced paper-thin against the grain.
- Can I use different types of cheese? Provolone and Cheez Whiz are the traditional options, but white American cheese is also popular for its superior melting capabilities. You should avoid hard, aged cheeses that do not melt smoothly over the meat.
- How do I get the steak thin enough at home? You should place the beef in the freezer for about thirty to forty-five minutes until it is firm but not frozen solid. This technique makes it much easier to achieve the translucent slices required for a proper cheesesteak.
How to Make an Authentic Philly Cheesesteak on the LoCo Griddle
Equipment
- 1 LoCo Griddle
- 1 Mandoline
Ingredients
- 1 pound NY Strip Steak, sliced thin
- 4 sub rolls, split
- 1 yellow onion, diced
- 8 slices provolone cheese
- 1 tbsp mayonnaise
Instructions
- Place the steak in the freezer uncovered for 30 minutes to help slice.
- Preheat the LoCo griddle with 3 cooking zones: sear, 400°F, and low.
- When the steak is ready slice thinly giving you a pile of thinly sliced beef.
- Dice the onion and set to the side.
- Split the sub rolls in half.
- Add oil and butter to the hot side of the grill then add the diced onions. Cook the onions 5-6 minutes until translucent and slightly browned. Then move the onions to the cooler side of the griddle.
- Add more oil and butter then the thinly sliced steak. Season the steak with salt and pepper. Continue cooking and stirring occasionally until the meat is well browned.
- Using the spatula scoop the onions up and mix them in with the cooked steak. When mixed well, divide the pile of steak and onions into 4 equal portions moved to the cooler side of the griddle.
- Top each pile with two slices of provolone cheese and close the lid of the griddle to help the cheese melt.
- Schmear some mayonnaise on the split sub rollas and place them on griddle split side down for 3-5 minutes or until they are nicely toasted.
- Place the toasted sub roll on top of a pile of steak, onion, and cheese. Using the spatula scoop the steak mixture in to the sub roll. Do this for each pile of meat.
- Place the stuffed sub roll in to a sheet of aluminum foil and wrap tightly. Let the cheesesteaks sit like this in the foil for 5-10 minutes so the rolls get soft and steamy. Slice in the middle and enjoy!
Nutrition information is automatically calculated, so should only be used as an approximation.


So delicious!
Thank you 🙏