
This post contains affiliate links. Please see our disclosure policy.
Hello and welcome back to The BBQ Buddha. Making perfect pizza on a Big Green Egg can be challenging, often leading to mixed results if you don’t have the right technique. Achieving that elusive combination of a crisp bottom, airy dough, and perfectly melted toppings requires a bit of practice and the right approach to heat management.
While I’ve mastered the cooking technique, I owe the incredible foundation of this pizza to the experts at Serious Eats. Their meticulous approach to dough produces a thin, light crust that crisps perfectly under the dome, while their homemade sauce delivers a depth of flavor far superior to anything store-bought.
This post will guide you through combining their masterful recipes with the high-heat capabilities of the Big Green Egg to deliver restaurant-quality results every time. So, grab an ice-cold Peroni, fire up your ceramic cooker, and let’s make the perfect crispy pizza.
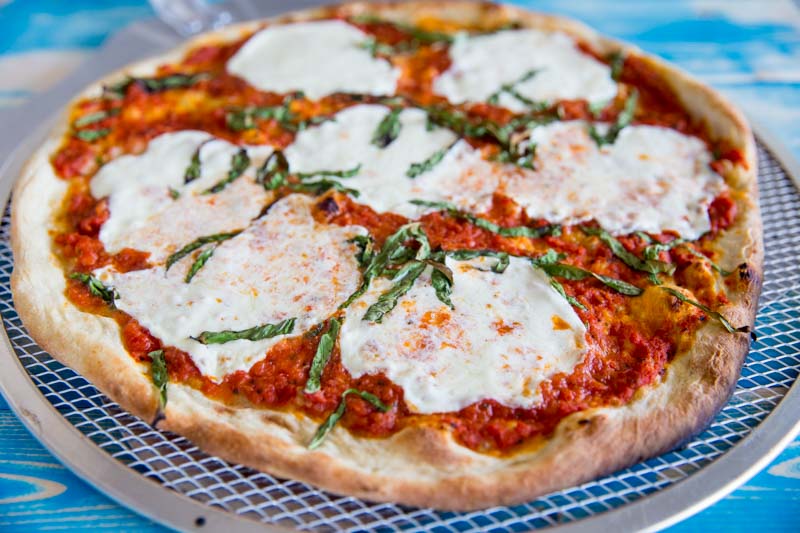
Table of Contents
- Step 1: Mastering the Dough
- Step 2: The Cold Fermentation
- Step 3: The Authentic Pizza Sauce
- Step 4: Preparing for the Bake – The Margherita
- Step 5: Stretching and Loading the Pizza
- Step 6: Assembling the Pizza
- Step 7: The Big Green Egg Setup for Optimal Pizza
- Step 8: Reaching Target Temperature
- Step 9: Loading the Pizza
- Step 10: Managing the Cook and Turning
- Conclusion: Pizzeria Quality from Your Backyard
- Perfect Crispy Pizza on the Big Green Egg Recipe
Get My NEW Book
The Ultimate Big Green Egg Cookbook

Step 1: Mastering the Dough
The foundation of a perfect Big Green Egg pizza is the crust. To achieve that balance of airy texture and crispy exterior, precision is key.
I highly recommend weighing your flour, yeast, salt, sugar, olive oil, and warm water before adding them to the mixer to ensure consistency every time you make your dough ball.
- Why Scale Matters: Using a kitchen scale for the flour and water is far more accurate than using cups, as flour density can vary wildly.
- The Serious Eats Method: Following the precise ratios from the Serious Eats recipe allows the dough to develop the right structure to handle high-temperature cooking without burning or becoming soggy.


Step 2: The Cold Fermentation
Once the dough is mixed and kneaded, it needs time to rest and develop flavor. This step is crucial for achieving that authentic pizzeria-quality crust.
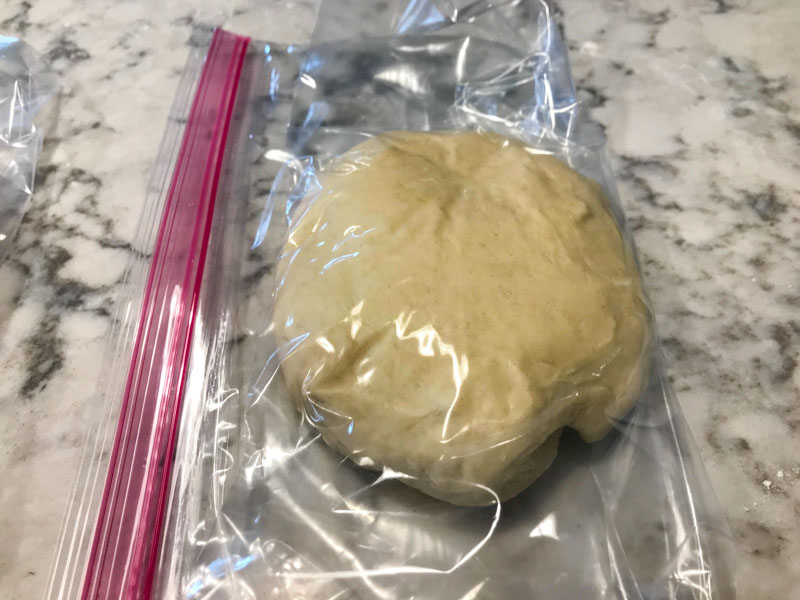
I divided the dough into three equal pieces and placed each one in a separate Ziploc bag. Then, I refrigerated the dough balls for 24 hours before using, allowing the gluten to settle, which makes the dough much easier to stretch without tearing.
- Flavor and Texture: This cold fermentation process allows enzymes to break down starches into sugars, resulting in a more complex flavor and a lighter, crispier texture when baked.
- Ease of Handling: Allowing the dough to rest for a full day significantly relaxes the gluten network. This makes stretching the dough to the edge of your pizza peel a breeze, rather than a frustrating battle.
Step 3: The Authentic Pizza Sauce
With the dough relaxing in the fridge, it’s time to create the sauce. For this recipe, we are keeping it simple, focusing on high-quality ingredients that don’t need to be cooked before going on the pizza.
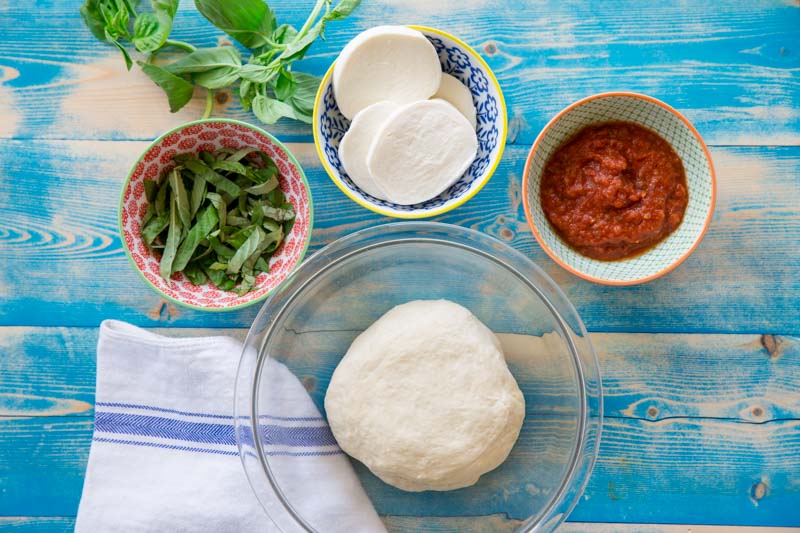
To create a simple yet delicious pizza sauce, I combined whole peeled San Marzano tomatoes, salt, sugar, oregano, red pepper flakes, basil, garlic powder, and onion powder.
- The San Marzano Advantage: Using canned San Marzano tomatoes is essential. They are less acidic and naturally sweeter than standard plum tomatoes, providing that authentic, robust flavor found in the best pizzerias.
- No-Cook Method: By not cooking the sauce beforehand, you allow the tomatoes to roast and caramelize directly on the pizza inside the hot Big Green Egg, preserving their fresh, bright flavor.

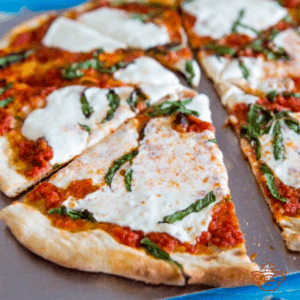
Step 4: Preparing for the Bake – The Margherita
With the dough fermented and the sauce ready, it is time to assemble. For this cook, I went with a classic Pizza Margherita, a true test of quality ingredients and high-heat technique.
I assembled the pizza using fresh mozzarella, fresh basil, my homemade tomato sauce, and the fermented dough which I made sure to take out of the refrigerator at least 2 hours before stretching.
- Room Temperature Dough: This is absolutely critical. If you try to stretch cold dough, it will fight you, tear, or shrink back to a small circle. Bringing it to room temperature makes it pliable and easy to stretch into a thin crust.
- Margherita Balance: Using fresh mozzarella (rather than low-moisture) is key for that creamy texture, but you must be careful not to overload the pizza, or the excess moisture will turn the crust soggy.
Step 5: Stretching and Loading the Pizza
Now for the fun part: shaping the dough and getting it onto the heat. This is where many new pizza makers struggle, so I am going to show you how to set yourself up for success.
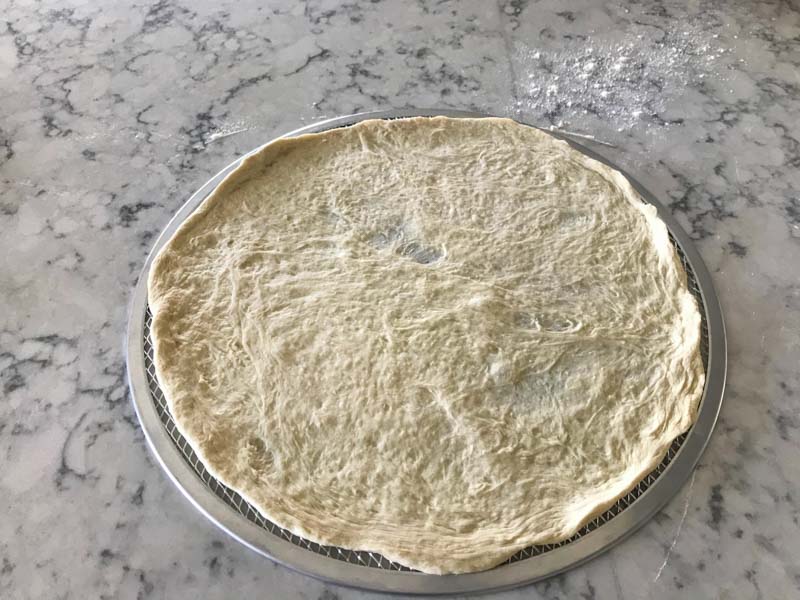
Once the dough ball had sat at room temperature for at least two hours, I kneaded and stretched the dough into a flat circle. To keep things simple and ensure a flawless transfer into and out of the Big Green Egg, I used a pizza screen.
- Why Use a Pizza Screen: For beginners, a pizza screen is a lifesaver. It bridges the gap between stretching the dough and getting it onto the hot stone without the risk of the pizza sticking to your peel and ruining the shape. It ensures the pizza loads with little to no effort.
- The Alternative (Peel Method): If you prefer not to use a screen, you must be fast and precise. You’ll need to heavily dust a metal pizza peel with cornmeal or semolina flour to act as ball bearings, allowing the pizza to slide off easily. Even then, overloading the pizza with toppings can cause it to stick.
- My Technique: While I have used the peel method many times, I chose the screen for this cook for simplicity. It allows the crust to get crisp while ensuring the final product looks as good as it tastes, which is crucial when you are trying to perfect your technique.
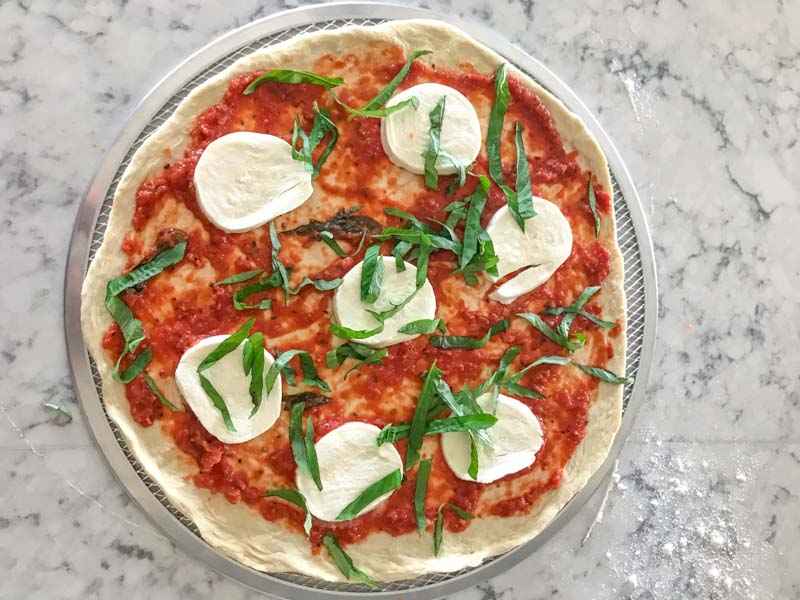
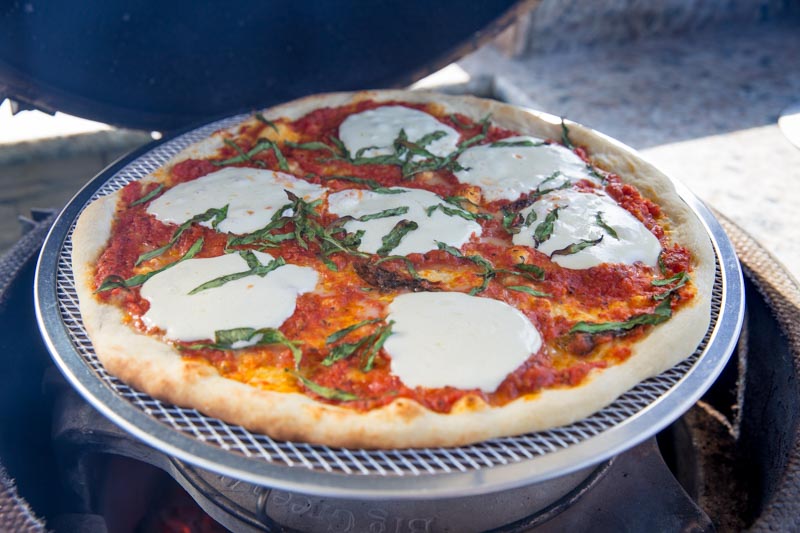
Step 6: Assembling the Pizza
Now that the dough is stretched and resting on the pizza screen, it’s time to add the toppings. The key here is moderation… too much sauce or cheese will weigh down the dough and prevent it from becoming crisp.
I covered the dough with three tablespoons of my homemade sauce, added thin slices of fresh mozzarella, and finished with freshly chopped basil.
- Sauce Application: Three tablespoons is the perfect amount for a 12-inch pizza. You want a thin layer that adds flavor without making the crust soggy.
- Cheese and Herb Placement: Placing the mozzarella slices spaced out allows the heat to circulate, while the basil provides that classic, aromatic Margherita finish.
Step 7: The Big Green Egg Setup for Optimal Pizza
To get that true pizzeria-style crust, you need a high-heat environment that cooks the bottom of the pizza faster than the top. This setup creates a massive heat soak for the stone while protecting the pizza from direct flame.
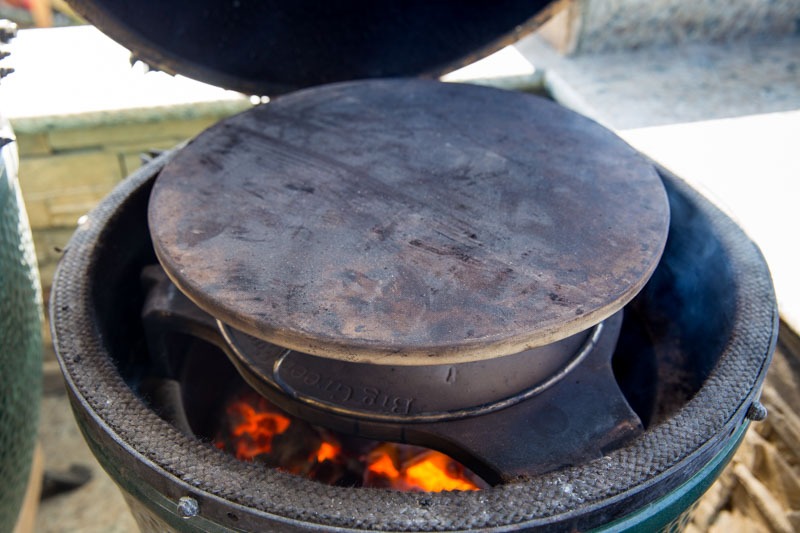
I lit my Big Green Egg with a full charcoal box, placed the ConvEGGerator legs-down, and set a pizza stone on top. To create a heat barrier between the hot ConvEGGerator and the stone, I used a small Woo-Ring to elevate the stone slightly.
- Why Get the Stone High Up: Raising the pizza stone higher into the dome of the EGG puts it closer to the intense heat radiating off the ceramic lid. This simulates a wood-fired brick oven, ensuring the cheese bubbles and the crust browns perfectly on top at the same time the bottom crisp up.
- My Technique (The Double Barrier): Placing the ConvEGGerator legs-down and then elevating the stone on a Woo-Ring creates a vital air gap. This gap prevents the pizza stone from getting too hot too fast, which would burn the bottom of the crust before the toppings are cooked.
- Alternative Setup (EGGspander System): If you have the EGGspander system, you can achieve similar results by placing the ConvEGGerator in the bottom position, adding the multi-level rack, and placing your stone on the top level. This creates a large air gap for consistent heat distribution.
Step 8: Reaching Target Temperature
Now that the Egg is configured, it’s time to bring the heat. You cannot rush this step; the ceramic stone needs time to fully absorb the heat to ensure an even cook.
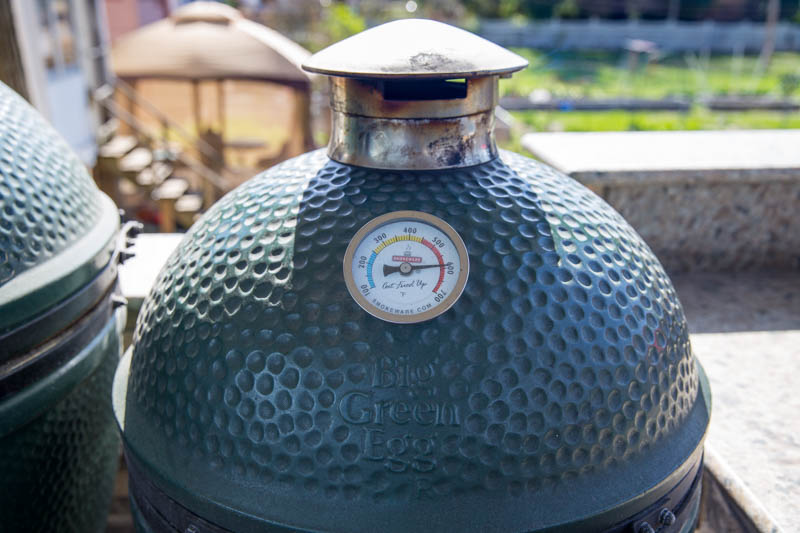
I raised the temperature of the Big Green Egg to 600°F and allowed the pizza stone to preheat for at least 45 minutes before cooking.
- The Importance of 600°F: This high temperature is required to produce a fast, blistering cook on the dough, similar to a traditional wood-fired oven. It cooks the crust quickly without drying out the toppings.
- Heat Soaking: Even after the thermometer reads 600°F, the stone itself is likely colder. Letting it sit at temperature for nearly an hour ensures that the stone is fully saturated with heat, preventing the pizza from sticking and ensuring a crispy bottom.
Step 9: Loading the Pizza
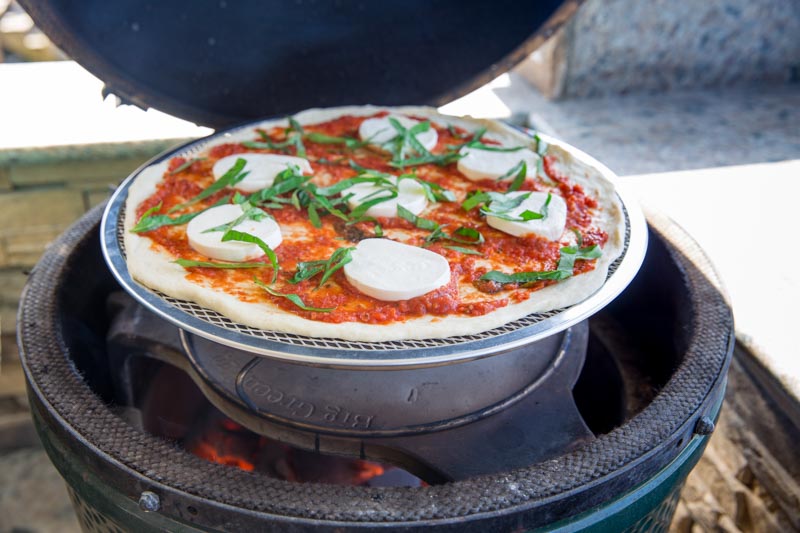
With the Big Green Egg at a roaring 600°F and the stone thoroughly heated, it is time to bake. However, safety is paramount when working with high-temperature ceramics.
Before opening the lid, make sure to “burp” your Big Green Egg by lifting it just an inch or two to allow oxygen to enter slowly. Once safely opened, slide the pizza onto the hot stone using a pizza peel, and immediately close the lid.
- Why We Burp the Egg: At high temperatures, the Egg is starved of oxygen. Lifting the lid suddenly can cause a dangerous flash of flame known as flashback. Burping allows air to enter slowly, preventing this risk.
- The Loading Technique: With the pizza on the screen (or directly on a heavily floured peel), make a swift, confident motion to slide it onto the center of the preheated stone. Close the lid quickly to retain that high cooking temperature.
Step 10: Managing the Cook and Turning
Once the pizza is on the stone, the real magic happens, but you cannot just walk away. At 600°F, 30 seconds can be the difference between a perfect crust and a charred mess.
The pizza will be ready in 7-10 minutes, depending on how crispy you like your crust. I highly recommend turning the pizza halfway through the cook to ensure even browning.
- Monitoring the Heat: Keep a close eye on the thermometer to make sure the temperature stays near 600°F. If the dome temperature starts to spike too high, close the top vent slightly.
- The “Turn”: Around the 4-5 minute mark, carefully open the Egg (remember to burp it!) and use your peel to rotate the pizza 180 degrees. This ensures that the side closest to the back of the Egg—which is usually hotter—doesn’t burn while the front stays undercooked.
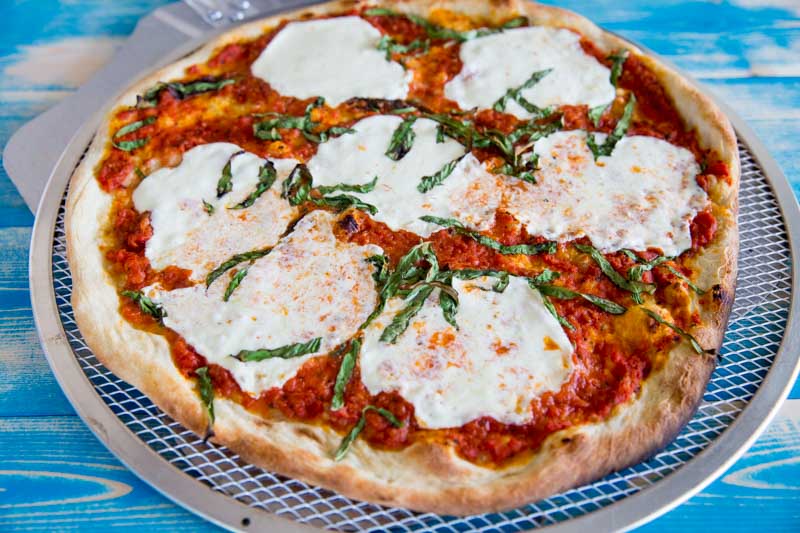
- Checking for Doneness: The pizza is ready when the crust is golden brown and blistered, and the cheese is bubbly and starting to develop a slight golden color.

Conclusion: Pizzeria Quality from Your Backyard
Mastering pizza on the Big Green Egg takes a little practice, but once you nail the setup and technique, you’ll never want to order delivery again. By taking the time to properly preheat the stone and managing the high-heat environment, you can consistently achieve that perfect, crispy crust.
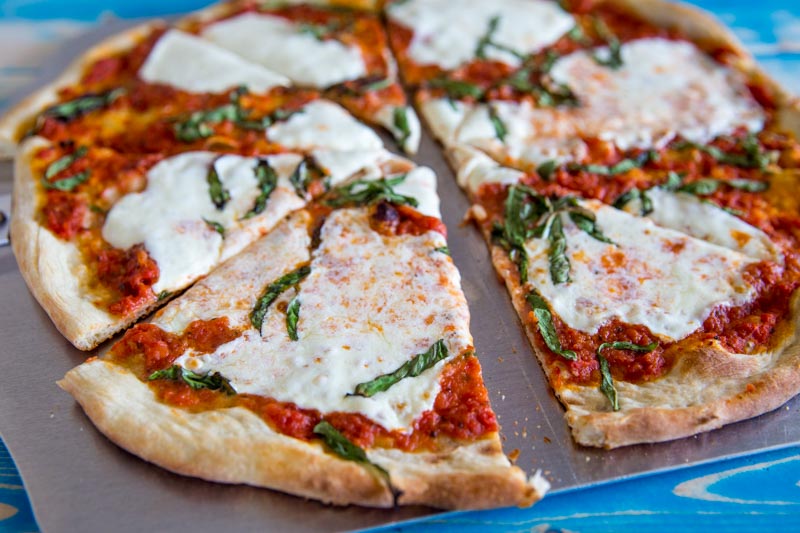
This Margherita pizza was absolutely perfect, with a crust that was light, airy, and beautifully charred. I cannot wait to use this dough and sauce recipe again with different toppings for my next cook.
- Final Tip: Don’t be afraid to experiment with the temperature. Some prefer a slightly lower temp (around 500-550°F) for a longer bake, which can yield a more traditional, chewier crust.
- Get the Gear: If you are serious about perfecting your pizza game, I highly recommend investing in a [Pizza Screen], a quality [Metal Peel], and a [Woo-Ring or EGGspander] to manage your stone elevation.
Thanks for joining me back at The BBQ Buddha. Fire up your Egg, grab a Peroni, and enjoy the best pizza of your life!
Perfect Crispy Pizza on the Big Green Egg
Equipment
- 1 pizza screen
- 1 Pizza Peel
- 1 Woo Ring or EGGspander
Ingredients
For the Dough (Serious Eats Method):
- 22.5 ounces about 4 1/2 cups bread flour, plus more for dusting
- .5 ounces, about 1 1/2 tablespoons sugar
- .35 ounces kosher salt, about 1 tablespoon
- .35 ounces, about 2 teaspoons instant yeast
- 1.125 ounces Extra Virgin olive oil, about 3 tablespoons
- 15 ounces lukewarm water
For the Sauce (Serious Eats Method):
- 1 can (28 oz) Whole peeled San Marzano tomatoes
- 1 tsp Salt
- 1 tsp Sugar
- 1 tsp Dried oregano
- 1/2 tsp Red pepper flakes
- 1 tbsp Fresh basil, chopped
- 1/2 tsp Garlic powder
- 1/2 tsp Onion powder
For Assembly (Margherita Style):
- Fresh mozzarella cheese, sliced
- Fresh basil leaves
- Cornmeal or semolina flour, optional for pizza peel
Instructions
- Prepare the Dough: Weigh your flour, yeast, salt, sugar, olive oil, and warm water first. Combine in a mixer and knead until smooth.
- Cold Fermentation: Divide the dough into 3 equal pieces and place each one in a separate Ziploc bag. Refrigerate for 24 hours to allow the gluten to settle and flavor to develop.
- Prepare the Sauce: Combine the San Marzano tomatoes, salt, sugar, oregano, red pepper flakes, basil, garlic powder, and onion powder. Blend until smooth or crush by hand for a rustic texture. Do not cook the sauce.
- Egg Setup: Light your Big Green Egg with a full charcoal box. Place your ConvEGGerator legs-down. Place a pizza stone on top, using a Woo-Ring or similar spacer to elevate the stone high up in the dome.
- Preheat: Get the Big Green Egg up to 600°F. Let the pizza stone preheat for at least 45 minutes to ensure it is thoroughly heat-soaked.
- Shape the Dough: Take the dough out of the fridge at least 2 hours before using to reach room temperature. Knead and stretch the dough into a flat circle.
- Assemble: Place the dough circle on a pizza screen for ease of use. Cover the dough with 3 tbsp of sauce, slices of mozzarella, and fresh basil.
- Cook: "Burp" the Big Green Egg before opening. Slide the pizza (on the screen) onto the hot stone using a pizza peel. Close the lid.
- Manage the Bake: Cook for 7-10 minutes. Turn the pizza halfway through to ensure even browning.
Nutrition information is automatically calculated, so should only be used as an approximation.


Great recipe! My crust/dough was thicker than I wanted. Do I just need to keep rolling it out to make a thinner crust? How does this sigh freeze? What would I have to do to use it from frozen?
Let the dough come to room temp first before stretching in to tape. That might help. I have never frozen the dough, so I don’t know.