
This post contains affiliate links. Please see our disclosure policy.
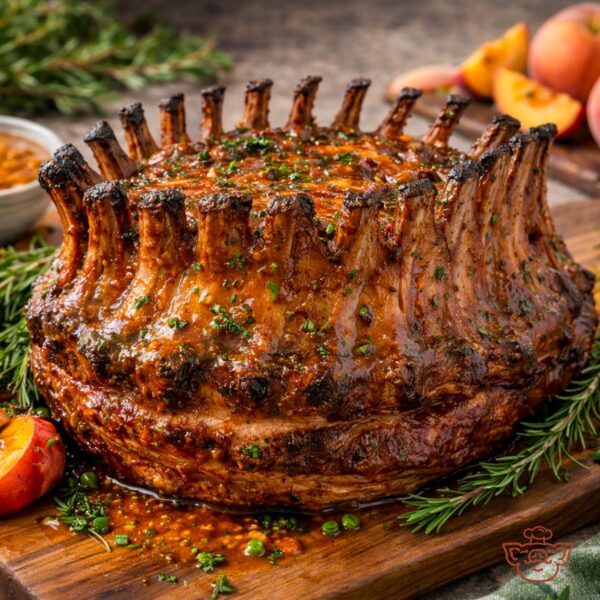
These Sticky Asian Glazed Pork Belly Burnt Ends were actually part of the winning lineup for the 2017 People’s Choice Award at EGGtoberfest with Team EGGcellent Eats. The secret isn’t just in the smoke; it is in the transition from a dry, seasoned bark to a sticky, luxurious lacquer. We are using the Big Green Egg to slowly render the fat until these cubes are “probe tender,” then finishing them in a pan with a glaze that features Gochujang, ginger, and honey.
Whether you are looking for a show-stopping appetizer or a main course to serve over a bed of jasmine rice, this recipe is a masterclass in balancing fat, smoke, and spice. So, grab an ice-cold Reformation Cadence Belgian Style Ale, fire up the Egg, and let’s make some BBQ gold.
Table of Contents
- Step 1: Sourcing the Perfect Pork Belly
- Step 2: The Cubing and the Foundation
- Step 3: The Smoke Session
- Step 4: Managing the Bark and the Spritz
- Step 5: Crafting the Sticky Asian Glaze
- Step 6: The Transition to the Pan
- The Final Reveal: How to Know When They Are Done
- Sticky Asian Glazed Pork Belly Burnt Ends (BBQ Candy) Recipe
Get My NEW Book
The Ultimate Big Green Egg Cookbook

The “So What?” — Why the Asian Glaze?
Pork belly is incredibly rich. While a standard BBQ sauce adds more sugar and weight, an Asian-style glaze uses acidity from rice vinegar and the fermented heat of Gochujang to cut through the fat. This balance prevents the dish from feeling overly heavy and keeps your palate excited for the next bite rather than overwhelmed by sweetness.
Step 1: Sourcing the Perfect Pork Belly
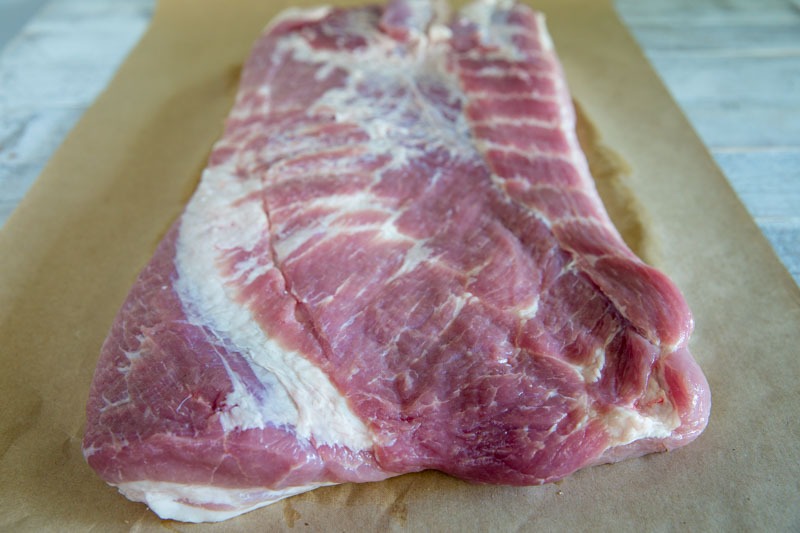
The foundation of great BBQ candy starts with the quality of your meat. Since we are turning these into bite-sized burnt ends, you need a slab that can handle a long cook while remaining juicy.
- Where to Shop: I found the slab for this cook at Costco, which is a fantastic source for high-quality pork belly at a reasonable price. You can also find great options at local butcher shops, Asian supermarkets (like H-Mart), or specialty grocers like Whole Foods.
- What to Look For: You want a slab that has a clear, defined layering of meat and fat. Avoid pieces that are almost entirely fat; look for that “bacon-like” striation where the pink meat and white fat are balanced roughly 50/50.
- The Skin Question: Most pork belly at big-box stores like Costco comes with the skin already removed. If you buy from a butcher and it still has the skin on, you will want to trim that off. While crispy skin is great for other recipes, it becomes tough and leathery in a burnt-end style cook.
The “So What?” — Whole Slab vs. Pre-Sliced
You might see pre-sliced pork belly strips at the store. While these can work in a pinch, I always recommend buying the whole slab. Cutting the cubes yourself allows you to control the exact size, aiming for uniform 1.5-inch squares, which ensures every piece of “candy” cooks at the exact same rate. If the pieces are uneven, the small ones will dry out before the big ones are tender.
Step 2: The Cubing and the Foundation
Now that you have your slab, it is time to transform it into those bite-sized nuggets. Uniformity is your best friend here to ensure every piece reaches that “melt-in-your-mouth” status at the same time.
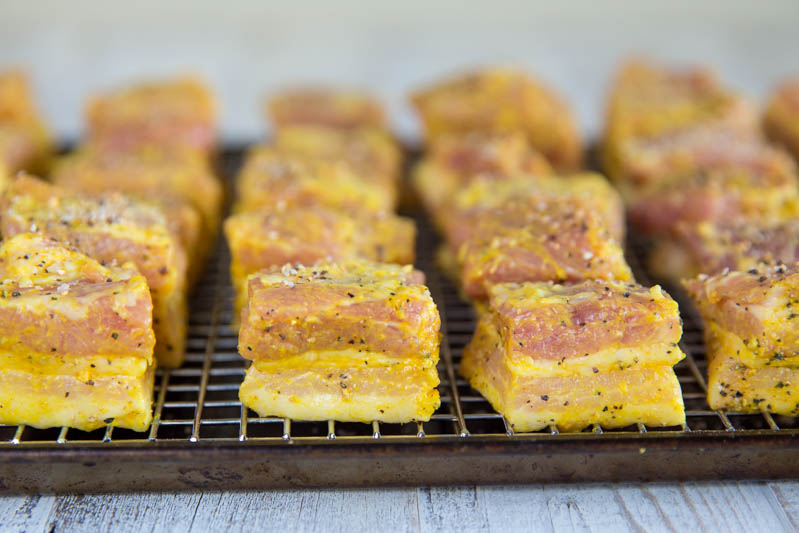
- The Cut: If your pork belly still has the skin on, start by carefully slicing it off. Once the skin is removed, cut the belly into uniform 1.5-inch cubes. Remember that these will shrink slightly as the fat renders, so do not go too small or you will lose that juicy center.
- The Slather: Place your cubes into a large bowl and add a thin coating of yellow mustard. This is not for flavor; the vinegar in the mustard helps tenderize the surface and acts as a “binder” to help the seasoning stick to the meat through the entire smoke.
- The Seasoning: Keep it simple with a generous dusting of salt and pepper. While the glaze will bring the complex Asian notes later, a base of salt and pepper ensures the meat itself is seasoned deeply.
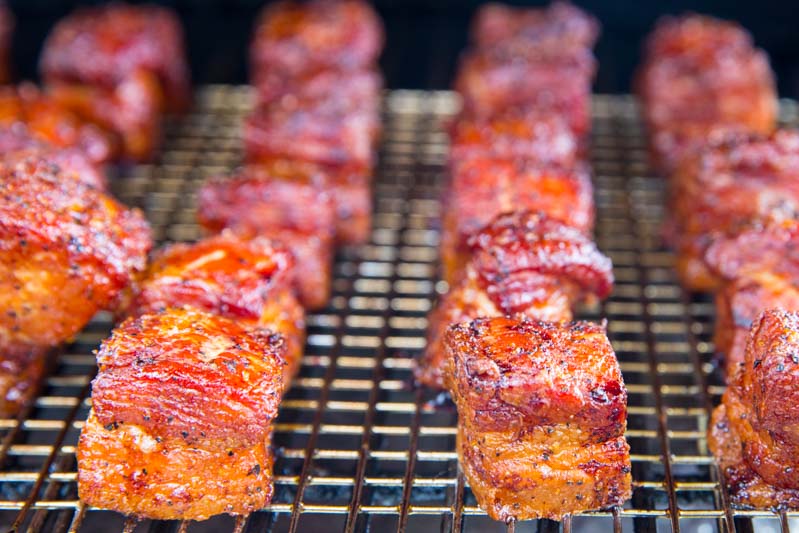
- The Rack: Arrange the seasoned cubes on a wire cooling rack set inside a sheet pan. This makes it incredibly easy to transport the pork to the Big Green Egg all at once, and more importantly, it allows the smoke to circulate around all six sides of every cube.
Grilling by Feel: The Spacing Secret
When placing your cubes on the rack, make sure they are not touching. You want at least a half-inch of “breathing room” between each piece. If the cubes are crowded, they will steam instead of smoke, and you will miss out on that beautiful mahogany bark that makes the final glazed product so visually stunning.
Step 3: The Smoke Session
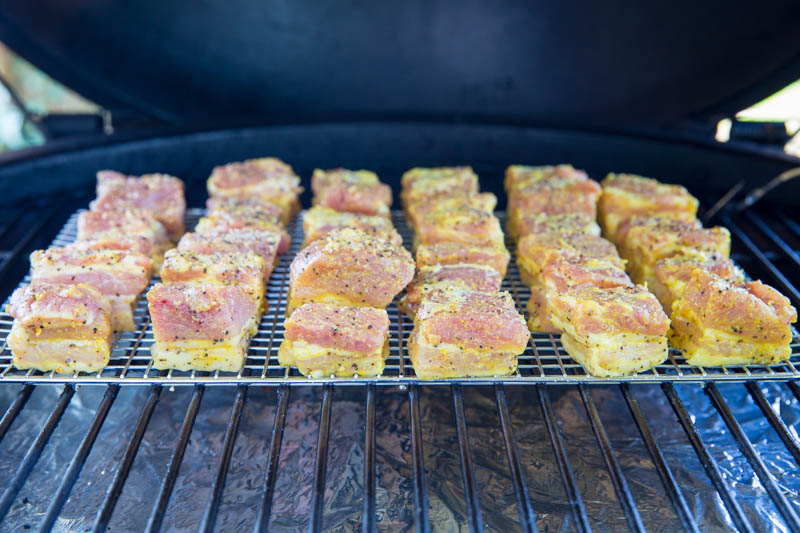
Now it is time to let the Big Green Egg do what it does best. We are looking for a steady, indirect heat that will slowly render the fat while building a solid foundation of smoke flavor.
- The Setup: Configure your Egg for indirect cooking by inserting the convEGGtor (legs up). Place your stainless steel cooking grid on top.
- The Temp: Aim for a rock-solid 275°F. This “low and slow” temperature is high enough to start the rendering process but low enough to prevent the sugar in the pork from burning.
- The Wood: Since we are finishing these with an Asian-inspired glaze, I recommend using Apple or Cherry wood. These fruitwoods provide a subtle sweetness and a beautiful mahogany color that pairs perfectly with the savory notes of the glaze. If you want a slightly more aggressive “BBQ” profile, a single chunk of Hickory works well too.
- The Placement: Place the entire wire rack directly onto the cooking grid. Using the rack ensures that you do not have to flip each individual cube, and it keeps the pork elevated for maximum smoke penetration.
Grilling by Feel: The Bark Check
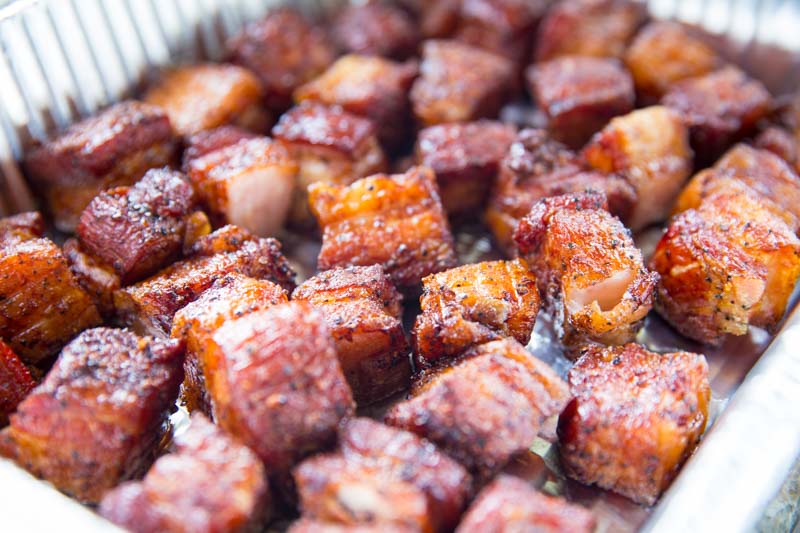
You are going to leave these cubes alone for about 2.5 to 3 hours. You are not just cooking for time; you are cooking for color. You want to see the edges of the pork belly begin to darken and the fat start to look translucent and “squishy.” When the cubes have taken on a deep reddish-brown hue and the seasoning has set into a nice bark, you are ready for the next phase.
The “So What?” — Why the convEGGtor Matters
Pork belly is incredibly high in fat. If you were to cook these over direct heat, you would deal with constant flare-ups as the fat renders out. By using the convEGGtor, you create an oven-like environment that protects the meat from the flames, allowing the fat to gently melt and baste the meat from the inside out without the risk of charring.
Step 4: Managing the Bark and the Spritz
The goal during this window is to build a beautiful bark while keeping the exterior of the pork belly supple. This is where patience pays off.
- The Spritz: Every 45 minutes, open the dome and quickly spray the pork belly cubes with apple juice. The sugar in the juice helps with caramelization, while the moisture prevents the edges from becoming too crunchy or “jerky-like.”
- The Target: You are looking for an internal temperature of 190°F. Use a high-quality instant-read thermometer to check a few of the larger cubes.
- The Feel: At 190°F, the fat should be well-rendered, and the cubes should feel tender when squeezed lightly with a pair of tongs. They aren’t quite “melt-in-your-mouth” yet, that happens in the next step, but they should be close.
Grilling by Feel: Color is Your Guide
While 190°F is the numerical goal, your eyes are just as important. If the pork hits 190°F but still looks pale, let it ride a bit longer to soak up more smoke. Conversely, if the bark is getting too dark before you hit your temperature, it is time to move them into the pan regardless. You want that perfect balance of a mahogany exterior and a tender interior.
The “So What?” — Why Apple Juice?
Spritzing serves two purposes. First, it cools the surface of the meat slightly, which allows the interior to catch up without the outside burning. Second, smoke is attracted to cold, wet surfaces. By keeping the pork “tacky” with apple juice, you are actually helping the meat absorb more of that fruitwood flavor from the Big Green Egg.
Step 5: Crafting the Sticky Asian Glaze
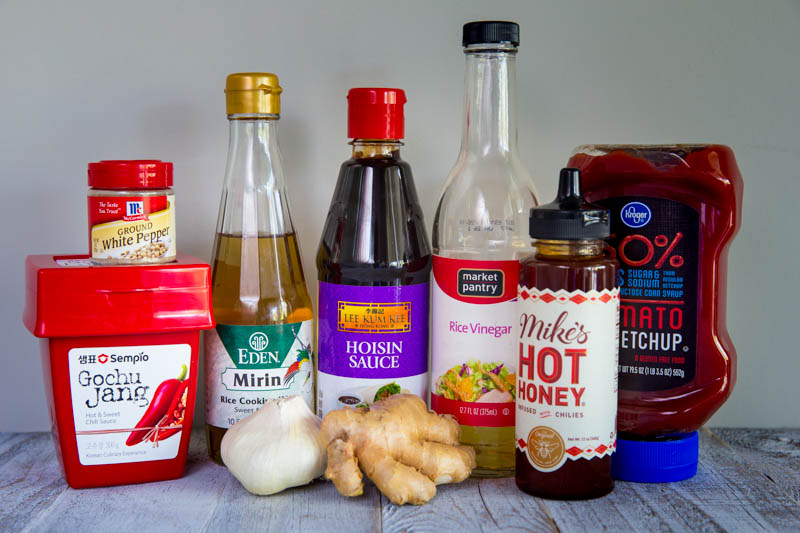
While the pork is finishing its initial smoke, it is time to build the flavor profile that sets this recipe apart. This glaze is a power move. It combines the fermented depth of Korean chili paste with the brightness of rice vinegar and the classic sweetness of honey and hoisin.
The Glaze Ingredients:
- Gochujang: This fermented red chili paste is the soul of the sauce. It provides a savory, funky heat.
- Hoisin Sauce: Think of this as the “Asian BBQ sauce” base—thick, sweet, and salty.
- Honey: For that glossy, finger-licking shine.
- Ketchup: Adds a familiar tomato tang and helps with the sticky texture.
- Mirin & Rice Vinegar: These provide the necessary acidity to cut through the heavy pork fat.
- Fresh Garlic & Ginger: Minced fine to add a sharp, aromatic bite.
- White Pepper: Offers a subtle, floral heat that lingers on the back of the palate.
The “So What?” — Why White Pepper?
You might be tempted to use black pepper, but white pepper is a staple in Asian cuisine for a reason. It has a sharper, more fermented “earthiness” than black pepper and doesn’t distract from the vibrant red color of the Gochujang. It provides a heat that warms the mouth without overpowering the delicate ginger and honey notes.
Step 6: The Transition to the Pan
Once your pork belly hits that 190°F mark and has a beautiful mahogany color, it is time to move them into the finishing phase. This is where we shift from dry smoke to a luxurious braise.
- Transfer: Carefully pull the wire rack off the Big Green Egg. Use tongs to move the pork belly cubes into a disposable aluminum pan.
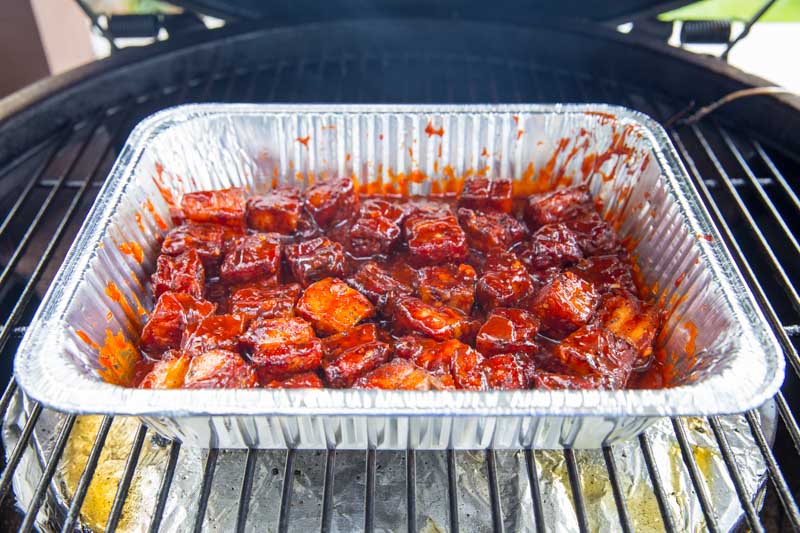
- The Glaze: Pour your prepared Asian glaze over the hot cubes. Toss them gently to ensure every side of every piece is fully coated.
- The Foil: Cover the pan tightly with a sheet of aluminum foil. This step is crucial because it traps the heat and moisture, allowing the pork belly to braise in its own rendered fat and the glaze.
Return the covered pan to the Big Green Egg for another 45 to 60 minutes. You are looking for an internal temperature of around 203°F to 205°F. At this point, the pork should be “probe tender,” meaning your thermometer slides in and out with zero resistance.
The “So What?” — Why Use an Aluminum Pan?
Using a pan for the final stage serves two purposes. First, it prevents the sugar-heavy glaze from dripping into your grill and creating acrid smoke. Second, it allows the pork belly to “confits” in the sauce. This process breaks down any remaining collagen, turning what could be a chewy piece of meat into a tender morsel of BBQ candy.
The Final Reveal: How to Know When They Are Done
After the final braise, carefully remove the foil and take a look. You are looking for two specific markers to know that your BBQ candy is ready for the table.
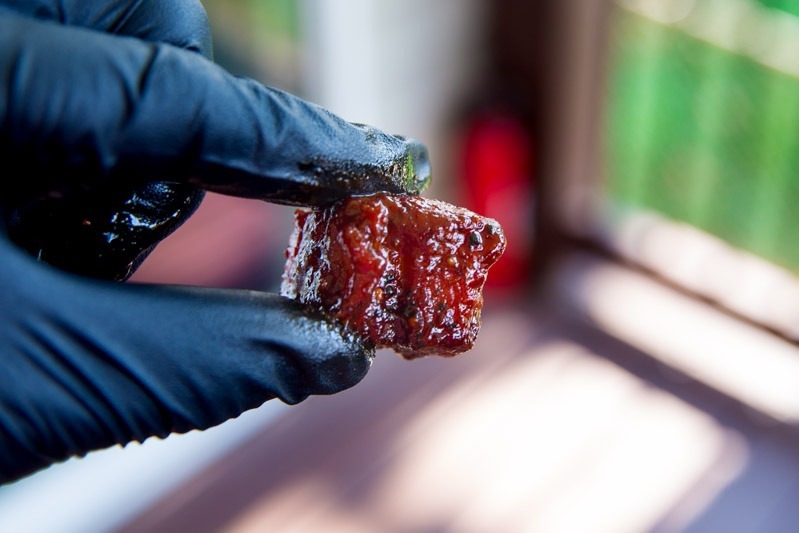
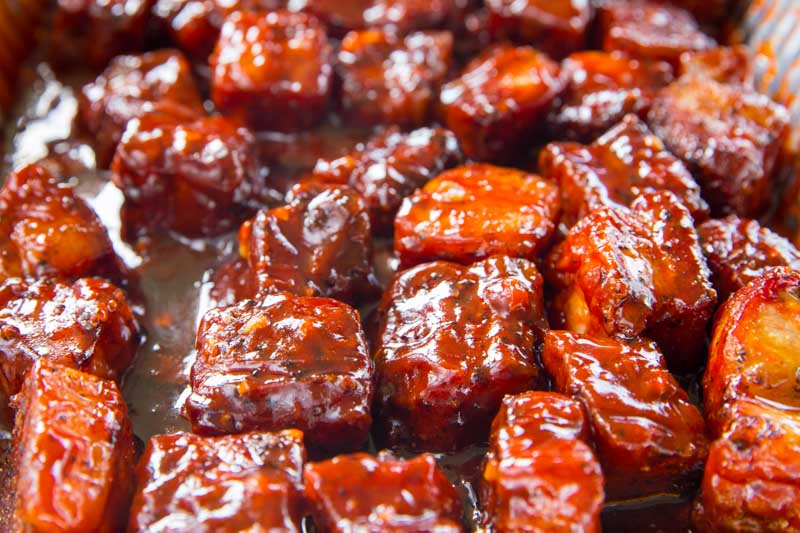
First, check the glaze consistency. It should have reduced into a thick, dark, and sticky lacquer that clings to every cube rather than pooling at the bottom of the pan. Second, check the texture. Take a toothpick or your temperature probe and slide it into a few cubes. It should go in and out with absolutely zero resistance, just like sliding a hot knife through room-temperature butter.
If the glaze is still a bit thin, leave the pan uncovered on the grill for an extra five to ten minutes. This allows the moisture to evaporate and the sugars to caramelize into that perfect, tacky finish.
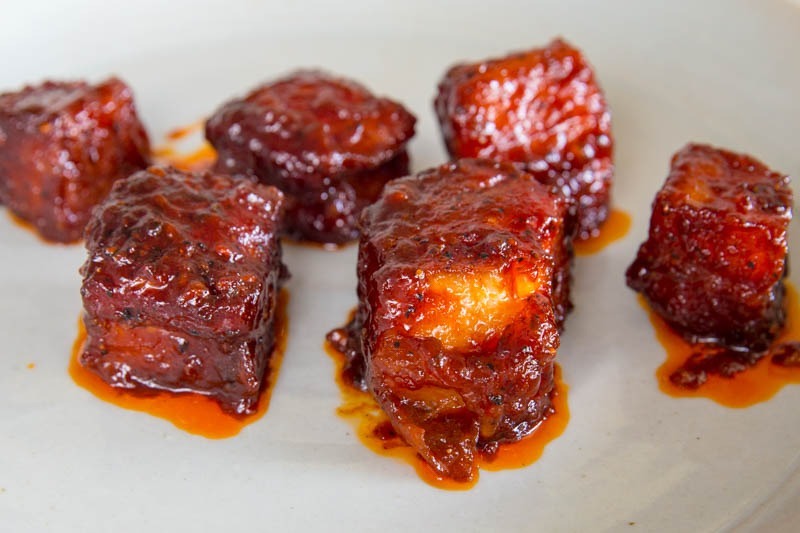
Once the Asian glaze has reduced and the pork belly is perfectly tender, it is time to pull the pan, serve, and smile! These little nuggets are the ultimate crowd pleaser. The combination of the smoky pork and the punchy, sweet heat of the glaze is addictive. Honestly, you will probably find yourself wanting to put this glaze on everything from grilled salmon to ribs.
Sticky Asian Glazed Pork Belly Burnt Ends (BBQ Candy)
Equipment
- 1 wire rack
Ingredients
Pork Belly Ingredients:
- 1.5-3 pounds pork belly, skin removed
- 3 tbsp yellow mustard, binder
- 1 tbsp kosher salt
- 1.5 tbsp coase ground pepper
Asian Glaze Ingredients:
- ½ cup gochujang
- ¼ cup hoisin sauce
- ¼ cup ketchup
- ¼ cup honey
- ¼ cup soy sauce
- ¼ cup Korean rice wine
- 1 tbsp unseasoned rice vinegar
- 2 tbsp fresh ginger, finely gated
- 3 cloves garlic, finely grated
- 1 tbsp ground white pepper
Instructions
- Prep: Cut the pork belly into 1.5 inch cubes. Coat with a thin layer of mustard and season generously with salt and pepper.
- Smoke: Set the Big Green Egg to 275°F for indirect cooking with fruitwood. Place cubes on a wire rack and smoke until the internal temperature reaches 190°F (about 2.5 to 3 hours). Spritz with apple juice every 45 minutes.
- Glaze: Whisk the glaze ingredients together. Place the smoked cubes into an aluminum pan and toss thoroughly with the glaze.
- Braise: Cover the pan tightly with foil and return to the grill for 45 to 60 minutes until the pork is probe tender (around 203°F to 205°F).
- Finish: Remove the foil for the last 10 minutes if you want the glaze to thicken further. Serve hot.
Nutrition information is automatically calculated, so should only be used as an approximation.


Made these tonight for the second time and they did not disappoint ! This is definitely a must make! Cook this for your friends and family and become the hero.
Thanks brother!
Best version ever. Great heat, great flavors. Made our book of repeating recipes. Well done.
A very kind this to say. Thank you for the nice comment 🙂
Okay, one thing about this recipe is that it makes a lot of sauce! So you could probably glaze 4 lb of pork belly with this sauce recipe so just be aware. Still my go-to pork belly recipe ever.
Good catch. Thank you 🙏