
This post contains affiliate links. Please see our disclosure policy.
Mastering the art of cooking a whole fish over a live fire is one of the most rewarding skills for any backyard pitmaster. While many people feel intimidated by the delicate nature of seafood, learning How to Roast Whole Yellowtail Snapper on the Big Green Egg: Thai Style provides a foolproof way to achieve incredible results. By roasting the snapper whole, you protect the moist white flesh from the high heat of the charcoal while the skin crisps to perfection. This process provides a dramatic presentation that will surely impress your guests at any tropical-themed gathering.
The secret to this vibrant dish lies in the balance of the spicy Thai red chili and pungent garlic marinade. Because the Big Green Egg excels at maintaining a steady convection heat, the aromatics can penetrate the fish without burning under a direct flame. You should focus on sourcing the freshest yellowtail snapper possible to ensure a clean and sweet flavor profile. This technique allows the wood-fired smoke to mingle with the bright citrus and heat of the Thai spices. Now get yourself a cold Singha beer, sit back, and enjoy our guide for How to Roast Whole Yellowtail Snapper on the Big Green Egg: Thai Style.
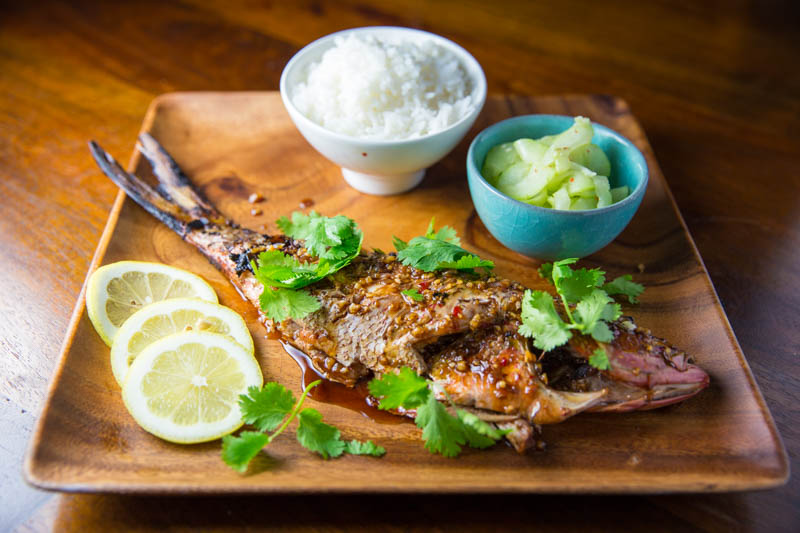
Table of Contents
- Step 1: The Bold Thai Marinade
- Step 2: Mixing the Perfect Thai Marinade
- Step 3: Scoring and Marinating the Whole Fish
- Step 4: Big Green Egg Setup for Direct Grilling
- Step 5: Grilling with the Raised Direct Method
- Step 6: Grilling and Glazing the Snapper
- Step 7: Serving the Whole Thai Snapper
- Step 8: Serving the Thai Red Chili Snapper
- How to Roast Whole Yellowtail Snapper on the Big Green Egg: Thai Style Recipe
Get My NEW Book
The Ultimate Big Green Egg Cookbook

Step 1: The Bold Thai Marinade
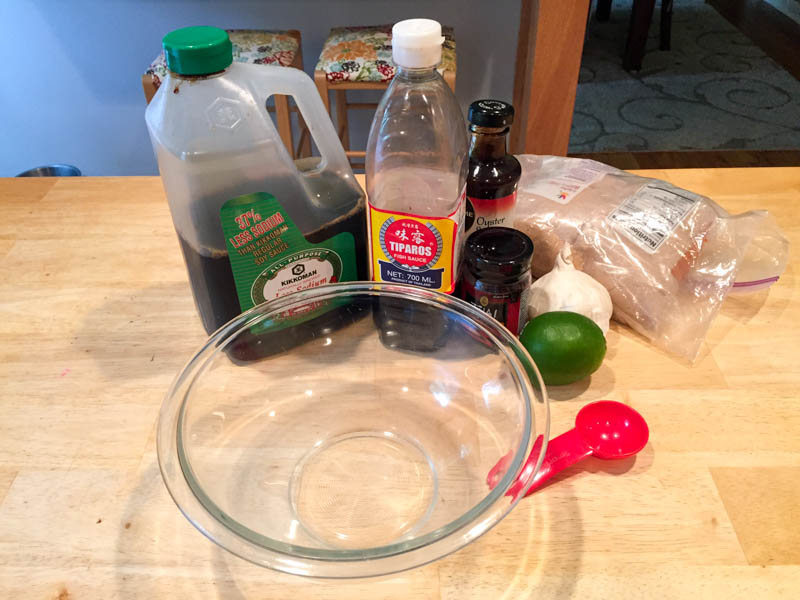
Creating a complex and balanced flavor profile is the first step in learning How to Roast Whole Yellowtail Snapper on the Big Green Egg: Thai Style. By combining soy sauce, fish sauce, and oyster sauce, you build a savory umami base that perfectly complements the delicate white fish. This process provides a deep foundation of salt and brine that anchors the brighter, more aggressive aromatics in the mixture. You should ensure these liquid components are thoroughly blended before adding your spicy and sweet elements.
The addition of Thai red chili paste and fresh garlic provides the heat and pungency that define this iconic Southeast Asian style. While the chili brings the fire, the lime juice and brown sugar offer the necessary acidity and sweetness to balance the palate. Because the sugar caramelizes quickly over the charcoal, it creates a beautiful mahogany glaze on the skin during the roasting process. You should whisk the ingredients until the sugar dissolves completely to ensure an even distribution of flavor across the entire fish. This technique ensures that every bite of your wood-fired snapper delivers a sophisticated and spicy kick.
Step 2: Mixing the Perfect Thai Marinade
Achieving a professional balance of flavors starts with blending these high-impact ingredients into a smooth paste. By whisking the soy, fish, and oyster sauces together, you create a savory base for the yellowtail snapper. This process provides a consistent flavor that carries the heat and sweetness deep into the meat during the roast. You should ensure the brown sugar dissolves entirely to prevent uneven caramelization on the hot grill grates.
Once the liquids are combined, you can fold in the Thai red chili paste and minced garlic. While the paste adds a vibrant color, the garlic offers a sharp pungency that pairs well with the fish. Because the ingredients are fully integrated, the marinade will cling effectively to the skin and the interior scores. You should prepare this mixture just before prepping the fish to keep the lime juice bright and acidic. This technique ensures your wood-fired seafood carries the signature complexity of authentic Thai street food.

Step 3: Scoring and Marinating the Whole Fish
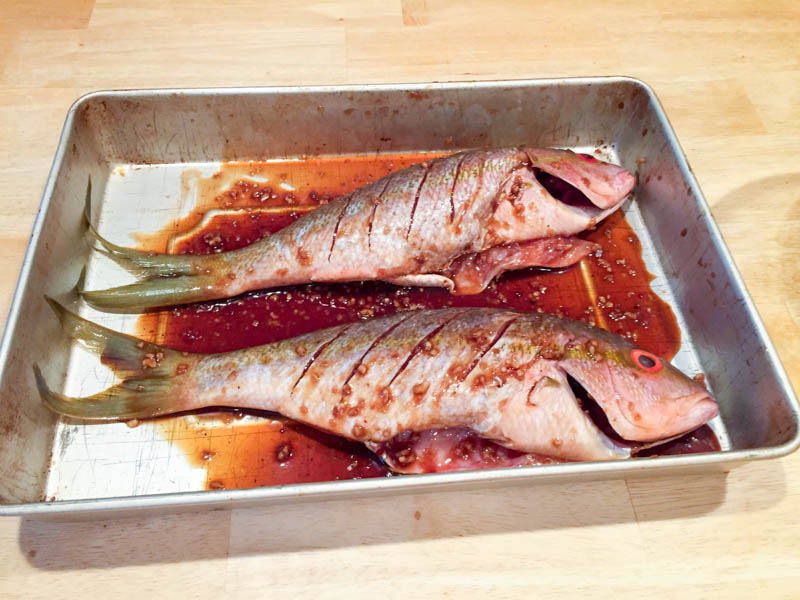
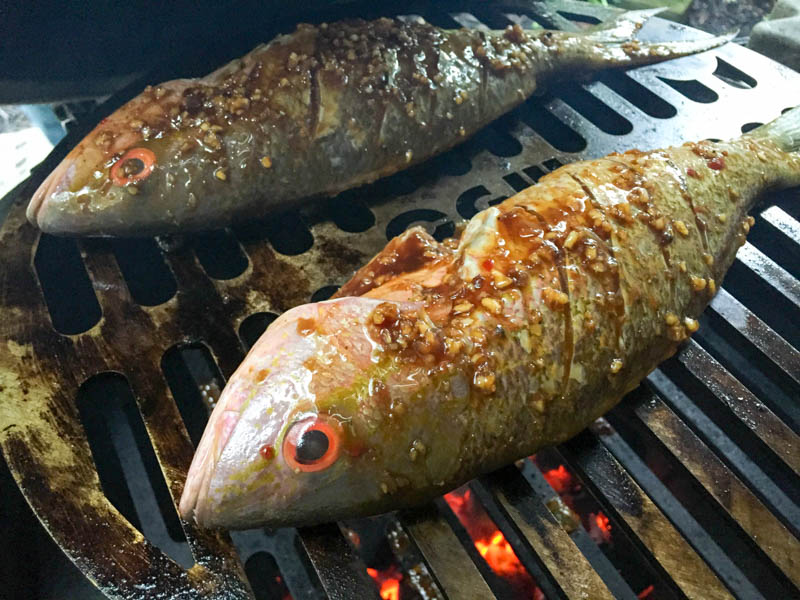
Preparing your yellowtail snapper for the grill requires a few strategic cuts to ensure the heat and flavor penetrate the thickest parts of the meat. By taking a cleaned and descaled fish and cutting deep slits crosswise about one inch apart on both sides, you create channels for the aromatics to enter. This process provides a faster and more even cook because the hot air of the Big Green Egg can reach the bone more effectively. You should use a very sharp chef’s knife to slice through the skin and into the flesh without tearing the delicate surface.
Once you have finished scoring the fish, you should pour approximately two-thirds of the Thai red chili marinade over the entire exterior. While the remaining portion stays set aside for the final glaze, you should focus on rubbing the liquid deep into the slits you just cut. Because the fish absorbs the salt and citrus quickly, a short rest of 20 to 30 minutes is often enough to transform the flavor profile. You should ensure the cavity of the fish is also lightly coated to provide a consistent taste from head to tail. This technique ensures that every bite of your roasted snapper carries the bold heat of the garlic and red chili paste.
Step 4: Big Green Egg Setup for Direct Grilling
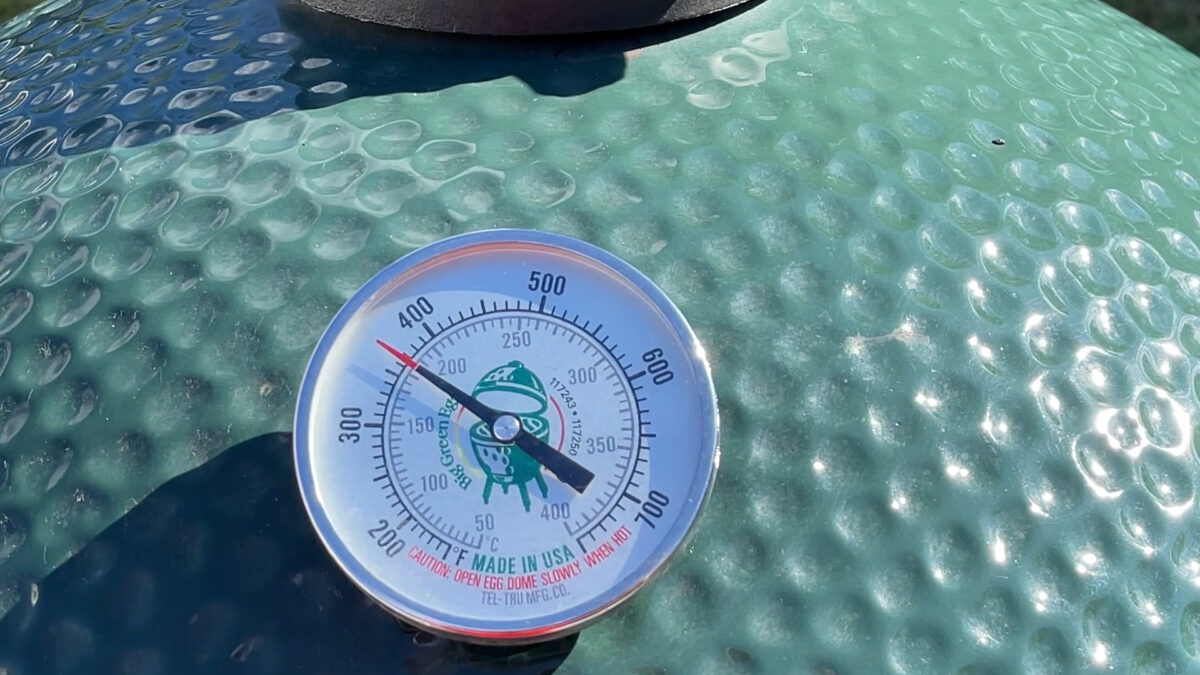
Stabilizing your grill at a moderate temperature is the key to achieving a crispy skin without drying out the delicate yellowtail snapper. By preheating the Big Green Egg to a steady 350°F while the fish marinates, you create a controlled environment for a perfect roast. This process provides the consistent convection heat necessary to render the fat in the skin while the wood-fired smoke infuses the meat. You should focus on achieving a clean-burning fire with natural lump charcoal to ensure the bright Thai flavors remain the star of the dish.
While the ceramic walls of the Egg absorb the heat, you should take a moment to clean and oil your grill grates thoroughly. Because fish skin is notoriously prone to sticking, a well-seasoned or lightly lubricated surface is essential for a professional presentation. You should monitor the airflow and keep the dome closed to maintain a steady temperature throughout the entire cooking cycle. Once the grill is stabilized, you are ready to place the marinated snapper directly over the hot coals. This technique ensures that your seafood develops a beautiful char while the interior remains succulent and tender.
Step 5: Grilling with the Raised Direct Method
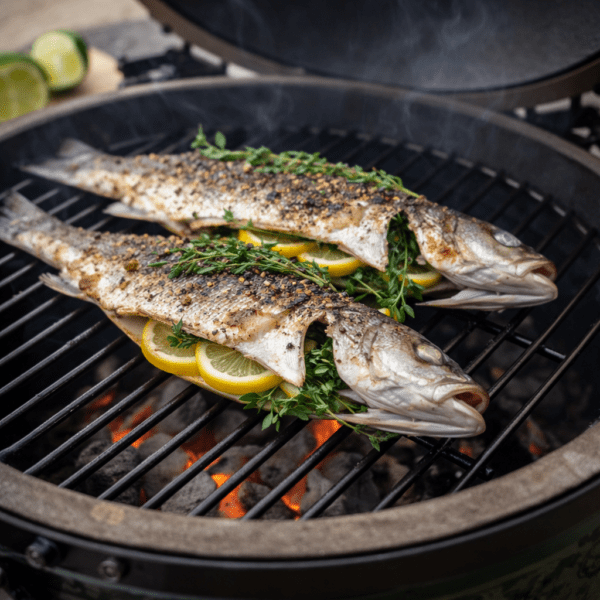
Elevating your yellowtail snapper away from the intense glow of the charcoal is the most effective way to roast a whole fish. By utilizing a raised direct setup, you allow the convective heat of the Big Green Egg to circulate around the snapper for an even cook. This process provides the perfect environment to crisp the skin while the delicate white meat remains succulent and tender. You should strive for a height of approximately 4 to 6 inches above the fire ring to achieve professional-grade results.
While I traditionally use a 2-tier swing rack from Ceramic Grill Works for this technique, you can easily replicate this setup with modern accessories. Because the official EGGspander system from Big Green Egg is now widely available, most pitmasters can achieve this elevation with a single integrated rack. You should oil the grill grate generously with a high-smoke-point oil before placing the fish down to ensure the skin does not stick. Once the fish is on the heat, the raised position allows the wood-fired smoke to penetrate the meat without scorching the delicate surface. This technique ensures a beautiful presentation and a flawlessly cooked seafood feast every time.
Step 6: Grilling and Glazing the Snapper
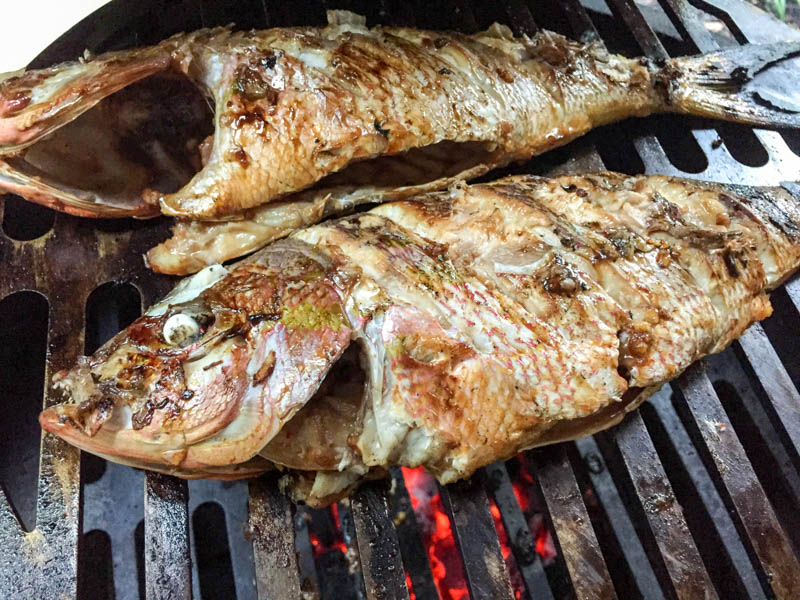
Achieving the perfect internal temperature for a whole fish requires careful attention to both time and texture. By grilling the yellowtail snapper for approximately 7 to 10 minutes per side, you allow the convective heat to cook the meat thoroughly to the bone. This process provides a consistent result that highlights the natural sweetness of the seafood while the Thai spices form a fragrant crust. You should adjust your timing based on the thickness of the fish to ensure the center remains juicy and tender.
While the fish roasts, you can decide how to best utilize the remaining third of your vibrant Thai red chili marinade. Because I chose to save the reserved liquid for the final presentation, the bright citrus and garlic notes remained fresh and punchy for the table. You should monitor the progress by checking the thickest part of the fish with a fork or an instant-read thermometer. Once the flesh turns opaque and flakes easily away from the bone, the snapper is ready to be pulled from the grill. This technique ensures that your wood-fired feast is served at the peak of flavor with a professional, glossy finish.
Step 7: Serving the Whole Thai Snapper
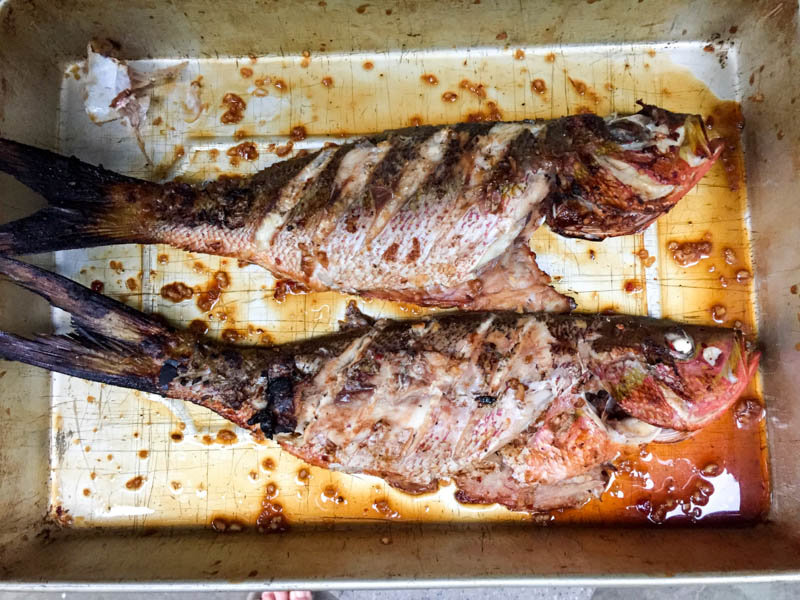
Capturing the peak of flavor requires moving the yellowtail snapper from the Big Green Egg to the serving platter without delay. By pulling the fish from the grill as soon as the flesh flakes, you stop the cooking process at the ideal moment. This process provides a succulent and moist texture that is the hallmark of a professional wood-fired seafood dish. You should use two large spatulas to carefully lift the whole snapper to ensure the crispy skin remains intact.
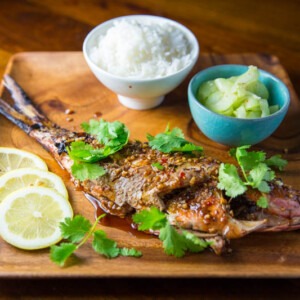
Once the fish is on the platter, you can apply the final touches that bring the Thai flavors to life. While the meat is still steaming, you should drizzle the remaining one-third of the red chili and garlic marinade over the top. Because the sauce is fresh and unheated, it provides a bright contrast to the deep, smoky notes of the roasted skin. You should garnish the plate with fresh cilantro and lime wedges to enhance the vibrant presentation. This technique ensures that your guests experience a restaurant-quality meal that perfectly balances heat, salt, and citrus.
Step 8: Serving the Thai Red Chili Snapper
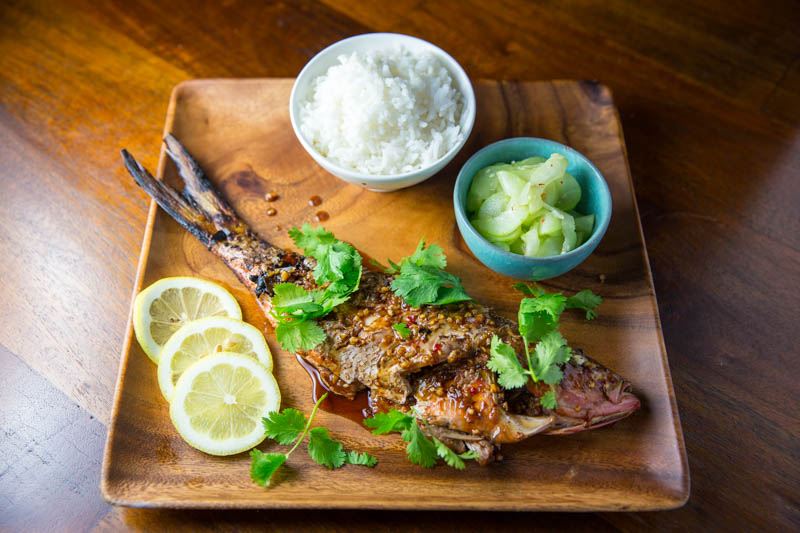
Creating a complete dining experience requires pairing your wood-fired seafood with the right side dishes. By serving the whole yellowtail snapper alongside a bowl of fluffy steamed white rice, you provide a neutral base that absorbs the spicy and savory juices. This process provides a satisfying balance to the bold heat of the Thai red chili and garlic marinade. You should place the platter in the center of the table so your guests can easily flake the meat away from the bone.
While the rice offers comfort, an Asian cucumber salad provides the necessary crunch and acidity to refresh the palate between bites. Because the fish is rich and savory, the vinegar and sesame notes of the salad cut through the intensity of the marinade. You should drizzle the last portion of the reserved chili sauce over the snapper just before your guests dig in. This timing ensures the garlic and lime flavors remain bright and aromatic as the meal begins. This technique ensures that every element of your Big Green Egg feast works together to deliver an authentic Thai flavor profile.


How to Roast Whole Yellowtail Snapper on the Big Green Egg: Thai Style
Ingredients
Fish:
- 1 whole red snapper (or 2 whole yellowtail snappers), descaled and cleaned
Marinade Ingredients:
- 5 tbsp oyster sauce
- 5 tbsp soy sauce
- 12 cloves garlic, minced
- 2 tbsp fish sauce
- 3 tbsp brown sugar
- 1/4 tsp black pepper
- 1 tbsp lime juice
- 1 tbsp Thai red chili sauce
Garnish:
- 1 cup fresh cilantro, rough chopped
- 1 Lemon , cut in to wedges
Instructions
- Mix all the ingredients for the marinade in a bowl (whisk)
- Cut slices crosswise in the fish 1″ apart on each side
- Rub 2/3 of the marinade in to the fish cavity and the slices
- Preheat the BGE to 350°
- Cook raised direct for 7-10 minutes per side
- Serve with the reserved marinade, lemon and chopped cilantro
Nutrition information is automatically calculated, so should only be used as an approximation.


How fragrant and flavoursome! I haven’t cooked a whole fish in a while before.. but it is something that I sure love to eat. Thanks for the inspiration.
This dish turned out better than expected based on the previous experience. I look forward to hearing out it turns out for you. Thanks for your comments always brings a smile to my face!
Your Thai fish dish looks great!
Thanks for the compliment. This fish turned out great and I was really happy about the flavor profile. I need to find better chilies at my local grocery stores!