
This post contains affiliate links. Please see our disclosure policy.
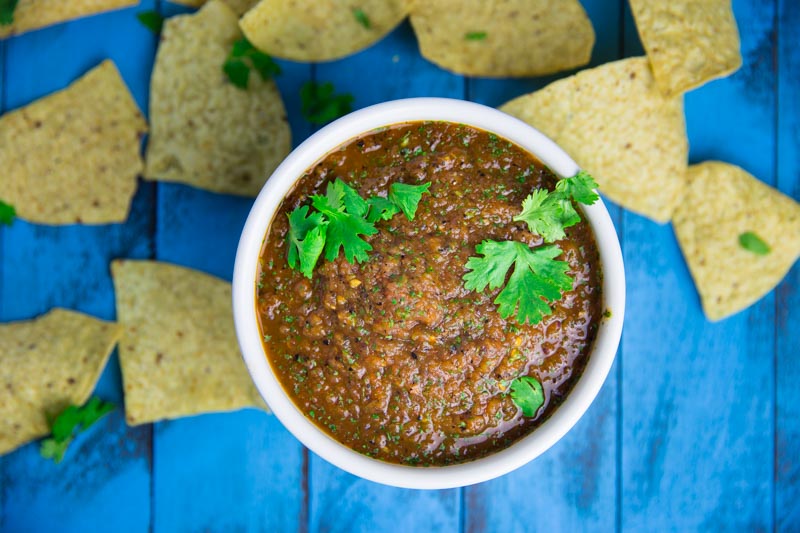
If you have been looking for the secret to a perfect, restaurant-style salsa at home, the answer isn’t in a jar… it is in the fire. Making salsa on the Big Green Egg allows you to transform simple vegetables into something complex, smoky, and incredibly vibrant.
While many people start by smoking their vegetables low and slow, I found that the real magic happens when you go for a direct, high-heat roast. By charring the vegetables directly over the lump charcoal on my MiniMax, I was able to achieve a much deeper flavor profile. That blistered skin on the tomatoes and the blackened edges of the onions provide a natural sweetness and a hint of smoke that you just can’t get any other way.
This fire-roasted method is now my go-to technique, and once you taste the difference that a bit of “char” makes, it will be yours too. Now sit back, grab an ice-cold Corona with a fresh lime wedge, and enjoy this post for Big Green Egg Fire Roasted Salsa.
Table of Contents
Get My NEW Book
The Ultimate Big Green Egg Cookbook

Why Fire-Roasted Beats Smoked
When it comes to salsa, there is a big difference between smoked and roasted:
The Speed: Using a hot MiniMax or any Big Green Egg, you can have your vegetables prepped and charred in under 15 minutes.
The Texture: High-heat roasting softens the vegetables while keeping their juices intact, leading to a brighter finish.
The Flavor: Smoking can sometimes overpower the fresh acidity of the tomatoes. Charring them over a hot fire adds a “grilled” essence that complements the cilantro and lime perfectly.
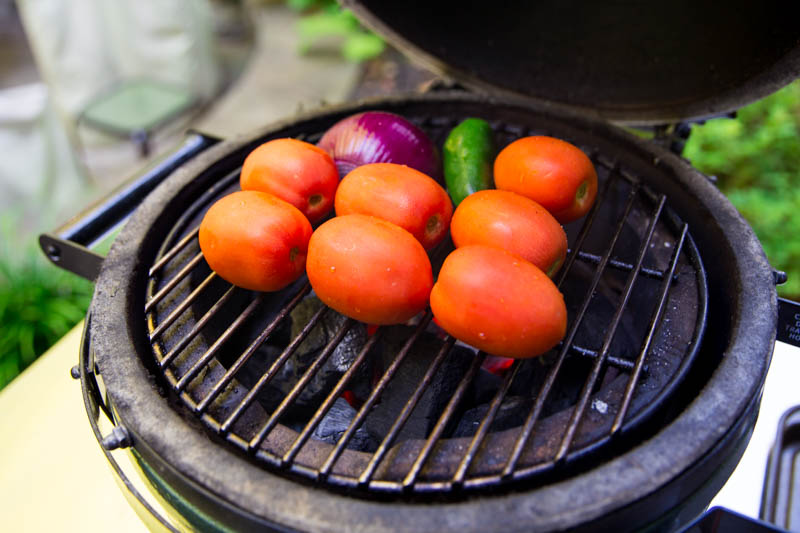
Step 1: BGE Setup and Roasting the Vegetables
For this cook, the goal is a clean, direct roast that concentrates the flavors without making the vegetables greasy. Setting up the Big Green Egg (or MiniMax) for direct heat is the best way to achieve that authentic charred skin.
The Setup
I lit the MiniMax and let it preheat to 350°F before adding the roma tomatoes, red onion, jalapeño, and garlic. Maintaining a steady 350°F gives you enough heat to blister the skins and soften the interiors of the vegetables without burning them through before they are cooked.
Direct Fire Roasting
I did not oil the vegetables but placed them directly on the grilling surface. * The Benefit: By skipping the oil, you allow the skins to char and blister naturally. This creates a “dry” roast that provides a cleaner smoke flavor and prevents the salsa from feeling heavy or oily later.
- The Process: Keep the dome closed as much as possible to maintain that consistent convection heat, but don’t be afraid to open it every few minutes to rotate the vegetables.
Buddha Note: You are looking for specific cues here. The tomatoes should start to split and show black char marks, the onion layers should soften and caramelize, and the jalapeños should look blistered all over.
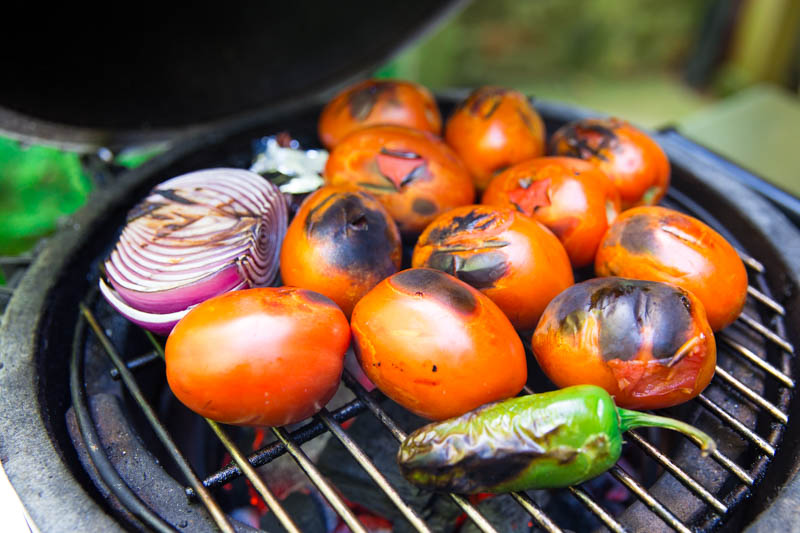
Step 2: The Art of the Char
I let the vegetables roast directly over the lit charcoal, turning them occasionally to ensure even coloring on all sides. This direct-heat method is where the salsa gets its “soul.” As the tomatoes and onions make contact with the hot stainless steel grates, the natural sugars caramelize, creating those dark, flavorful blisters that define a true fire-roasted salsa.
- Rotational Cooking: Using long-handled tongs, give the tomatoes and jalapeños a quarter-turn every 3 to 4 minutes. You want the skins to be blackened and peeling away from the flesh, which adds a subtle bitterness that perfectly balances the acidity of the lime later on.
- Managing the Heat: Even at 350°F, the area directly above the center of the charcoal will be the “hot zone.” Move the smaller jalapeños toward the edges if they start to char too quickly, keeping the thicker-skinned tomatoes in the center.
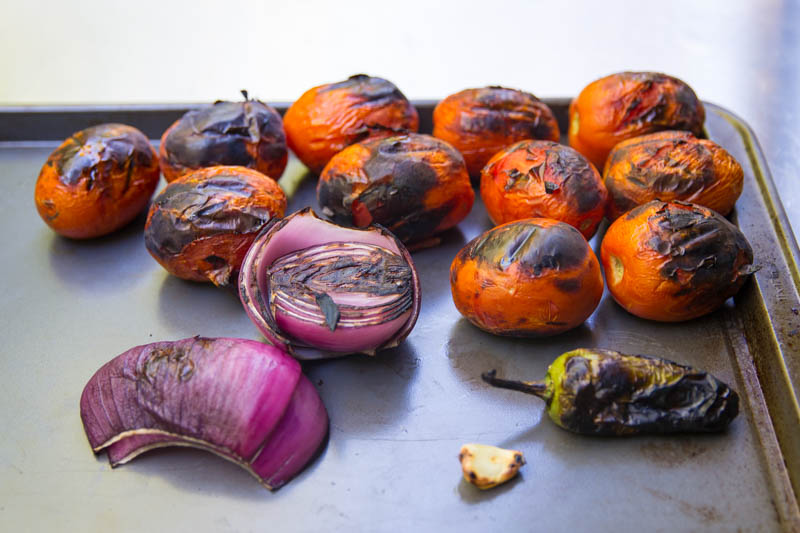
The Garlic Strategy
It is worth noting I put the garlic on later as to not overcook it. Garlic is the most delicate ingredient in this lineup. If it stays over the fire as long as the onions, it will turn acrid and ruin the batch.
- The Timing: Wait until the tomatoes are about halfway finished before tossing the garlic cloves onto the grate.
- The Goal: You are looking for the garlic to become fragrant and softened. Once the cloves feel slightly squishy to the touch and the skins have some light brown spotting, pull them off immediately. This ensures a sweet, mellow garlic flavor rather than a sharp, burnt one.
Finding the Perfect Char
Cooking by time is a good baseline, but with fire-roasted salsa, you really want to cook by sight and feel. How long this will take depends on how “charred” you want the vegetables. Some folks prefer a light golden roast, while others want that deep, blackened “Mexican street-style” finish that provides a heavy hit of smoke.
I kept them on for 15 minutes and they came out looking like this. At the 15-minute mark on the MiniMax, the transformation is usually complete:
- The Tomatoes: The skins should be split wide open, with the juices beginning to bubble and concentrate.
- The Onions: They should be softened all the way through, with the outer layers showing dark, caramelized edges.
- The Jalapeños: You are looking for a “deflated” appearance where the skin has separated from the pepper, creating a smoky pocket of air.
Buddha Note: If you want a chunkier, more robust salsa, don’t be afraid of the black bits! Those charred fragments are concentrated flavor. If you prefer a milder, cleaner-looking sauce, you can easily peel the skins off after the roast, but I highly recommend keeping some in the mix for that authentic BGE character.
Step 3: The Blend
Once the fire has done its job, the final flavor profile comes down to how you handle the roasted ingredients. You want to preserve that “grilled” texture without over-processing the vegetables into a liquid.
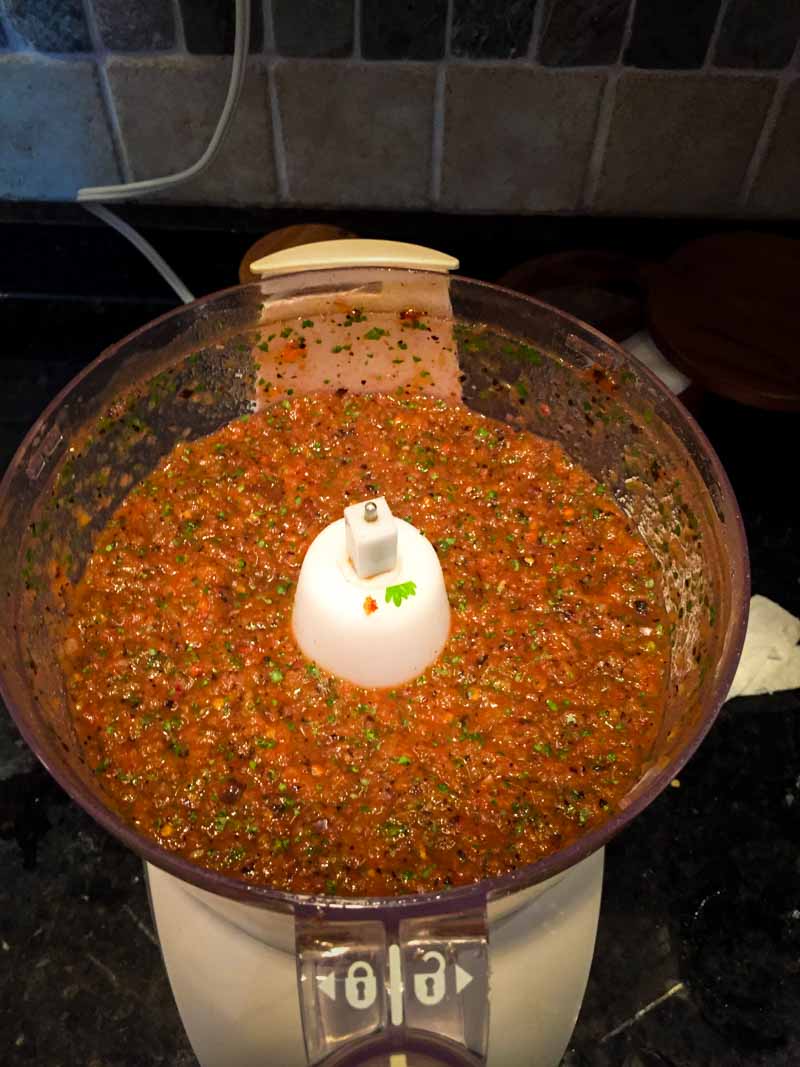
After the roasted vegetables cooled, I roughly chopped them and added them to a food processor with cilantro, lime juice, cumin, salt, and pepper.
- The Rough Chop: Cutting the onions and tomatoes into smaller chunks before they hit the blades ensures that everything breaks down at the same rate. This prevents you from having one giant chunk of onion floating in a sea of tomato purée.
- The Seasoning: * Cumin: This adds an earthy, warm undertone that bridges the gap between the smokiness of the char and the brightness of the lime.
- Fresh Lime Juice: The acidity is crucial here. It “wakes up” the roasted flavors and balances the sweetness of the charred onions.
- Cilantro: Use the leaves and the tender upper stems for the most punchy herb flavor.
Pulse for Texture
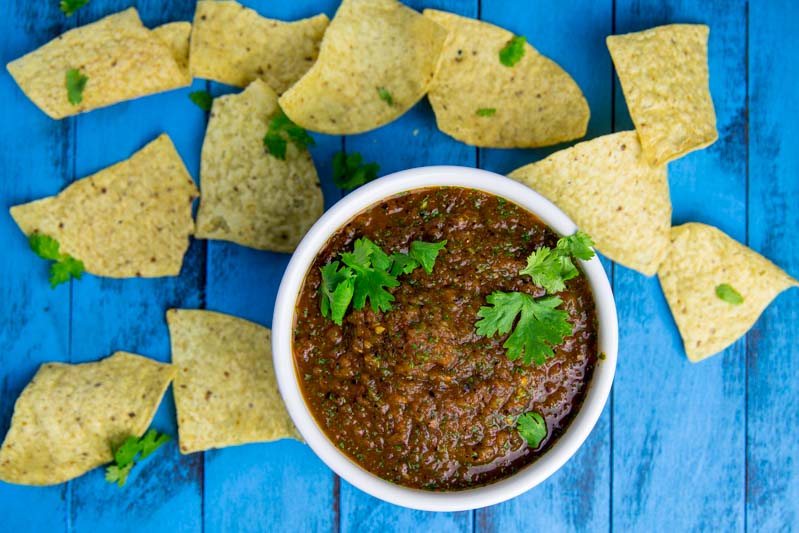
Buddha Note: This is the most important part of the process. Pulse the food processor in short bursts. You are looking for a rustic, chunky consistency similar to what you’d find at a high-end Mexican cantina. If you hold the button down, you’ll end up with a smooth sauce… which is fine for a taco topping, but for a dipping salsa, texture is king.
Step 3: The Rest
Salsa is always better after the flavors have had a chance to “get to know each other.”
- The Marriage: Transfer the salsa to a glass bowl, cover it, and let it sit in the fridge for at least an hour.
- The Heat Check: As the salsa rests, the capsaicin from the roasted jalapeños will infuse the rest of the mixture. Taste it again after it has chilled. You might find you want an extra pinch of salt or another squeeze of lime to brighten it back up.
The “So What”: Why This Method Wins
You might be tempted to just throw raw ingredients into a blender and call it a day. But the “so what” here is the depth of flavor. By charring the vegetables on the Big Green Egg, you are adding a third dimension to the salsa: smokiness.
Raw salsa is bright and acidic, but fire-roasted salsa is savory, sweet, and complex. The charring process reduces the water content in the tomatoes, concentrating their natural sugars. When you combine that intensified sweetness with the earthy notes of cumin and the zip of fresh lime, you get a salsa that isn’t just a condiment—it is the star of the table.
Final Thoughts: The “Uncle Julio” Profile
If you have ever had the salsa at Uncle Julio’s, you know that specific roasted, dark, and slightly smoky profile. This technique gets you as close to that as possible in your own backyard. The MiniMax is the perfect tool for this because it gets up to temperature quickly and keeps the vegetables close to the coals for a superior sear.
The beauty of this recipe is its flexibility. If you want more heat, leave the seeds in the jalapeños or swap one out for a serrano. If you want it sweeter, add more red onion. Once you master the “15-minute char,” you can tweak the ratios to make your own signature blend.
Storage and Shelf Life
Since this salsa uses fresh ingredients without preservatives, how you store it matters:
- The Glass Rule: Always store your salsa in a glass jar or airtight container. Plastic can sometimes absorb the smells of the onion and garlic or leach flavors into the sauce.
- Fridge Life: This salsa will stay fresh and delicious for 5 to 7 days in the refrigerator.
- The “Better with Age” Factor: I actually recommend making this the day before you need it. A 24-hour rest in the fridge allows the cumin and garlic to fully meld with the tomato juices.
- Freezing: Believe it or not, because the vegetables are already roasted, this salsa freezes surprisingly well. Just leave a little headspace in the jar for expansion and it will last up to 3 months.
Quick Pairing Guide
- The Classic: Thick-cut, salted tortilla chips.
- The Upgrade: Use it as a base for Chilaquiles or spoon it over Huevos Rancheros.
- The Main Event: This is the perfect companion for Skirt Steak Tacos or a Smoked Pork Butt.

Easy Big Green Egg Fire Roasted Salsa Recipe
Ingredients
Vegetables:
- 6-8 Roma tomatoes
- 1 Red onion, peeled and halved
- 2-3 Jalapeños, stems removed after roasting
- 3 Garlic clove, kept in skins
The Finishers
- 1/2 Bunch fresh cilantro, roughly chopped
- 1 tbsp Fresh lime juice, approx. 1/2 a lime
- 1/2 tsp Ground cumin
- Kosher salt & pepper, to taste
Instructions
- BGE Setup: Light your Big Green Egg and stabilize the temperature at 350°C. Setup the grill for direct grilling with no convEGGtor.
- The Roast: Place the tomatoes, onion, and jalapeños directly on the clean cooking grate. Do not use oil; the dry heat is what creates the perfect blistered skin.
- The Timing: Roast the vegetables for about 15 minutes in total. Use tongs to turn them occasionally so they char on all sides.
- Add Garlic: Add the garlic cloves (in their skins) during the last 5–7 minutes of the roast to prevent them from becoming bitter.
- Cool Down: Remove all vegetables once they are softened and charred. Let them cool for 10 minutes. Peel the garlic and remove the stems from the jalapeños.
- The Pulse: Roughly chop the roasted onions and tomatoes. Add them to a food processor along with the garlic, jalapeños, cilantro, lime juice, cumin, salt, and pepper.
- Texture Control: Pulse in short bursts until you reach a rustic, chunky consistency. Avoid over-processing into a purée.
- The Rest: Transfer to a glass jar and refrigerate for at least 1 hour before serving to allow the flavors to meld.
Nutrition information is automatically calculated, so should only be used as an approximation.


This looks good and easy. I’ll definitely have to try it.
I have the BGE on my Christmas list, but your article about the rotisserie chicken opened my eyes to the Kamado Joe grills, and I must say I really like their story and brand. Before the BGE, I had a new Weber on my list. As far as the coking results and food flavor, how do the two types of grills compare (Standard gas grill vs ceramic Kamado-styles)?
Thanks.
For me gas is about convenience and charcoal is about flavor. With ceramic grills you can do low and slow (traditional BBQ), high heat (pizza or searing steaks), and everything in between. There is never a right or wrong in my book but if you love cooking and eating a kamado style grill is the best bet!
Got it. Everyone I know with a ceramic grill raves about them.
I was planning on taking the wife to this year’s BGE Eggtoberfest in Atlanta to get a better idea of what they’re all about, but I have a scheduling conflict.
Thanks for the info, and keep the goodness coming!