
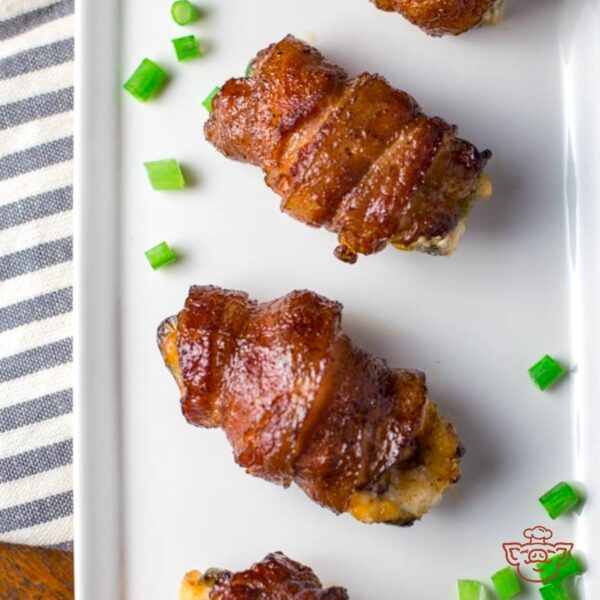
This post contains affiliate links. Please see our disclosure policy.
The Art of the Chill: Mastering Cold Smoked Salmon
Hello again and welcome back! This year has started off with a series of blog posts featuring things I have wanted to learn but for one reason or another procrastinated. This post focuses on curing and cold smoking, two areas covered in a great book named Charcuterie: The Craft of Salting, Smoking, and Curing by Michael Ruhlman and Brian Polcyn. This book is a staple for anyone looking to go beyond standard grilling and into the deeper science of meat preservation.
For this cook, I followed the “pro-level” path: I cured, then cold smoked a beautiful piece of farm-raised salmon. Unlike hot smoking, where the goal is to flake the fish with heat, cold smoking is a delicate dance of salt and smoke that preserves the silky, buttery texture of the salmon while infusing it with an incredible depth of flavor.
It’s a process that requires patience, but the result is a delicacy that rivals the best “nova” lox you can find in New York or Scandinavia. So, let’s get into the details. Now sit back, grab a nice glass of Sauvignon Blanc, the crisp acidity is the perfect pairing for the richness of the fish, and enjoy this post for Big Green Egg Cold Smoked Salmon.
Table of Contents
- The Simplicity of the Cure: Salt and Sugar
- The Transformation: From Fresh to Cured
- The Desalination: Finding the Perfect Balance
- The “No-Heat” Smoke Setup: Harnessing the Smoker Tray
- Prepping the Big Green Egg for a Heat-Free Environment
- Airflow and Environmental Control
- The Long Bathe: 6 to 12 Hours of Smoke
- The 8-Hour Sweet Spot
- The Final Rest: Locking in the Flavor
- The Next Morning: The Big Reveal
- Final Thoughts on the Cook
- Big Green Egg Cold Smoked Salmon Recipe
Get My NEW Book
The Ultimate Big Green Egg Cookbook

Understanding the Process: Cure First, Smoke Second
Before we touch the Big Green Egg, we have to talk about the most important step: The Cure. You cannot cold smoke raw salmon safely without first removing excess moisture and “setting” the protein with salt.
For this farm-raised salmon, I used a classic dry cure. This isn’t just for flavor; the salt acts as a preservative and creates a “pellicle”, a tacky skin on the surface of the fish, that allows the smoke to stick properly later on.
The Basic Cure Mix
Optional Aromatics: Many recipes from Charcuterie suggest adding things like lemon zest, fresh dill, or crushed peppercorns to infuse the meat during the 24-hour soak.
Kosher Salt: The primary engine of the cure.
Sugar: To balance the salt and keep the fish tender.
The Simplicity of the Cure: Salt and Sugar
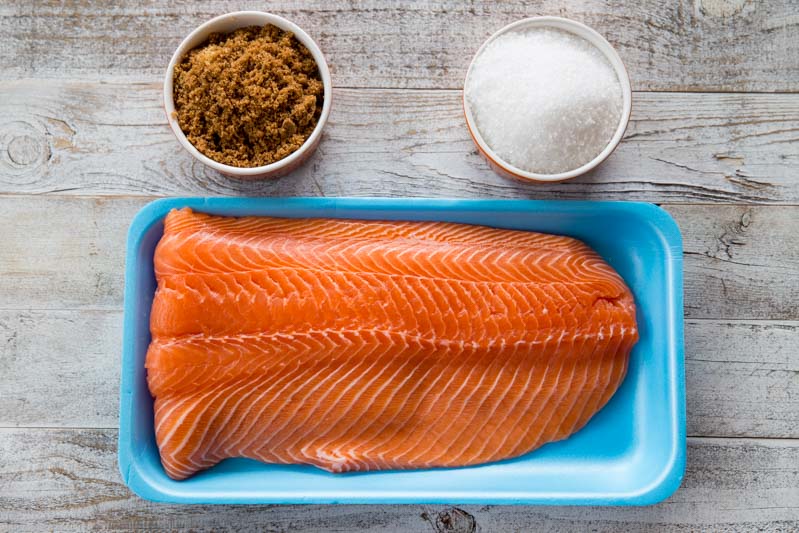
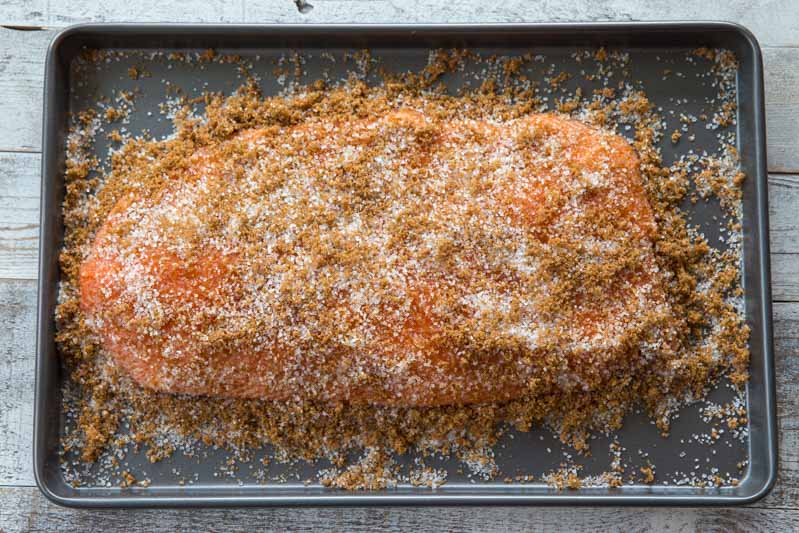
Although there are a lot of moving parts to this recipe, the cure used for the salmon was surprisingly simple, featuring just two primary ingredients: Coarse Salt and Brown Sugar. In the world of Charcuterie, it is easy to get lost in complex spice blends, but for high-quality salmon, you want the natural flavor of the fish to shine through. The salt and sugar perform a specific, essential chemistry:
- Coarse Salt: This is the workhorse. It draws moisture out of the salmon cells through osmosis, which firm up the flesh and inhibits the growth of bacteria. Using a coarse grain is important because it dissolves more slowly and evenly than fine table salt.
- Brown Sugar: While the salt draws moisture out, the sugar helps to mellow the harshness of the salt and keeps the salmon from becoming too “ham-my” or tough. The molasses in the brown sugar also adds a subtle hint of caramel that pairs beautifully with the smoke later on.
The 1:1 Ratio
For this beautiful piece of farm-raised salmon, I used a 1:1 ratio—equal parts salt and sugar. This is my preferred balance; it provides enough salt to safely cure the fish and tighten the proteins, while the equal amount of sugar ensures the final product remains silky and “melt-in-your-mouth” tender rather than overly salty.
The Application
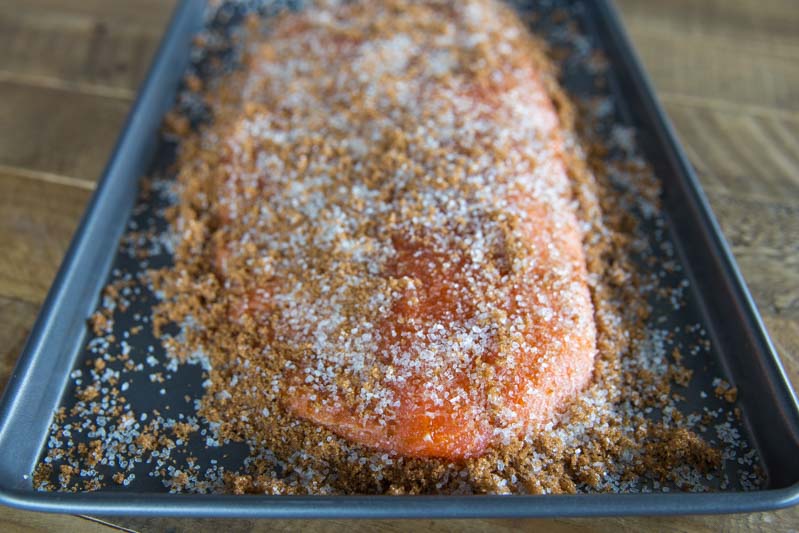
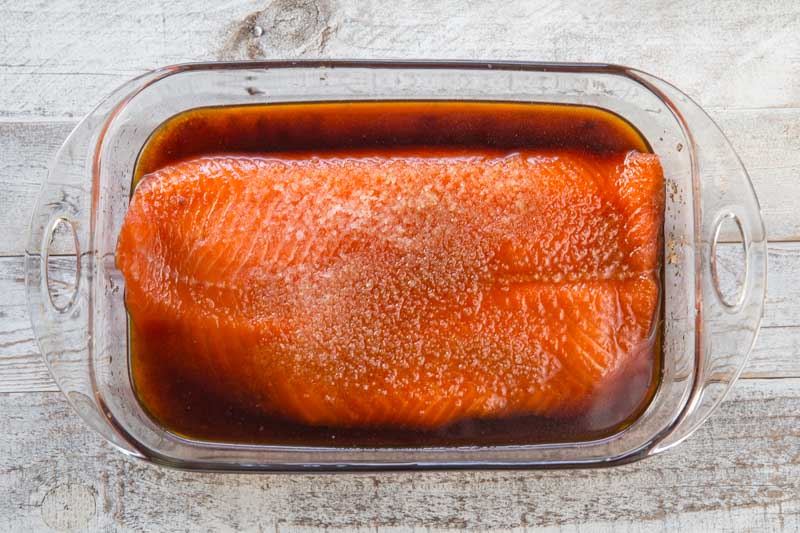
I applied a generous layer of this mixture to both the flesh and the skin side of the salmon. You want to make sure the fish is completely “buried” in the cure. Once coated, I wrapped it tightly and placed it in the refrigerator.
Pitmaster Note: During this stage, you’ll notice liquid pooling in your container. That’s a good sign! It means the salt is doing its job and pulling the water out of the fish, concentrating the flavor and preparing it for the smoke.
The Transformation: From Fresh to Cured
As the salt and sugar go to work, you’ll witness a fascinating bit of food science. Because the cure pulls so much moisture out of the salmon, it essentially creates its own “brine.” I quickly realized I needed to move the salmon to a deeper dish to accommodate all that extracted liquid and ensure the fish stayed in contact with the curing agents.
The 36-Hour Mark
Here is the salmon after 36 hours in the cure. The change is dramatic:
Weight: If you were to weigh the salmon now, it would be significantly lighter than when it started. This loss of water weight is what makes cold smoking possible; with less water, the fish is less hospitable to bacteria and more receptive to smoke.
Texture: What was once a soft, pliable piece of raw fish has now become firm and dense to the touch. The muscle fibers have tightened up, which is exactly what you want for a clean slice later.
Color: The flesh has taken on a deeper, more vibrant translucent orange. It looks “jewel-like” and polished.
The Desalination: Finding the Perfect Balance
Once the salmon has spent that critical 24 to 48 hours in the cure, it has been successfully preserved, but it is also packed with an intense amount of salt. If you moved straight from the cure to the smoker, the flavor would be overwhelming. To get that delicate, high-end deli taste, you have to perform a two-step “reset.”
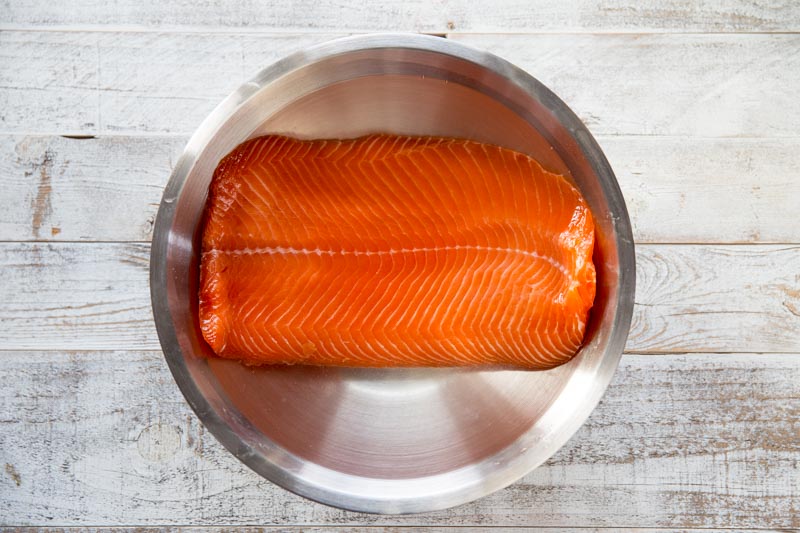
1. The Initial Rinse
First, I took the salmon out of its brine and held it under a steady stream of cold, running water. You want to be thorough here, use your fingers to gently rub away every visible grain of salt and sugar from both the flesh and the skin.
2. The 30-Minute Soak
Even after a good rinse, the exterior of the fish is still highly concentrated with salt. To “pull” some of that excess salinity back out, I placed the salmon in a large bowl of fresh, cold water for 30 minutes.
- How it works: This is essentially reverse-osmosis in action. The fresh water helps draw out the salt from the very surface of the fish, ensuring the final product is savory and seasoned, rather than “salty.”
- Don’t skip this: This 30-minute soak is the secret difference between “homemade” jerky-style salmon and a professional-grade lox.
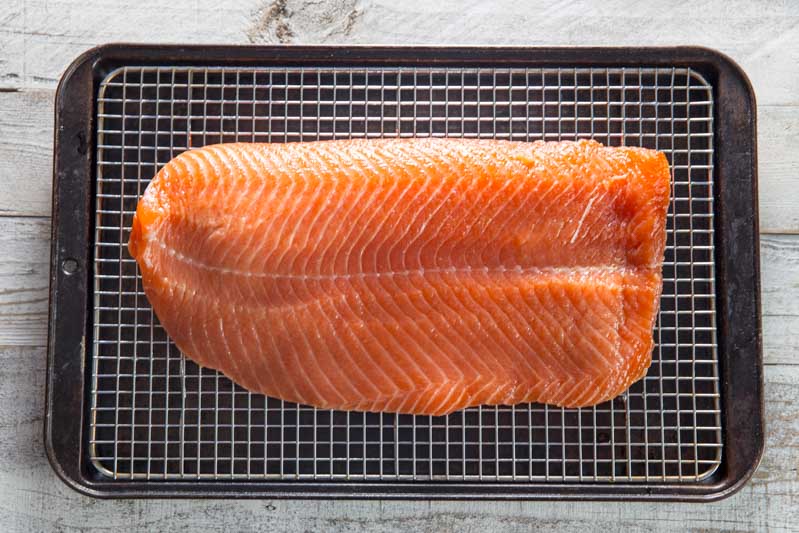
3. Drying, the Wire Rack, and the Pellicle
After the soak, the final preparation step is all about airflow. I pulled the salmon out of the water, patted it dry with paper towels, and placed it onto a wire cooling rack set over a baking sheet.
I then placed the entire setup into the refrigerator, uncovered, to sit overnight.
The Smoke Magnet: Think of the pellicle as a “smoke magnet.” Smoke doesn’t stick well to wet meat; it bounces off. By drying it overnight on the rack, you create a surface that the smoke will perfectly adhere to, resulting in that deep, translucent color and rich flavor we’re looking for.
Why the Wire Rack? Using a rack is essential because it allows air to circulate around the entire piece of fish, top, bottom, and sides. If you lay it flat on a plate, the bottom stays damp, which prevents an even cure.
Creating the “Glue”: This overnight rest in the dry environment of the fridge develops the pellicle. This is a thin, tacky, slightly shiny skin that forms on the surface of the meat.
Setting the Stage for Smoke
With the salmon cured, rinsed, soaked, and dried, it is finally ready for the Big Green Egg. But remember: this is a cold smoke, so we aren’t lighting a traditional fire.
The “No-Heat” Smoke Setup: Harnessing the Smoker Tray
After the salmon has rested overnight in the fridge and that perfect, tacky pellicle has formed, it’s finally time to head to the Big Green Egg.
For a true cold smoke, the internal temperature of your grill must stay below 80°F. If it climbs too high, the fish will begin to “cook,” and you’ll lose that buttery, silky texture. To achieve this, we aren’t lighting the lump charcoal in the Egg at all. Instead, we use an external smoke generator that smolders independently of the grill’s main fuel source.
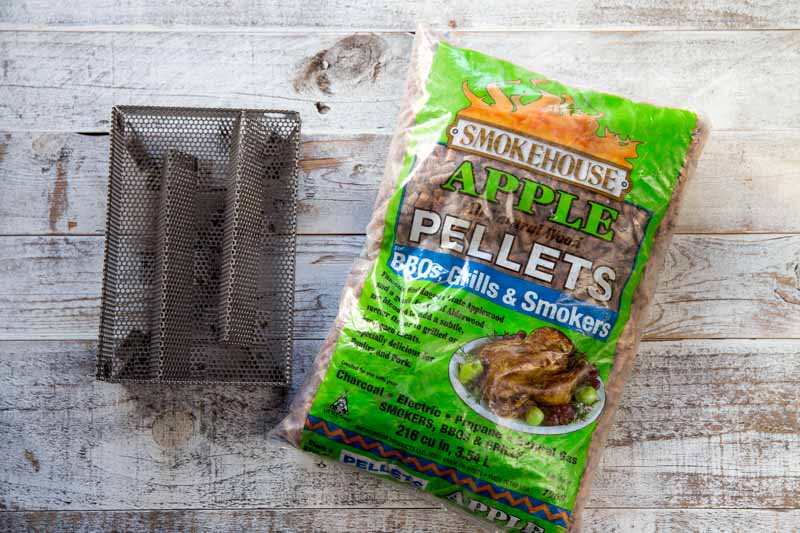
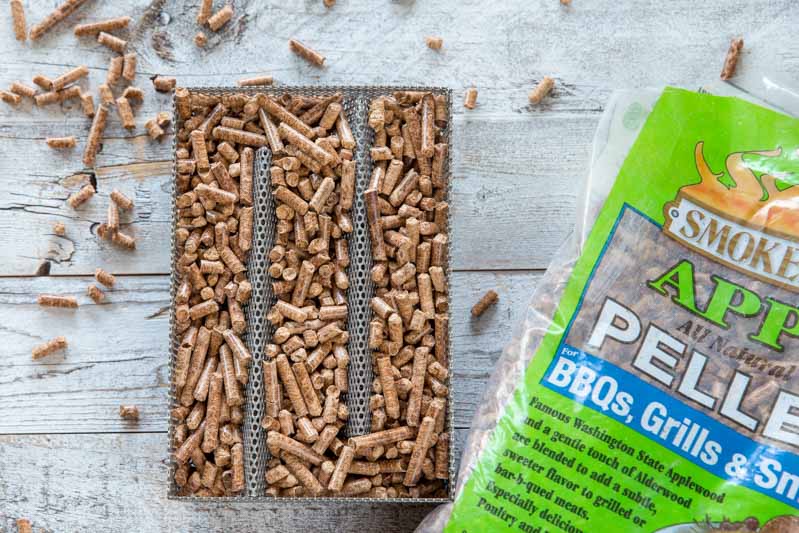
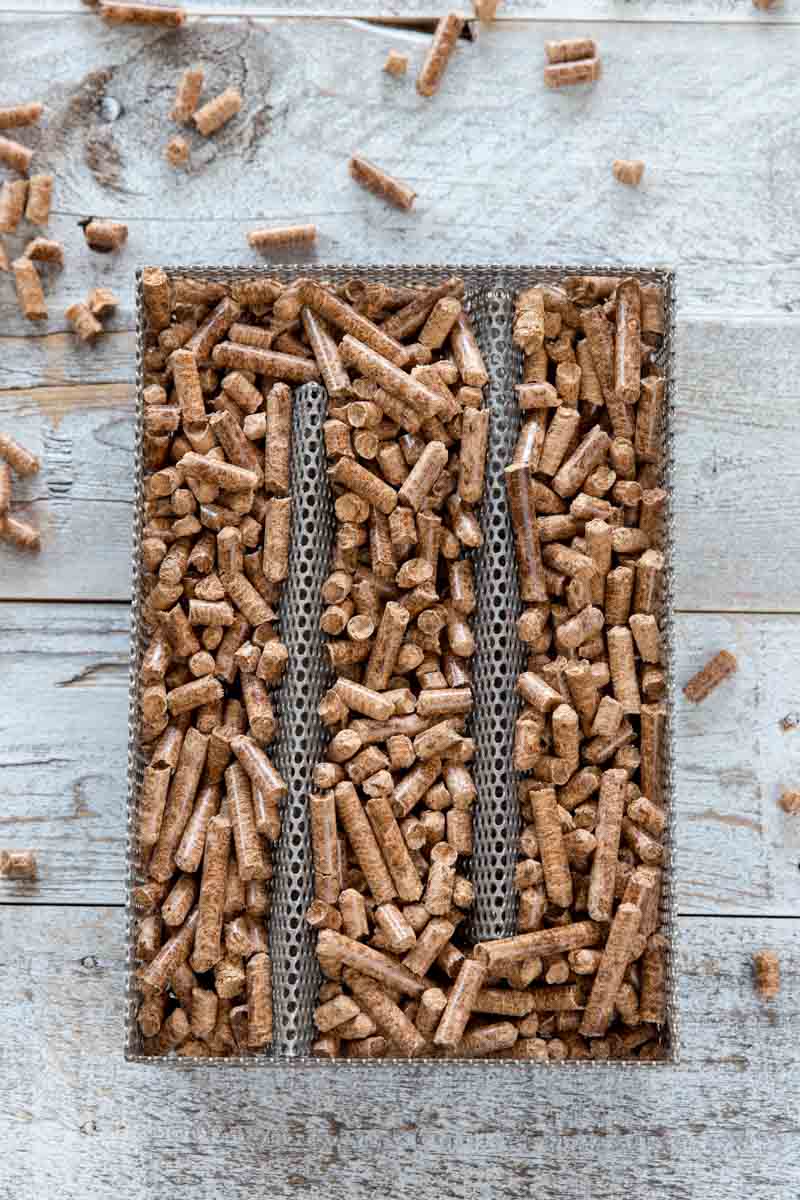
The Solution: Kaduf Pellet Smoker Tray
Since the Amazen maze is currently out of stock, the Kaduf Pellet Smoker Tray is the perfect alternative. It uses the same “maze” principle to provide long-lasting smoke without significant heat.
- Long-Lasting Performance: This tray is designed to provide up to 12 hours of billowing smoke, which is more than enough for several batches of salmon.
- Versatile Fueling: It works exceptionally well with Apple Wood pellets for a mild, sweet flavor, but you can also use wood chips if you prefer a more intense smoke profile.
- Compact Design: The 5″x8″ stainless steel design fits easily on the charcoal grate of a Large Big Green Egg, leaving the main cooking surface entirely free for your fish.
Other Ways to Get the Smoke Rolling
If you’re looking for different styles of smoke generators or a DIY approach, here are some great alternatives:
- Pellet Smoker Tubes: Options like the Lizzq 12″ Pellet Smoker Tube are incredibly popular. While they take up less space, they typically burn for about 5 hours. They are perfect for shorter cold-smoking sessions like cheese or nuts.
- The “Two-Grill” Offset (DIY): If you have a second, smaller grill, you can light a tiny fire there and use a flexible dryer vent hose to pipe the smoke into the bottom vent of your Big Green Egg. This allows the smoke to cool completely before it ever touches the salmon.
- The “Ice Bath” Heat Sink: On warmer days, place a large pan of ice on top of your convEGGerator (plate setter) directly beneath the salmon. This acts as a thermal barrier, ensuring the ambient temperature around the fish stays chilled while the smoke circulates.
The Smoke Duration
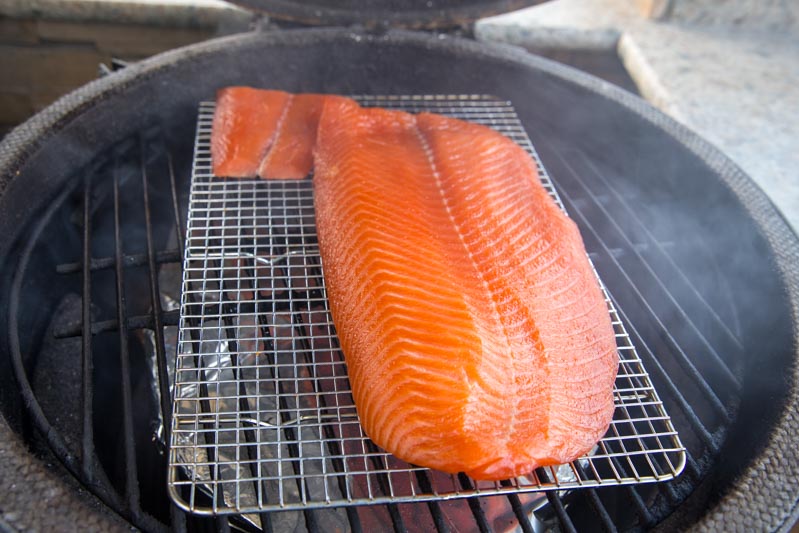
Once your Kaduf tray is lit and placed in the bottom of the Egg, position your salmon on the main cooking grid. I recommend leaving the salmon on its wire rack to ensure the smoke can circulate around the bottom of the fillet as well.
Prepping the Big Green Egg for a Heat-Free Environment
Before we start the smoke, we have to address the “thermal mass” of the Big Green Egg. These ceramic cookers are world-class at holding heat, which is usually a benefit, but for cold smoking, it’s our biggest hurdle.
1. The Empty Firebox
The first step is to clean out all of the lump charcoal from your Big Green Egg. You want the firebox to be completely empty.
- The Reason: Even unlit charcoal can hold onto ambient heat or restrict the airflow we need to keep the temperature low. By starting with a “clean slate,” you create a large, empty chamber that allows the cool smoke to circulate freely without any obstructions.
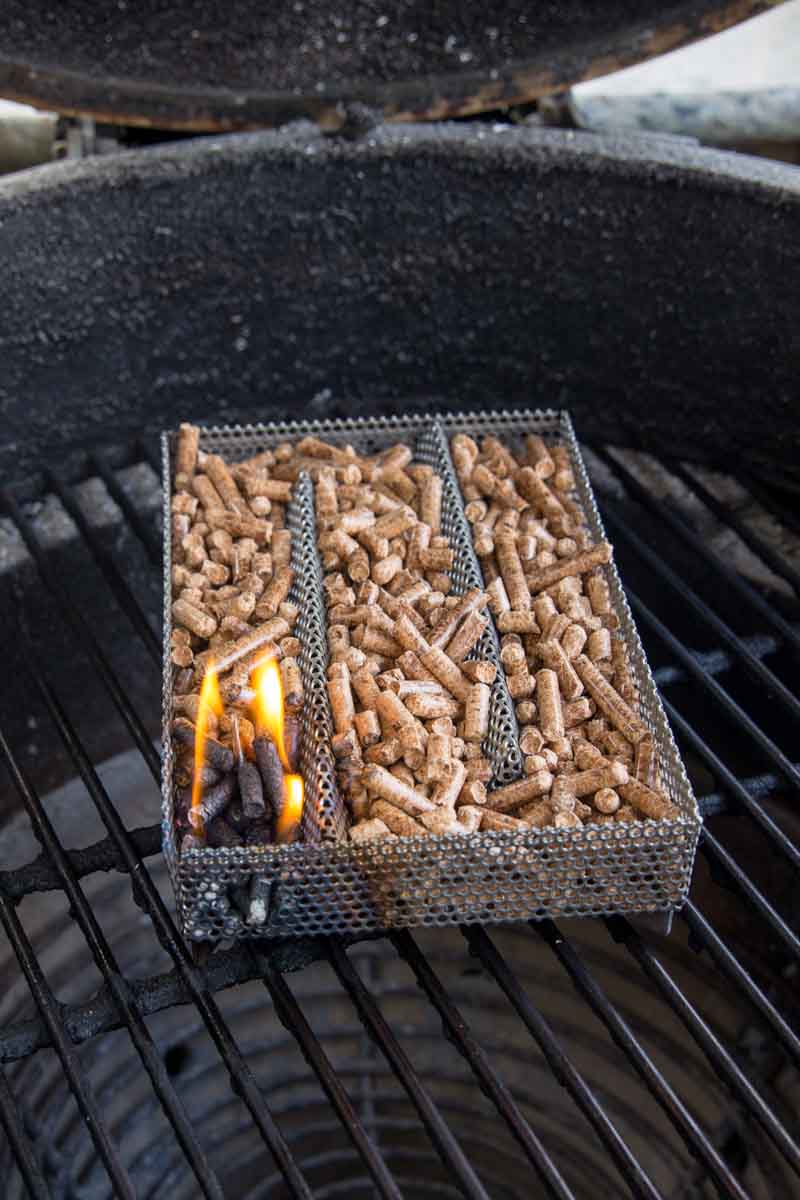
2. Lighting the Pellet Smoker
Once the Egg is empty, place your Kaduf Pellet Smoker Tray (or your smoke generator of choice) directly on top of the bottom fire grate.
- The Torch: Use a butane torch to light the pellets at the starting corner of the maze. Don’t be shy with the flame; you want to see a localized fire starting to roar.
- The 10-Minute Rule: Once the pellets catch fire, let the flame burn for a full 10 minutes. This feels like a long time, but it’s the most important part of the process. You are establishing a deep, self-sustaining ember bed.
- The Blow Out: After 10 minutes, gently blow out the flame. You should be left with a glowing red cherry and a thick, steady stream of “thin blue smoke.” If you blow it out too early, the pellets might extinguish once you close the dome, so patience here is key.
3. The Setup Flow
With the smoker tray smoldering, I then put the convEGGerator (plate setter) back in (legs up). On top of the legs, I place the stainless steel cooking grid. Finally, the salmon, still resting on its wire rack from the fridge, goes onto the grid.
Pro Tip: Make sure your bottom vent and top daisy wheel are wide open for the first few minutes to ensure the pellets have enough oxygen to stay lit. Once you see smoke consistently exiting the top, you can adjust the vents to a “half-open” position to trap the smoke without building heat.
The Smoke Session
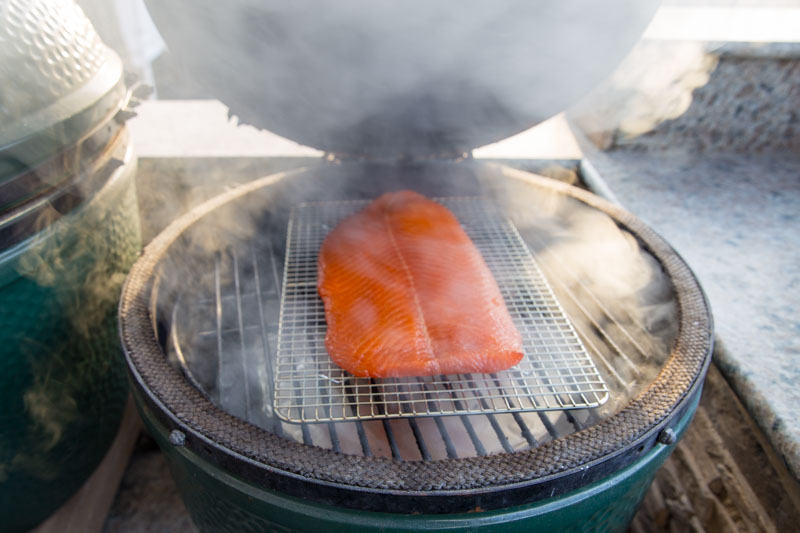
Now that the “smoke engine” is running and the salmon is positioned high away from the smoldering pellets, the real transformation begins.

Airflow and Environmental Control
With the pellet tray smoldering, it’s time to finalize the configuration. As mentioned, we want the smoke to move through the chamber rather than stagnating, which is why vent management is different for this cook than for a typical low-and-slow BBQ.
1. Wide Open Airflow
Keep both the top and bottom vents all the way open.
- The Goal: You want the smoke to “billow” from the Big Green Egg. Since we aren’t using lump charcoal, we aren’t worried about the vents feeding a massive fire. Instead, the open vents provide the oxygen necessary to keep the pellets smoldering in the tray and ensure a constant stream of fresh smoke passes over the fish.
2. Final Stack Assembly
As we established in the setup, place your convEGGerator (plate setter) in the legs-up position, followed by the stainless steel grill grate on top. This creates a multi-layered barrier between the smoldering pellets and the fish, ensuring that even the tiny amount of heat produced by the tray is dissipated before it reaches the salmon.
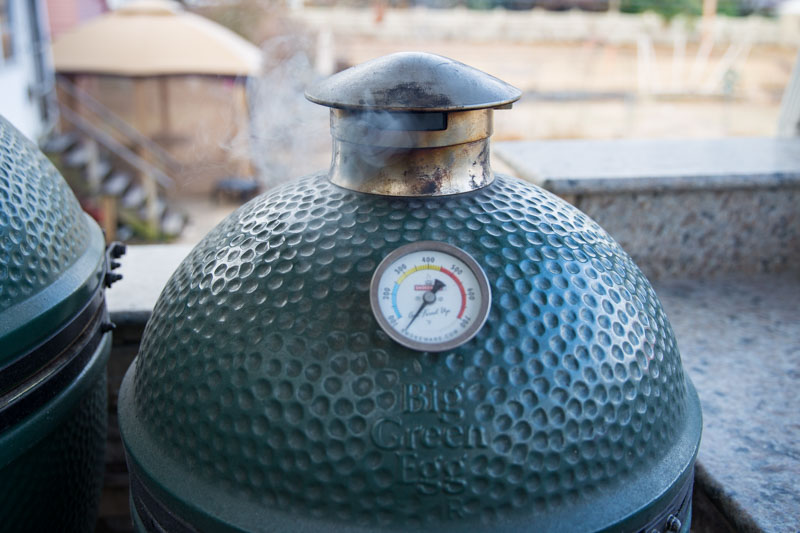
3. The Temperature “Safe Zone”
This is the most critical part of the process: Cold smoking must stay under 90°F (and ideally below 80°F). If the internal temp of the Egg crosses that threshold, the protein structure of the salmon changes, and you’ll end up with a cooked, flaky texture instead of the silky, translucent “Lox-style” finish.
- The Ice Hack: If you are attempting this in weather above 70°F, the ambient temperature combined with the smoldering pellets will likely push the Egg into the “danger zone.” In that case, you must add a tray of ice on top of the convEGGerator. This acts as a heat sink to keep the internal environment chilled.
- The February Advantage: Fortunately for this cook, Mother Nature was on my side. I did this in February with an outside temperature of 32°F. The Big Green Egg acted like a natural refrigerator, and the small ember from the pellet tray wasn’t enough to fight off the winter chill, keeping my internal temps perfectly low without the need for ice.
The Waiting Game
With the vents open and the winter air keeping the Egg chilled, the salmon is now in its happy place. Now we wait for the smoke to work its magic into the flesh.
The Long Bathe: 6 to 12 Hours of Smoke
Once you’ve confirmed the pellet tray is reliably producing that “thin blue smoke” for about 10 minutes, it’s time for the main event. Take your salmon, which should be sitting ready on that wire rack, and place it directly onto the cooking grid.
The Science of the Sit
By keeping the salmon on the rack rather than placing it directly on the Egg’s grate, you ensure that the smoke can circulate under the skin as well as over the flesh. Close the dome and settle in; this is the longest part of the journey.
Depending on your preference for smoke intensity, you want to let the salmon ride for anywhere from 6 to 12 hours.
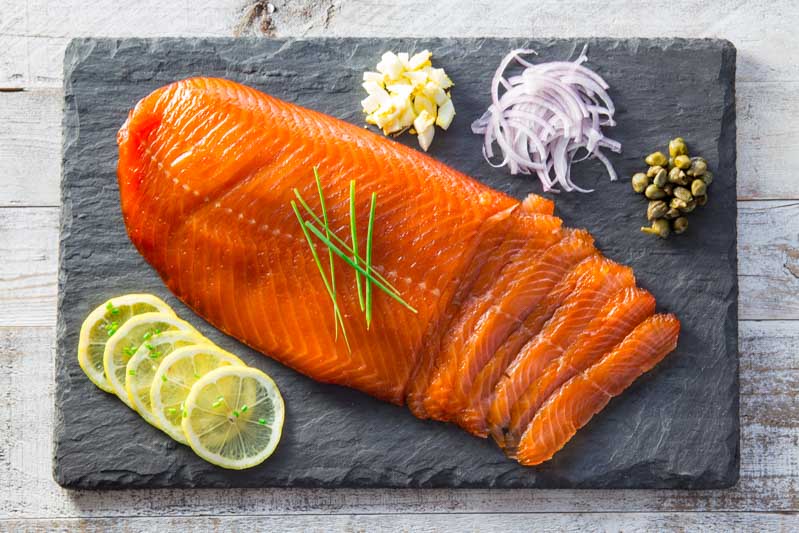
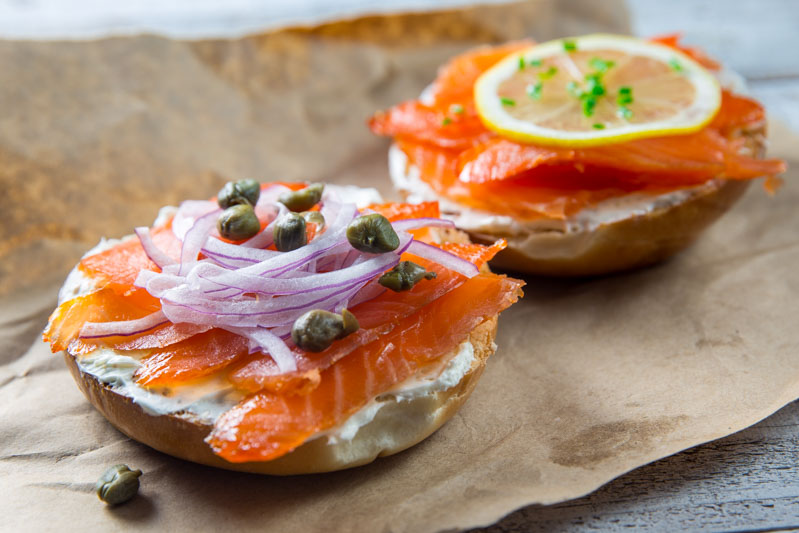
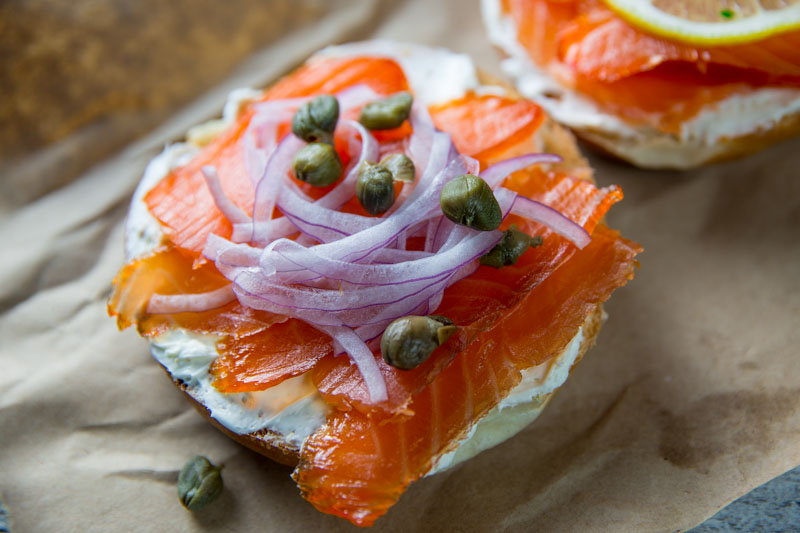
- The 6-Hour Mark: This results in a “Light Smoke.” The flavor will be delicate, allowing the natural richness of the farm-raised salmon and the sweetness of the brown sugar cure to take center stage. This is ideal if you plan on serving the salmon with bold accompaniments like capers or red onions.
- The 12-Hour Mark: This is for the true smoke lovers. A full 12-hour session (which the Kaduf tray can easily handle) produces a deep, traditional cold-smoked profile. The applewood flavor becomes more pronounced, and the exterior of the fish will take on a darker, more burnished hue.
Set It and Forget It
Because we are working in such a low-temperature environment (especially in that 32°F February air), you don’t need to worry about the fish overcooking. Your main job is simply to peek at the top vent every few hours to ensure that “whispy” smoke is still exiting the Egg. If the smoke stops, your pellet maze may have hit a “dead spot” and might need a quick relight.
The Finish Line is Close
As the hours pass, the smoke will permeate the pellicle we worked so hard to create, locking in that signature flavor. But be warned: the hardest part of this recipe isn’t the cure or the setup, it’s the wait that happens after you take it off the grill.
The 8-Hour Sweet Spot
For this particular fillet, the salmon reached its flavor peak right at the 8-hour mark. While the cold smoking window is flexible, 8 hours provides that quintessential “Goldilocks” result: enough smoke to be distinct and sophisticated, but not so much that it masks the buttery, clean taste of the fish.
Endurance of the Pellet Tray
As you can see in the photos, the Kaduf Pellet Smoker Tray was still going strong even after a full workday of smoking. One of the most impressive things about these maze-style smokers is their efficiency. Despite its small footprint, the slow “fuse-style” burn means it barely looks like you’ve made a dent in the pellet supply, yet it has been consistently pumping out that beautiful applewood aroma for hours.
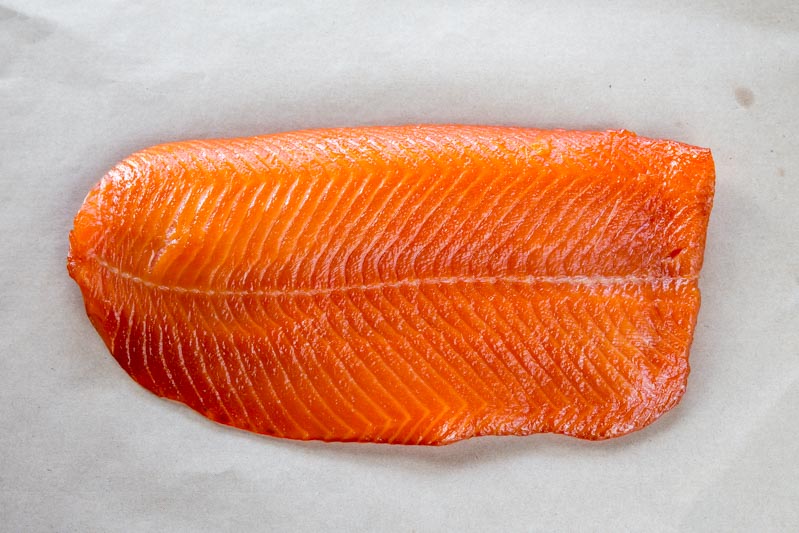
Signs of Success
By the time I decided to pull the salmon, I looked for a few key visual cues:
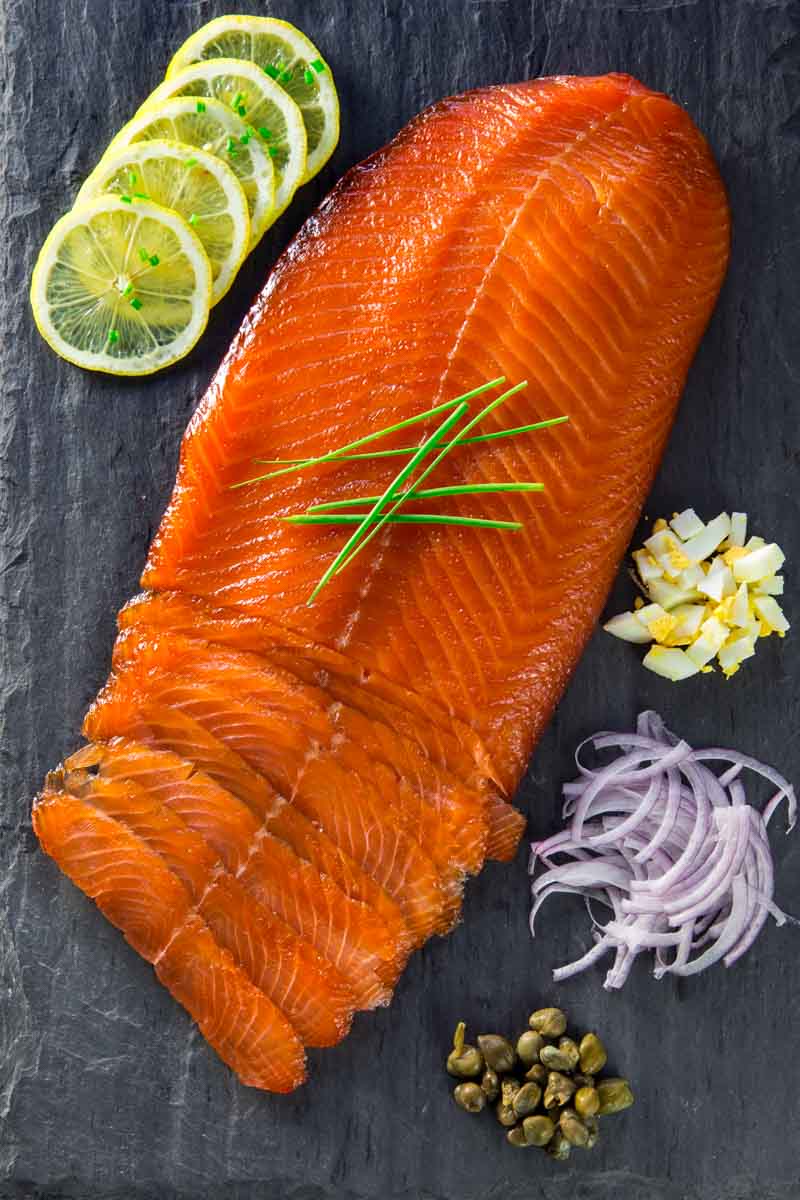
- The “Luster”: The pellicle had transformed from a simple tacky surface to a gorgeous, deep-orange lacquer. It looked almost like a piece of polished maple.
- The Firmness: When gently pressed, the salmon felt firm and dense, a stark contrast to the soft, flabby texture of a fresh, uncured fillet.
- The Aroma: The smell was no longer just “salty” or “sweet”; it had that intoxicating, woody perfume that only comes from a long, slow cold smoke.
Stopping the Clock
At 8 hours, I carefully lifted the wire rack off the Big Green Egg. It’s tempting to grab a knife and start slicing immediately as the smell alone is enough to make you want to skip the final step. But this is where the Charcuterie book teaches us one last lesson in discipline.
The Cold Rest
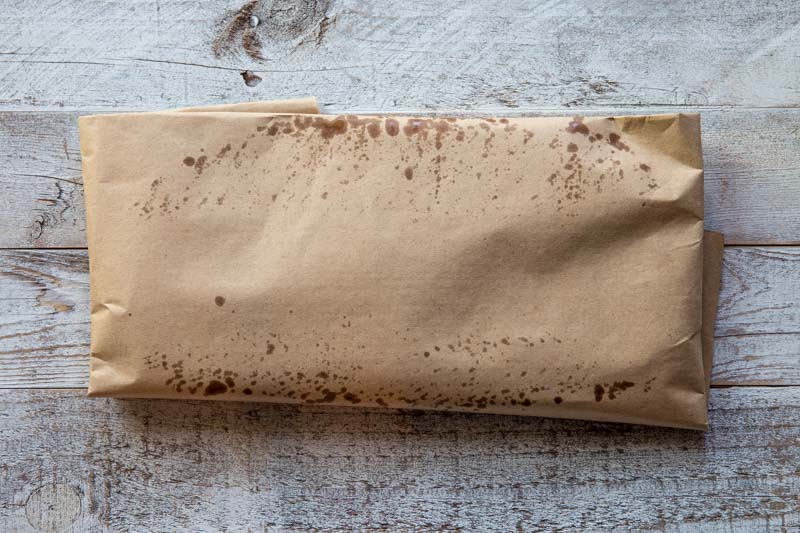
The smoke is currently “heavy” on the surface of the meat. To let those flavors migrate inward and mellow out, the salmon needs to be wrapped in butcher paper and placed back in the fridge for at least 24 hours. This ensures that every bite, from the skin to the surface, tastes exactly the same.
The Final Rest: Locking in the Flavor
Once the salmon has reached its 8-hour peak, it’s time for the final, and perhaps most difficult step: the waiting period. Pull the smoked salmon from the Big Green Egg, still on its wire rack, and bring it inside.
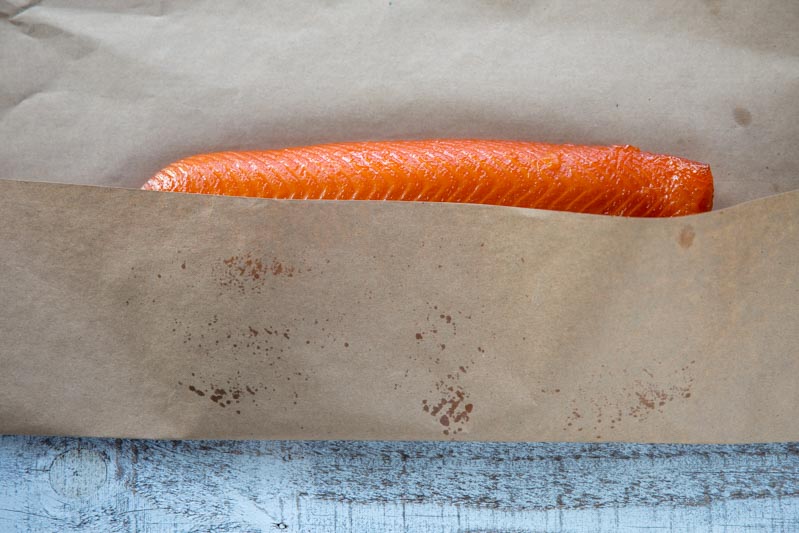
Why We Wrap in Butcher Paper
At this stage, I place the fillet onto a large piece of butcher paper. Unlike plastic wrap, which can sometimes trap excess moisture and make the pellicle soggy, butcher paper allows the fish to “breathe” just enough while still protecting it from the dry air of the refrigerator.
Texture Stabilization: The cold environment of the fridge helps the fats and proteins stabilize further. This makes the salmon much easier to slice into those translucent, paper-thin ribbons that are the hallmark of high-quality lox.
The Mellowing Effect: Right off the smoker, the flavor can be a bit “acrid” or overly intense on the very surface. By wrapping it and letting it sit in the refrigerator overnight, you allow the smoke molecules to migrate from the surface deep into the center of the fillet. This results in a balanced, uniform flavor throughout every bite.
The Next Morning: The Big Reveal
After its overnight rest, the salmon is officially transformed. What started as a standard piece of farm-raised fish is now a home-cured delicacy.
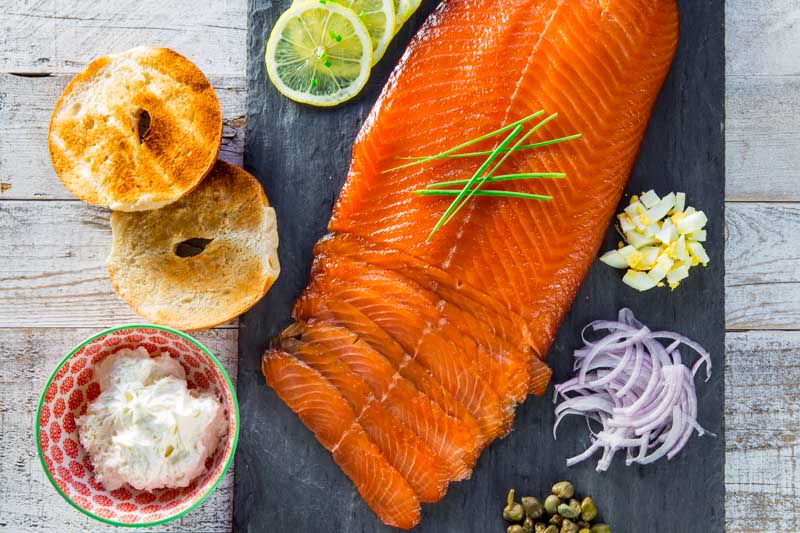
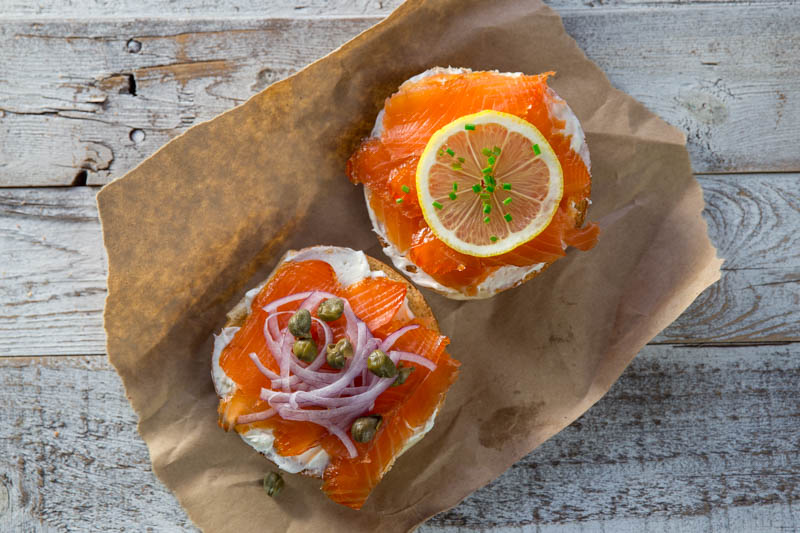
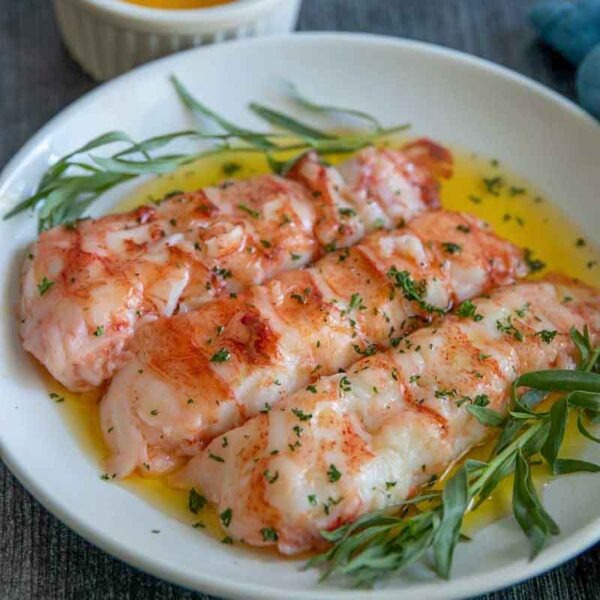
When you’re ready to serve, use a long, thin, sharp carving knife (or a dedicated salmon slicer). Aim for thin slices against the grain, starting at the tail end. Serve it up on a toasted bagel with cream cheese, capers, and red onion, or simply enjoy it on a cracker to let the applewood smoke shine.
Final Thoughts on the Cook
This project was a perfect reminder of why I love the Big Green Egg. It’s not just a grill; it’s a versatile tool that can handle everything from a 700°F sear to a 32°F cold smoke. If you’ve been procrastinating on curing and smoking your own fish, let this be your sign to start. The process is long, but the reward is world-class.

Big Green Egg Cold Smoked Salmon
Ingredients
- 2-3 Lbs. Salmon Filet
- 2 1/2 Cups of Coarse Salt
- 2 1/2 Cups of Brown Sugar
Instructions
- To make the cure:
- Combine the salt and brown sugar in a mixing bowl and mix well.
- Spread 1/3 of the cure over the bottom of a glass baking dish large enough to hold the fish.
- Lay the salmon on top of the cure.
- Spread the remaining cure on top of the salmon to cover the fish completely.
- Cover the dish with plastic wrap and cure the fish in your refrigerator for 24 to 48 hours.
- After 24-48 hours in the cure rinse the cure off the salmon under cold running water.
- Place the salmon in a large bowl and cover with cold water.
- Soak for 30 minutes, then drain well.
- Blot the salmon dry on both sides with paper towels.
- Lay the salmon on a wire rack over a sheet pan and let the salmon dry, uncovered, in the refrigerator over night.
- Fill your Pellet Smoker with Apple Wood pellets and light in one corner.
- Let the flame burn 10 minutes before blowing it out to produce the smoke.
- If you’re smoking the salmon on a warm day (temperature above 70 degrees), arrange the fish on a wire rack over a roasting pan filled with ice. (The fish should be at least 1 inch above the ice.)
- Empty out your fire box and place the Pellet smoker inside.
- Put the ConvEGGerator in the Big Green Egg for indirect cooking.
- Place the salmon on a wire rack in the Big Green Egg on top of the grill grate.
- Now cold smoke the salmon 6-12 hours. You will know when it is ready when it takes on that semi-firm and leathery look.
- Wrap the salmon in butcher paper and let it rest in the refrigerator overnight.
- Slice using a sharp knife diagonal to the fish, cut the salmon into paper-thin slices.
Nutrition information is automatically calculated, so should only be used as an approximation.


This smoked salmon looks incredible, it takes a bit of time (ok…waiting time) to make it, but dang, I am sure it´s worth the wait, thanks for all the great tips to make this smoked salmon, all I was missing was my glass of Sauvignon Blanc 🙂
Thanks Albert! Cheers!
This post is filled with little nuggets of cool technique. Thanks!
Great recipe!! But I have a question: I have smoked this salmon twice now, same salmon, same times/method, same everything except the outside air temperature was about 10°C (18°F) warmer the second time, & it appeared slightly more like cooked salmon, whereas the first time it was really “raw” like “typical” smoked salmon. I smoked it 12hrs through the night. First time was +/-10-11°C (50°F), 2nd time +/-19-20°C (68°F). Surely even at 20°C the salmon would not “cook” in 12hrs. Perhaps I should try with the Ice as suggested, even at lower temperatures (??)
Nevertheless still super tasty, just wondering if anyone had the same experience or has any ideas?
Cheers..
James you are exactly right. The change in outside temp impacted the cold smoke. Next time try the ice as that should offset the outside environment.
Hi Chris,
Going to give your recipe a go this weekend. Thanks for the well described process; it will be my first cold smoke.
Do you think outside temps around the freezing mark and just below will be a problem or affect the results? My setup is the same as yours.
Thanks
Darryl,
Thanks for reaching out. My assumption is it will not impact your cold smoke. If anything it should help. Interested in the results… please report back!
Thanks Chris! Will do.
Sorry for the delay in coming back with the results. The salmon came out perfectly in those conditions. I smoked on the lower side of your recommended time and we were very pleased with the results. Thank you for this excellent article and recipe.
Thanks for remembering and the kind words!
I’ve made this recipe twice now; each time amazing. The second time I smoked the fish for only 6 hours and it was probably the best smoked salmon I’ve had in my entire life. Long and fulfilling process – thanks for posting and can’t wait to try more curing/smoking.
Thanks for the response! I love this recipe and glad you do too.
Hi Chris. I’m new to your site but look forward to many future visits. The site is great and your recipes look awesome! Question. With the cold smoking in warm/hot weather using a large BGE, how would you suggest incorporating the ice into the process? Thanks!
To be direct, I haven’t done cold smoking in warm weather. With that said, I would suspect putting a large tray of ice in the BGE on top of the ConEVVGtor would help keep the environment cool.
…and thank you for the kind words!
Hi Chris, this is very interesting. To be clear, you are not using any charcoal in the BGE?
The pellets provide the smoke, but also are the heat source?
I have a cast iron smoker box I used to use with my gas grill. Can this hold the pellets?
You are correct, the pellets are the heat source as well. This is truly “cold smoking” which is more like curing than it is cooking. With that said, the smoker box should work fine.
Hi Chris. Finally did the salmon a few weeks ago. Live in Canada, 2 hours east of Toronto. Was able to find the Amazon pellet smoker, so very happy with it.
Salmon turned out ok.
Texture was great! Was a little salty though.
Left in the cure for 48 hours. Rinsed, then soaked in cold water for 30 minutes. Rinsed & soaked for another 30 minutes.
For my next attempt I have 2 thoughts:
1) reduce the amount of salt in the cure.
2) only cure for 24 hours.
I’m thinking option 2 is the best solution.
You’re thoughts?
I’d agree with option 2! So, happy you like the recipe.
I’ve done it 3 times now. The best outcome was with curing with just over 24hrs. First I did 48 hrs and it was very salty also. The other was 36 hrs, not as salty, but it didn’t turn out as well because my XL BGE got too hot. I think the pellets caught of fire near the end and raised the temp over 100°F. On the other hand, the “skin” produced during the time when the temperature was too high made what I called salmon jerky that was a big hit with some. I filleted that hard “skin” layer off and served it separately from the rest of the meat.
Sounds fantastic!
Thanks for the input Eric.
I too ended up with the “skin”. Mine came from deciding to do an 8 hour smoke. I filleted it off as well(all mine!).
Next time it’s a 24 hour brine & 6 hour smoke. Stay tuned!
I did another round over the weekend. This time 24hrs in cure and 5hrs in smoke and it turned out really good. I was aiming for 6 hrs in smoke, but my BGE was in direct sunlight and the temp kept creeping up past 90 despite ambient temps near 50. I tried everything to keep temp down, even closing the bottom vent completely and barely cracking the top vent but nothing worked, so I stopped at 5 hrs. Still have a little “skin” but not the jerky texture.
I love that you are incrementally making this recipe better!
When you say close the dome….are you referring to just the lid or do you shut down the vents also? I have a 2xl. Outside temp was 77 here in Arizona and I had a tray full or ice and ice surrounding and had an awful time keeping the temp down…pretty much think it cooked…not discouraged though as I am brand new to the big green egg.
No, I mean just close the dome. The wording above tells you how to set the vents (Keep the top and bottom vents all the way open and let the smoke billow from the Big Green Egg. Place your ConvEGGerator legs up and then the grill grate on top to complete your set up)
Remember this is a COLD SMOKE so if you are doing this in weather above 70° Fahrenheit you need to add a tray of ice to your environment to keep temp under 90°. F
I just finished smoking my. It looks fantastic! I’m trying to perfect it before thanksgiving. If this one is as good as it looks, how long will it last? I can get my hands on a vacuum sealer to prolong its life.
You will need to vacuum seal what you don’t eat for sure. Should last a few weeks sealed.
Probably a dumb question, but you’ve taken the skin off prior to the curing correct?
Correct, skin off.
Smoking 2 filets now on our Kamado Joe grill (just like the BGE). I bribed for 22.5 hours (only because of the schedule we had that day), rinsed and soaked in cold water for 30 mins and now smoking. Thinking of going for 6 hours and checking then. Hoping for the best! But so far, very easy. Just takes a bit of planning with time beforehand.
Sounds like a good plan. Let me know how it turns out.