This post contains affiliate links. Please see our disclosure policy.
There is something about a snowstorm that demands a kitchen full of aromatic warmth. On a recent Monday night, as the snow began to blanket Northern Virginia, I found myself sidelined from my usual post at the Big Green Egg. While I originally had visions of adapting a new recipe for a wood-fired cook, the weather had other plans, forcing me to keep the “BBQ Buddha” kitchen strictly indoors.
The inspiration for this cook came from my friend Toan, who shared a video from Helen’s Kitchen featuring a traditional Vietnamese Ginger Chicken (Ga Kho Gung). It was exactly what the night called for: an authentic, soul-warming dish that relies on simple pantry staples to create a complex explosion of flavor.
Even without the charcoal, this recipe fits perfectly into the “Grilling by Feel” philosophy. It’s all about managing the heat, watching the sugar transform into a deep amber caramel, and knowing exactly when that sauce has reached its peak “sticky” potential. If you are looking for a dish that brings a vibrant, Southeast Asian flare to a cold winter night, this is it. Now sit back, grab your favorite beverage, and enjoy this post for Caramelized Vietnamese Ginger Chicken: A Sweet and Spicy Braise.
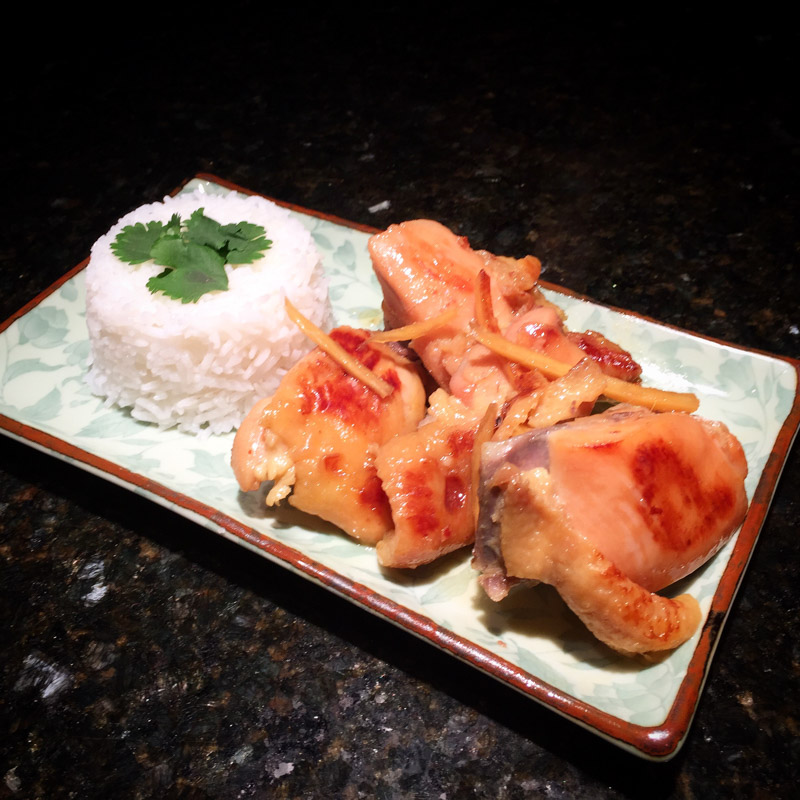
Table of Contents
- Step 1: The Butcher Prep (and a Knife Safety Warning)
- Step 2: The Aromatics and the 30-Minute Marinate
- Step 3: Building the Caramel Foundation
- Step 4: The Caramel Sear
- Step 5: The Braising Liquid
- Step 6: The Boil and the Simmer
- Step 7: The Final Reduction and Serving
- Caramelized Vietnamese Ginger Chicken: A Sweet and Spicy Braise Recipe
Get My NEW Book
The Ultimate Big Green Egg Cookbook

Step 1: The Butcher Prep (and a Knife Safety Warning)
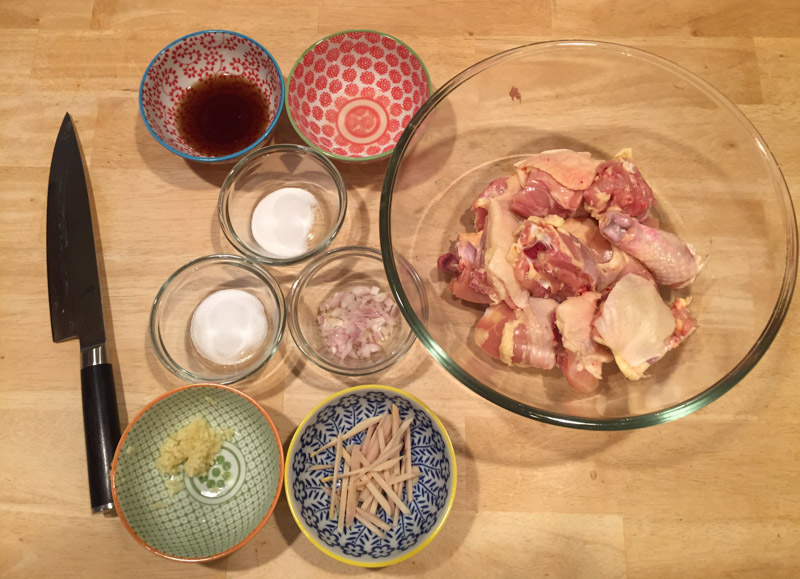
For this recipe, I went with whole chicken thighs and legs. To get that authentic Vietnamese “clay pot” texture, you really want the meat chopped into smaller, bite-sized pieces. Keeping the bone in is non-negotiable here; it provides a richness to the sauce that boneless meat just can’t replicate.
However, I learned a very practical lesson during this prep. I don’t own a heavy meat cleaver yet, so I reached for my Chef’s knife to get the job done. While I eventually got the hang of breaking down the joints and bone, my knife didn’t fare as well. By the time the chicken was ready, the blade was effectively retired.
Pro Tip: Do yourself (and your cutlery) a favor. If you don’t own a heavy-duty cleaver, ask your butcher to “bone-in chop” the thighs and legs into 1 or 2 inch pieces for you. It saves your knives and ensures you get clean cuts without bone splinters. A meat cleaver is officially the next item on my shopping list!
Cooking by Feel: The “Bone-In” Advantage
Using bone-in dark meat is what makes this dish legendary. As the chicken braises, the marrow and collagen from the bones meld with the sugar and fish sauce. This is the secret to a sauce that isn’t just sweet, but has a deep, velvety body that coats your palate.
Step 2: The Aromatics and the 30-Minute Marinate
While the chicken is prepped and waiting, it is time to build the flavor profile. In this dish, ginger isn’t just a seasoning; it’s a central character.
- The Ginger “Matchsticks”: Take a large piece of fresh ginger, peel it, and slice it into very thin, elegant strips (julienne). You want these thin “matchsticks” so they soften during the cook but still provide a textured, spicy bite in the final dish.
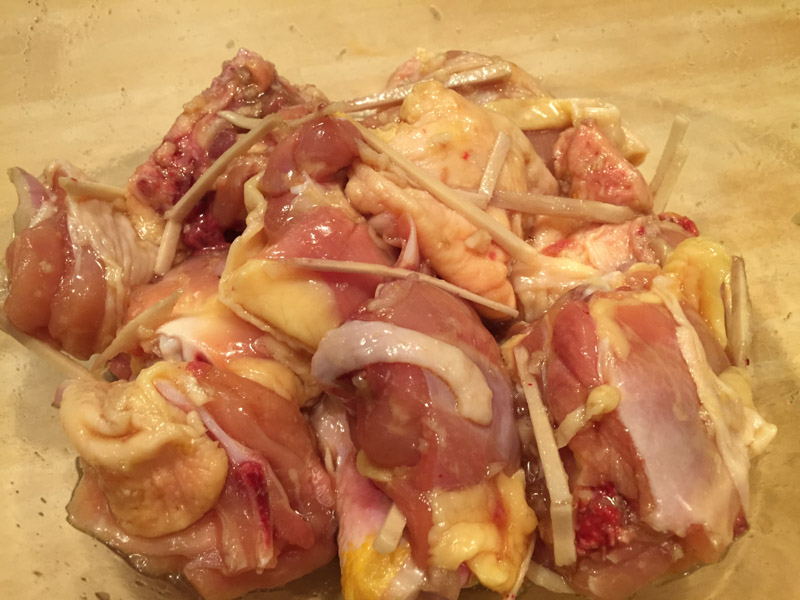
- The Marinade: In a large bowl, combine your chopped chicken and the ginger strips with the following:
- Minced Garlic and Chopped Shallots: For a savory, aromatic base.
- Fish Sauce and Chicken Stock: For that deep, umami saltiness.
- Sugar, Salt, and Ground Pepper: To balance the heat and enhance the savory notes.
- The Wait: Mix everything thoroughly and let it marinate for at least 30 minutes.
Cooking by Feel: The Power of the Soak
Letting the chicken sit for 30 minutes does more than just flavor the surface. The fish sauce acts as a light brine, helping the meat retain moisture even as we move into the high-heat caramelization phase. You’ll notice the aromatics, especially the ginger, start to perfume the meat, creating a scent that will fill your kitchen long before the stove is even on.
The “So What?” — Why Julienne the Ginger?
Many recipes call for grated ginger, but for an authentic Ga Kho Gung, the thin strips are essential. Grated ginger disappears into the sauce, but the julienned strips caramelize alongside the chicken. They absorb the sweet and salty glaze, turning into little “flavor bombs” that provide a bright, spicy contrast to the rich dark meat.
Step 3: Building the Caramel Foundation
With the chicken well-marinated, it is time to move to the stove. This is the stage where the dish gets its soul—the Nước Màu.
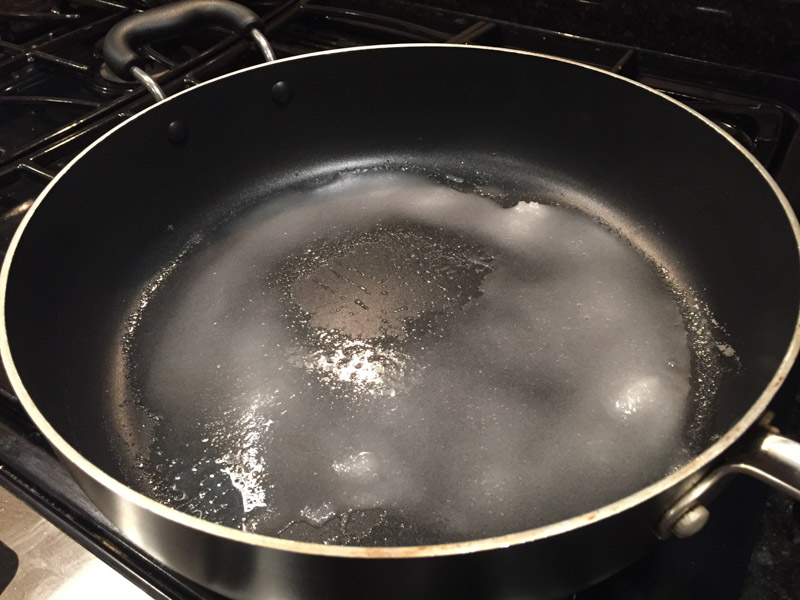
- The Setup: Take a large, heavy-bottomed pan or wok and add the Canola oil and the sugar.
- The Heat: Turn the burner to medium heat. Spread the sugar out so it is evenly distributed in the oil.
- The Transformation: Now, you wait. You are looking for the sugar to melt down and begin its chemical transformation from white crystals to a rich, liquid gold.
Cooking by Feel: The “Amber” Window
This is the most critical moment for your eyes and nose. You want to watch the sugar closely as the color deepens. The goal is to catch it right as it turns a dark amber… think of the color of a shiny copper penny.
If you pull it too early, the dish will be cloyingly sweet. If you wait too long and it turns black, it will be unpleasantly bitter. This is the essence of “cooking by feel”: trust your eyes to find that sweet spot where the sugar smells toasted and looks like molten glass.
Step 4: The Caramel Sear
As the sugar transitions from a golden liquid to a deep, bubbling brown, the clock starts ticking. This is the moment to move from observation to action.
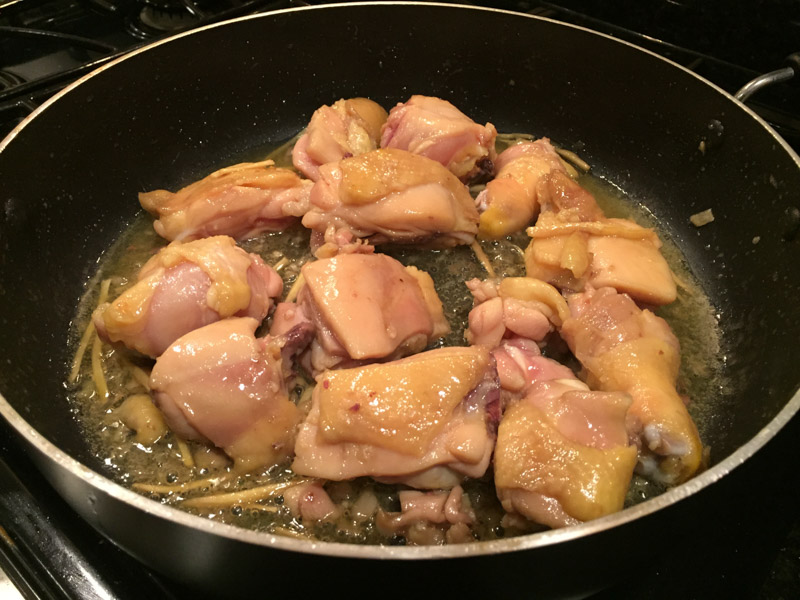
- The Drop: The second the sugar hits that dark amber color and starts to look thick and sticky, add your marinated chicken pieces to the pan.
- The Fast Mix: Work quickly and thoroughly. Use a sturdy spatula to toss the chicken, ensuring every piece is immediately coated in the hot caramel.
- The Searing Phase: Keep the chicken moving. You want to stir frequently as the meat sears. This prevents the sugar from overcooking into hard, burnt “candied” bits and instead allows it to lacquer onto the skin and meat.
- The Result: Continue this high-energy stir until the chicken has a beautiful, bronzed sear and no pink is visible on the surface.
The “So What?” — Why Move So Fast?
The sugar is at its most volatile right when it caramelizes. By adding the chicken and stirring immediately, you are using the moisture from the meat and the marinade to “quench” the caramel. This stops the sugar from burning while simultaneously using that intense heat to sear the aromatics and the chicken, creating a deep crust of flavor that you just can’t get from a standard braise.
Step 5: The Braising Liquid
After about 10 minutes of searing and stirring, your chicken should be beautifully bronzed and the aromatics should be smelling incredible. Now, it is time to introduce the moisture that will tenderize the meat and create your sauce.
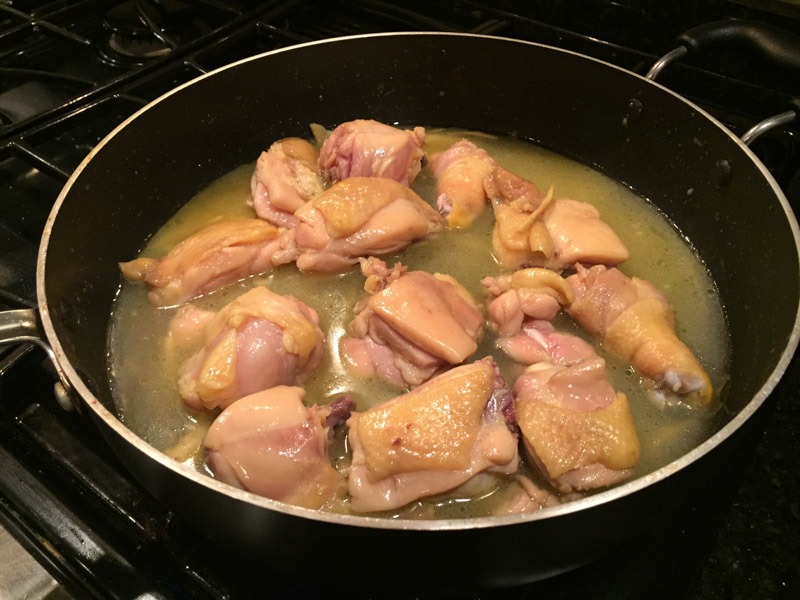
- The Blend: For this recipe, I used a combination of 2/3 coconut water and 1/3 chicken stock.
- The Pour: Add the liquid to the pan. You’ll see the dark caramel on the bottom of the pan begin to dissolve into the liquid, turning it into a rich, golden-brown broth.
- The Deglaze: As you pour the liquid in, use your spatula to scrape the bottom of the pan. This ensures all those flavorful, caramelized bits (the fond) are incorporated back into the sauce.
The “So What?” — Why the 2/3 to 1/3 Split?
Using mostly coconut water is a classic Vietnamese technique. Coconut water provides a delicate, natural sweetness and specific enzymes that help tenderize the chicken. Adding a 1/3 portion of chicken stock brings in a savory, salty backbone that keeps the dish from becoming too sweet. This ratio is the secret to a perfectly balanced “salty-sweet” profile.
Step 6: The Boil and the Simmer
Now that the liquids are in, you want to bring the flavors together and start the cooking process in earnest.
- Bring to a Boil: Turn the heat up just enough to bring the coconut water and chicken stock to a rolling boil. This ensures the caramel is fully incorporated and the temperature is uniform throughout the pan.
- The Adjustment: Once it hits that boil, lower the heat to medium.
- The Braise: You want a steady, active simmer. This isn’t a “low and slow” slow-cooker vibe; you want enough heat to keep the liquid moving so it can begin to reduce while the chicken cooks through.
Cooking by Feel: The “Steady Simmer”
Keep an eye on the bubbles. You are looking for a consistent, gentle agitation across the surface of the liquid. This medium heat is the “Goldilocks” zone—it is hot enough to break down the chicken and infuse it with ginger, but not so aggressive that it will toughen the meat before the sauce has a chance to thicken.
Step 7: The Final Reduction and Serving
With the heat set to medium, the final transformation begins. This is where patience pays off and the “braise” officially becomes a “glaze.”
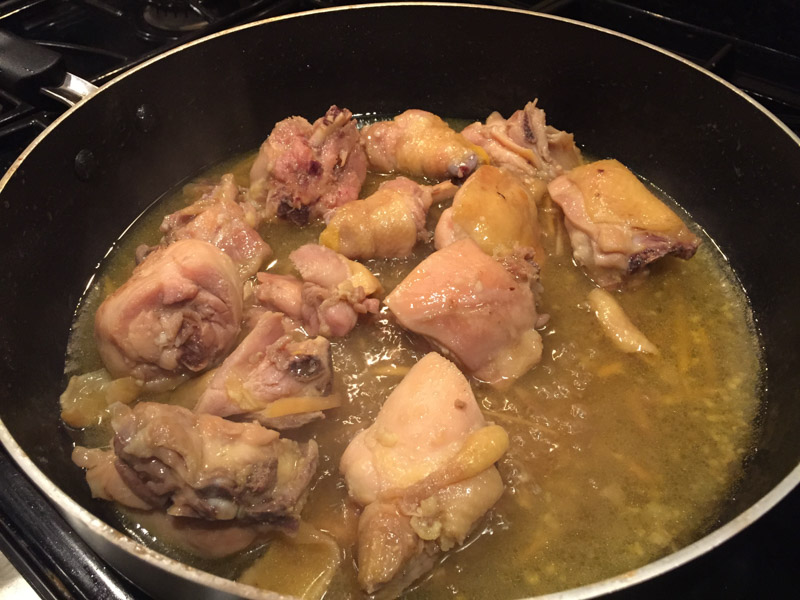
- The Open Pan: Keep the pan uncovered. This is essential because we want the steam to escape, allowing the coconut water and stock to evaporate and concentrate.
- The 30-Minute Reduction: Let the chicken cook for about 30 minutes. As the minutes pass, you will see the liquid level drop and the color deepen from a light gold to a dark, syrupy amber.
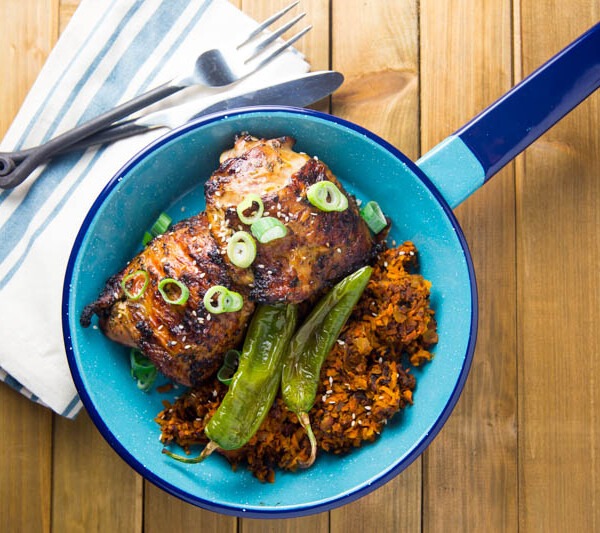
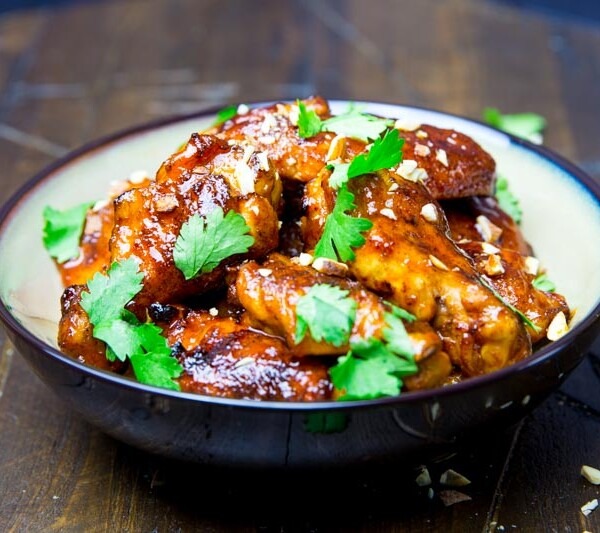
- The Sticky Finish: You’ll know you are done when the sauce is no longer a liquid but a thick, “sticky” coating that clings to every piece of chicken and ginger.
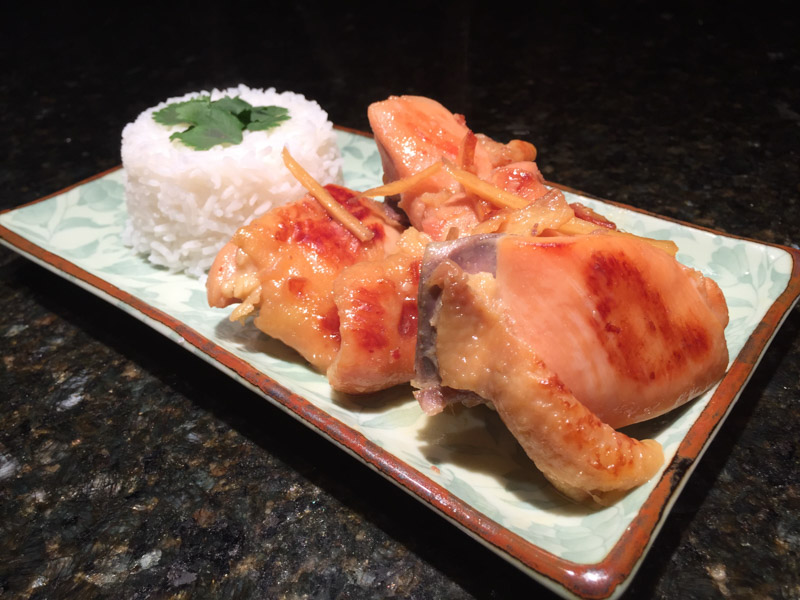
- Serve: Once the chicken is fully lacquered in that sweet and savory sauce, pull it off the heat immediately and plate it up.
Cooking by Feel: The “Bubble” Watch
As you approach the end of that 30-minute window, watch the bubbles in the pan. They will change from thin, watery bubbles to large, slow-popping, glossy ones. This is your cue that the sugars have concentrated and the sauce has reached peak stickiness. Give it a final toss to make sure the ginger matchsticks are evenly distributed.
The “So What?” — The Perfect Bowl
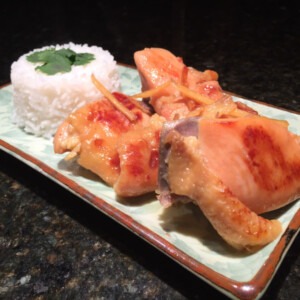
This chicken is bold, so it needs a neutral partner. Serve it over a generous bed of steamed jasmine rice. The rice acts as a sponge for any of that extra ginger-caramel nectar left in the pan. To brighten it up, you can top it with some fresh cilantro or a few slices of bird’s eye chili if you want an extra kick of heat.
Caramelized Vietnamese Ginger Chicken: A Sweet and Spicy Braise
Ingredients
The Meat:
- 2 pounds Chicken Thighs and Legs, Bone-in, chopped into 1-2 inch pieces
The Aromatics:
- 1 piece Large Fresh Ginger, peeled and julienned into thin matchsticks
- 3 cloved Garlic, minced
- 2 Shallots, finely diced
The Marinade:
- 3 tbsp fish sauce
- 1 tbsp sugar
- 1/2 tsp salt
- 1/2 tsp pepper
- 1/4 cup chicken stock
The Caramel Base:
- 2 tbsp vegetable oil
- 2 tbsp sugar
The Braising Liquid:
- 2/3 cup Coconut water
- 1/3 cup Chicken Stock
Instructions
- The Prep: Use a heavy meat cleaver to chop the chicken thighs and legs into bite-sized, bone-in pieces.
- The Marinade: In a large bowl, combine the chicken, ginger matchsticks, garlic, shallots, fish sauce, sugar, salt, pepper, and the 1/4 cup of chicken stock. Mix well and let marinate for at least 30 minutes.
- The Caramel: Add the canola oil and sugar to a large, heavy pan over medium heat. Watch closely as the sugar melts. Once it turns a deep amber brown, it is ready.
- The Sear: Immediately add the marinated chicken and ginger to the pan. Stir quickly and frequently for about 10 minutes to coat the meat in the caramel and sear the outside until no longer pink.
- The Liquid: Pour in the 2/3 cup coconut water and the remaining 1/3 cup chicken stock. Bring the mixture to a boil.
- The Simmer: Reduce the heat to medium. Keep the pan uncovered and let it simmer for about 30 minutes.
- The Glaze: As the liquid reduces, the sauce will thicken into a dark, gooey glaze. Once the chicken is thoroughly coated and the sauce is sticky, remove from the heat.
- Serve: Garnish with fresh cilantro or sliced chilies if desired. Serve immediately over a warm bed of jasmine rice.
Nutrition information is automatically calculated, so should only be used as an approximation.