This post contains affiliate links. Please see our disclosure policy.
Learning How to Master Two-Zone Grilling: Reverse Seared Picanha on the Big Green Egg is the fundamental skill that separates a backyard cook from a true pitmaster. While the Big Green Egg excels at holding steady temperatures, creating distinct hot and cool zones within a circular firebox can be a challenge without the right tools. You should view the addition of a Kick Ash Basket and Adjustable Divider as the ultimate upgrade for your ceramic grill. This process provides a way for you to sear a steak over direct flame while simultaneously roasting it on the indirect side. You will find that using a two-zone setup is the most effective method for achieving an edge-to-edge medium-rare finish on a prized cut like Picanha.
The secret to a perfect reverse sear lies in the separation of your fuel source. You should avoid the traditional method of spreading charcoal across the entire grate when you intend to slow-roast before searing. Because the Big Green Egg retains heat so efficiently, a divided firebox allows you to gently bring your meat to temperature before finishing with a high-heat crust. This technique ensures that your steak remains incredibly juicy while developing a professional-grade char. Prepare to organize your firebox and follow our definitive guide to the Kick Ash method of reverse searing.
Table of Contents
- Step 1: Implementing the Kick Ash Basket System
- Step 2: Installing the Kick Ash Can for Easy Disposal
- Step 3: Configuring the Two-Zone Firebox with the Divider
- Step 4: Clearing the Firebox for the Kick Ash Setup
- Step 5: Aligning the Kick Ash Can with the Draft Door
- Step 6: Seating the Charcoal Basket for Maximum Airflow
- Step 7: Loading the Fuel and Lighting the Two-Zone Fire
- Step 8: Starting the Indirect Roast
- Step 9: Monitoring the Roast and Preparing for the Sear
- Step 10: The High-Heat Direct Sear and Final Rest
Get My NEW Book
The Ultimate Big Green Egg Cookbook

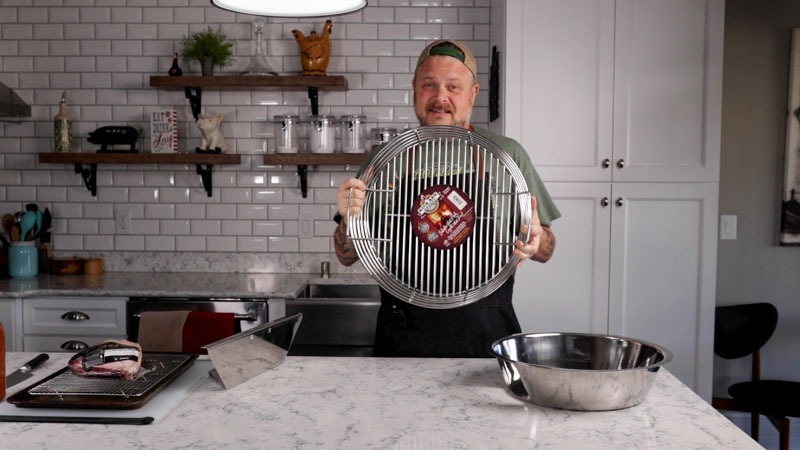
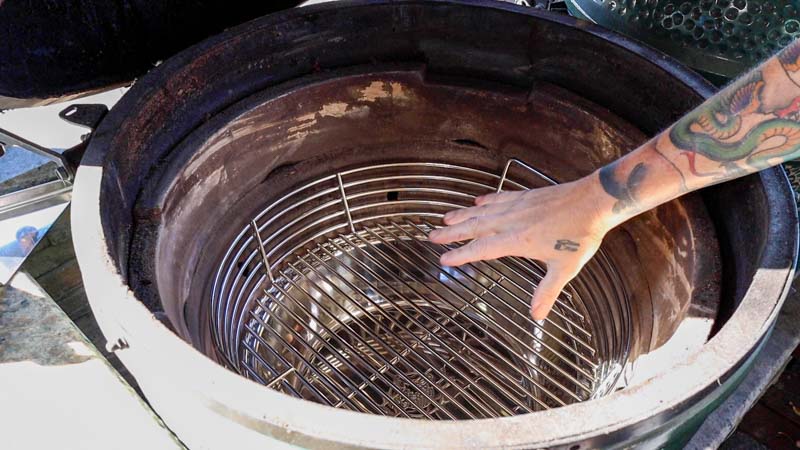
Step 1: Implementing the Kick Ash Basket System
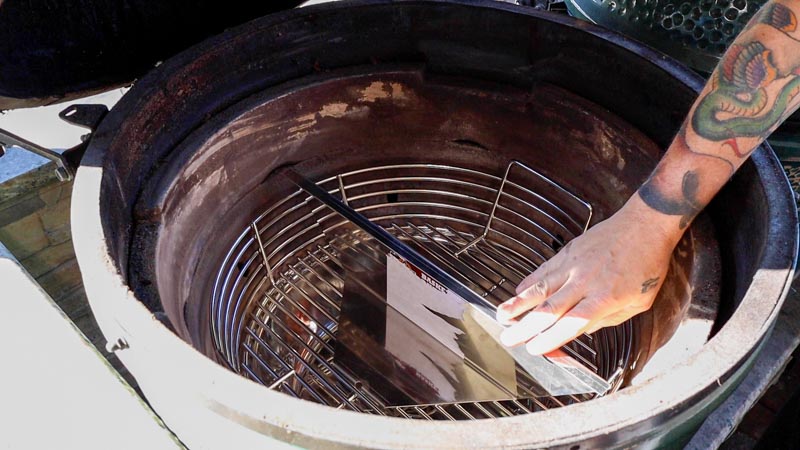
Mastering a professional-grade fire starts with maximizing the airflow within the ceramic walls of your grill. You should start by replacing the standard cast iron charcoal grate with a high-quality Kick Ash Basket to ensure your fuel remains free of debris. This process provides a way for you to “shake” the basket after every cook to remove spent ash while preserving your usable lump charcoal. You will find that keeping the air vents clear is the most effective method for maintaining precise temperature control on the Big Green Egg.
To achieve the best results, you must eliminate the tedious task of raking through old coals to find air pockets. You should simply lift the basket by its heavy-duty handles to sift out the dust that typically clogs the bottom of the firebox. This technique ensures that your Two-Zone Grilling setup receives a consistent stream of oxygen for a clean and efficient burn. Because a clean fire is the foundation of great barbecue, this simple upgrade transforms your pre-cook routine into a five-second task. This process allows you to spend more time focusing on the Picanha and less time on grill maintenance. Once the basket is clear, you should prepare the interior of the Egg for the next stage of the setup.
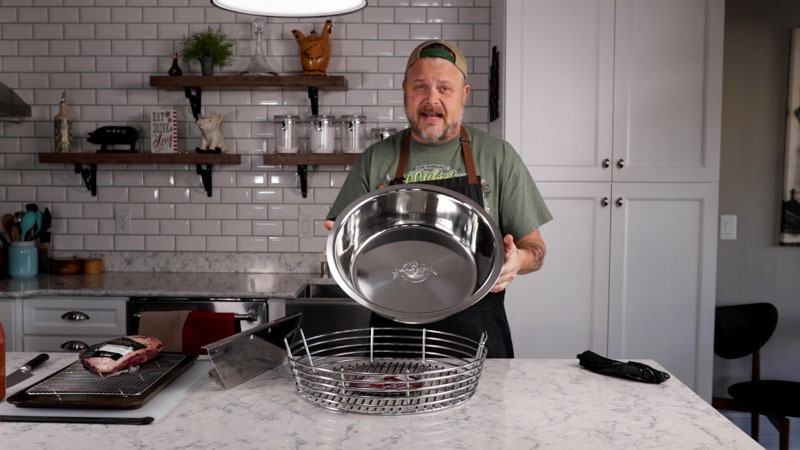
Step 2: Installing the Kick Ash Can for Easy Disposal
Mastering a professional-grade cleanup requires you to eliminate the mess that typically accumulates at the base of the Big Green Egg. You should start by sliding the Kick Ash Can into the bottom of the firebox with the handle facing toward the draft door. This process provides a way for all the ash from your charcoal shake to fall directly into a removable container. You will find that this setup is the most effective method for keeping your grill floor pristine without using a shop vac.
To achieve the best results, you must ensure the can sits level beneath the basket to catch every particle of spent fuel. You should simply pull the can out and dump the debris into a metal bucket once the cook is finished and the coals are cool. This technique ensures that your Two-Zone Grilling environment remains free of the fine dust that can choke your fire during a high-heat sear. Because the collection process is now contained, you avoid the cloud of ash that often accompanies manual raking. This process allows you to maintain a high-performance grill with minimal effort between your Picanha cooks. Once the can is in place, you should prepare to divide your firebox for the reverse sear.
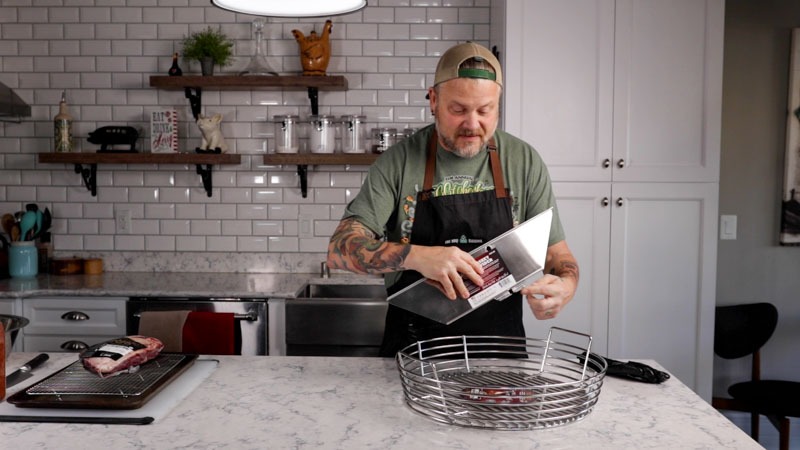
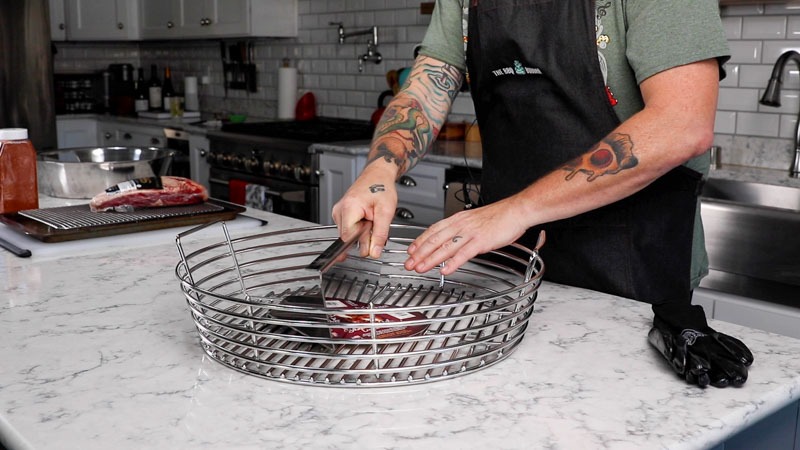
Step 3: Configuring the Two-Zone Firebox with the Divider
Mastering a professional-grade reverse sear requires you to physically separate your fuel source from your roasting zone. You should start by sliding the Kick Ash Adjustable Divider into the center of your basket to create two distinct halves. This process provides a way for you to establish a high-heat “hot side” and a gentle “cool side” within the same cook. You will find that having a dedicated indirect zone makes the low-and-slow portion of the Picanha cook much easier to manage than traditional methods.
To achieve the best results, you must lock the divider firmly in place before adding your lump charcoal. You should fill only one side of the basket to create a concentrated heat source that radiates across the Big Green Egg XL. This technique ensures that your Two-Zone Grilling setup is ready for both the initial roast and the final screaming-hot sear. Because the divider prevents the coals from shifting, you maintain a reliable “safe zone” for the meat throughout the entire cook. This process allows you to walk through a sample cook with full confidence in your temperature control. Once the divider is secure and the charcoal is lit, you should prepare to monitor your dome temperature for the perfect start.
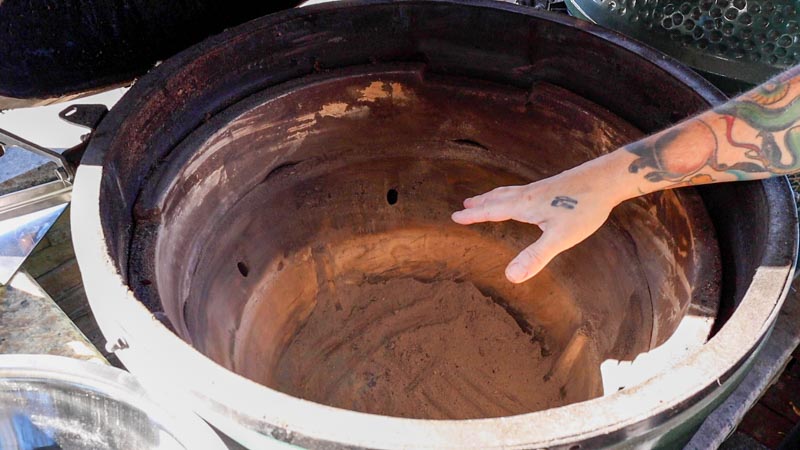
Step 4: Clearing the Firebox for the Kick Ash Setup
Mastering a professional-grade fire requires you to start with a pristine environment inside the ceramic walls of your grill. You should start by performing a complete deep clean of your Big Green Egg to remove every bit of old ash and stubborn debris from the firebox. This process provides a way for the fresh air to circulate freely from the bottom draft door through your new basket system. You will find that a clean slate is the most effective method for achieving the rapid temperature spikes needed for a world-class Reverse Seared Picanha.
To achieve the best results, you must remove the standard cast iron charcoal grate that originally came with your Egg. You should lift out the heavy grate and set it aside because the Kick Ash Basket will now handle all of your fuel containment needs. This technique ensures that your Two-Zone Grilling setup is not hindered by the small, clogged holes of the traditional grate design. Because airflow is the lifeblood of your fire, clearing out the bottom of the grill prevents any hidden blockages during the high-heat sear. This process allows your new accessories to sit perfectly level for a stable and predictable cook. Once the firebox is empty and the cast iron is gone, you should prepare to install the collection can.
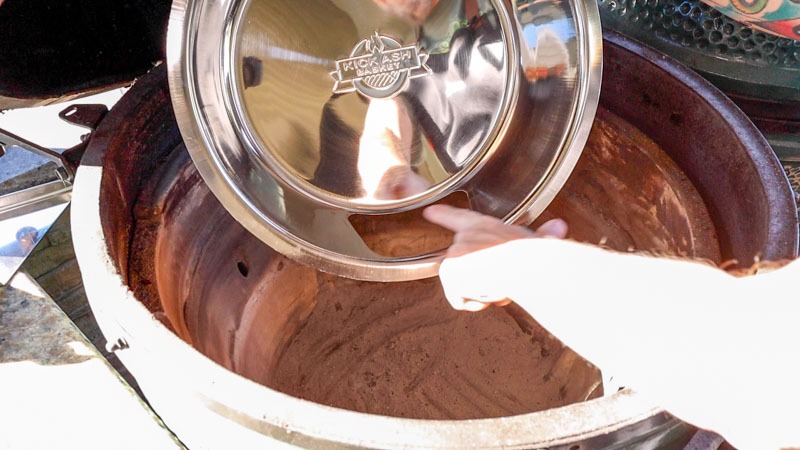
Step 5: Aligning the Kick Ash Can with the Draft Door
Mastering a professional-grade airflow requires you to align every component within the Big Green Egg for maximum intake. You should start by placing the Kick Ash Can directly on the floor of the ceramic base. This process provides a way for the air to flow smoothly through the bottom vent without hitting a metal wall. You will find that the specific orientation of the can is the most critical element for maintaining a responsive fire during your high-heat Picanha sear.
To achieve the best results, you must ensure that the open side of the can faces the direction of the bottom draft door. You should check the alignment carefully to confirm that the intake air can travel straight into the fuel bed. This technique ensures that your Two-Zone Grilling setup remains pressurized and ready to climb to 500°F or more. Because any obstruction at the intake level can cause a sluggish fire, a perfectly aligned can is your best defense against temperature drops. This process allows the oxygen to reach the charcoal basket instantly when you open the vents for the final sear. Once the can is seated and aligned, you should prepare to drop in the basket and the divider.
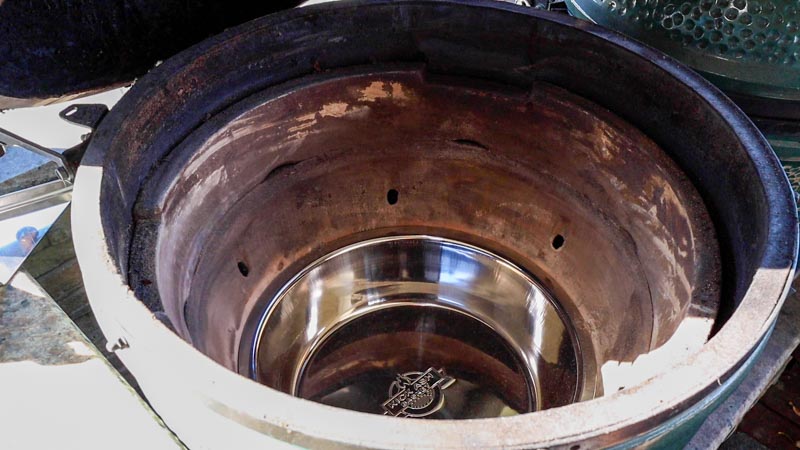
Step 6: Seating the Charcoal Basket for Maximum Airflow
Mastering a professional-grade fire requires you to create a stable and elevated platform for your lump charcoal. You should start by placing the Kick Ash Basket directly on top of the previously aligned collection can. This process provides a way for the fuel to sit high enough above the draft door to receive a constant stream of oxygen. You will find that the specialized clearance between the basket and the floor of the Big Green Egg is the most effective method for maintaining a clean burn.
To achieve the best results, you must ensure that the basket sits level and centered within the firebox. You should check that the handles are easily accessible so you can lift and shake the coals after your Picanha cook is complete. This technique ensures that your Two-Zone Grilling environment remains responsive to every minor adjustment of the bottom draft door. Because the basket replaces the traditional cast iron grate, you no longer have to worry about small holes becoming clogged with tiny charcoal shards. This process allows the heat to rise uniformly toward your cooking grid for a perfectly balanced reverse sear. Once the basket is seated firmly on the can, you should prepare to install the divider and load your fuel.
Step 7: Loading the Fuel and Lighting the Two-Zone Fire
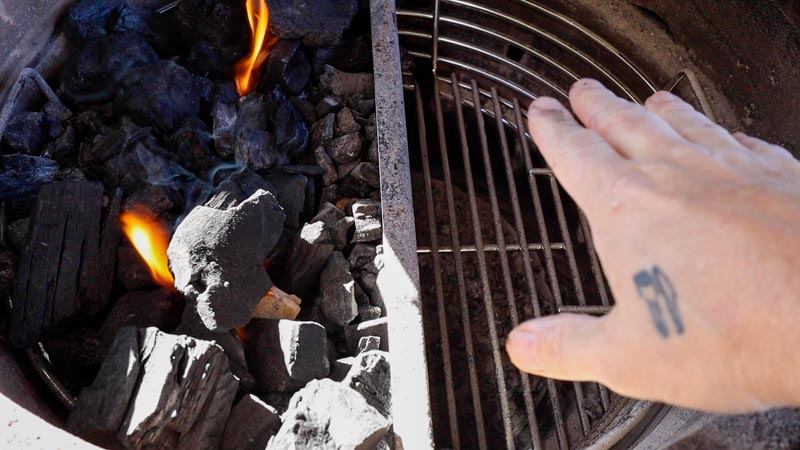
Mastering a professional-grade sear requires you to concentrate your fuel source to create a powerful thermal gradient. You should start by sliding the Kick Ash Divider into the center of the basket and locking it firmly into place. This process provides a way for you to fill exactly one half of the Big Green Egg with high-quality lump charcoal for a dedicated direct heat zone. You will find that keeping the other side of the basket empty is the most effective method for creating a safe roasting area for your Picanha.
To achieve the best results, you must ensure that your charcoal is lit and stabilized for a high-heat cook. You should use a natural fire starter to ignite the center of the coal pile until the embers begin to glow. This technique ensures that your Two-Zone Grilling setup develops a consistent heat source that radiates across the cooking grid. Because the divider prevents the coals from shifting toward the indirect side, you maintain a perfectly balanced environment for the reverse sear. This process allows the grill to climb to your target temperature while the indirect zone remains significantly cooler. Once the fire is established and the smoke runs clear, you should prepare to place the meat on the grill.
Pitmaster’s Note: Optimizing Airflow and Coal Placement
Achieving a screaming hot fire requires you to pay close attention to the structural design of your Kick Ash Divider. You should place your lump charcoal on the side of the divider that is opposite the stabilizing bar at the bottom of the basket. This process provides a way for the intake air to move upward through the coals without any metal obstruction from the divider frame. You will find that even a small change in coal placement can significantly impact how quickly your Big Green Egg reaches searing temperatures. Because I once inadvertently blocked the airflow by putting the lump on the “bar side,” I learned that maximum oxygen flow is the key to a responsive fire. This technique ensures that your Reverse Seared Picanha benefits from the most efficient heat possible.
Step 8: Starting the Indirect Roast
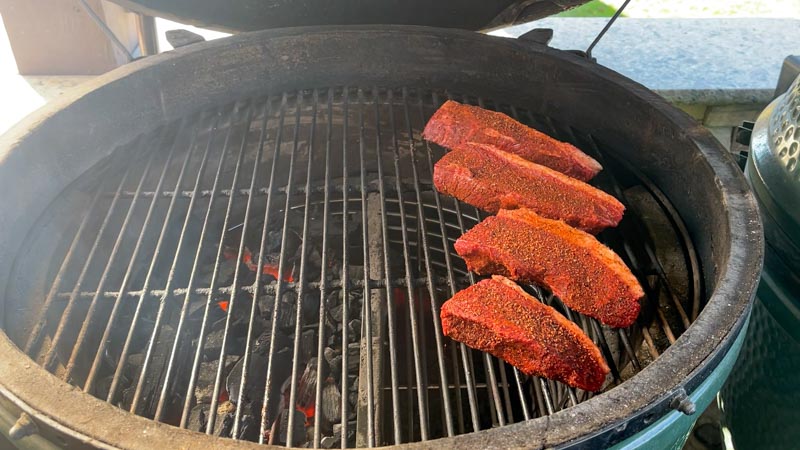
Mastering a professional-grade reverse sear requires you to resist the urge to cook the meat over high heat immediately. You should start by placing your stainless steel cooking grate over the Big Green Egg once the dome temperature has stabilized at a steady 300°F. This process provides a way for the Picanha to roast gently in the indirect zone away from the active pile of lump charcoal. You will find that keeping the meat on the “cool” side of the divider is the most effective method for rendering the fat cap without scorching the exterior.
To achieve the best results, you must monitor the internal temperature closely while the convective heat of the ceramic walls does the work. You should position the steaks so that the thickest parts are furthest from the charcoal line to ensure a perfectly even cook. This technique ensures that your Two-Zone Grilling setup functions like a high-end convection oven for the first phase of the process. Because the Kick Ash Divider keeps the fuel concentrated, the ambient temperature on the indirect side remains predictable and stable. This process allows the smoky essence of the charcoal to penetrate the beef as the internal temperature begins its slow climb. Once the steaks are in place and the lid is closed, you should prepare your instant-read thermometer for the first check.
Step 9: Monitoring the Roast and Preparing for the Sear
Mastering a professional-grade internal temperature requires you to use a high-quality instant-read thermometer throughout the indirect phase. You should cook the Picanha steaks on the cool side of the divider until they measure exactly 115°F in the thickest part of the meat. This process provides a way for the beef to reach its target doneness slowly without the muscle fibers tightening and squeezing out the juices. You will find that flipping the steaks once in the opposite direction of the heat source is the most effective method for ensuring an even roast.
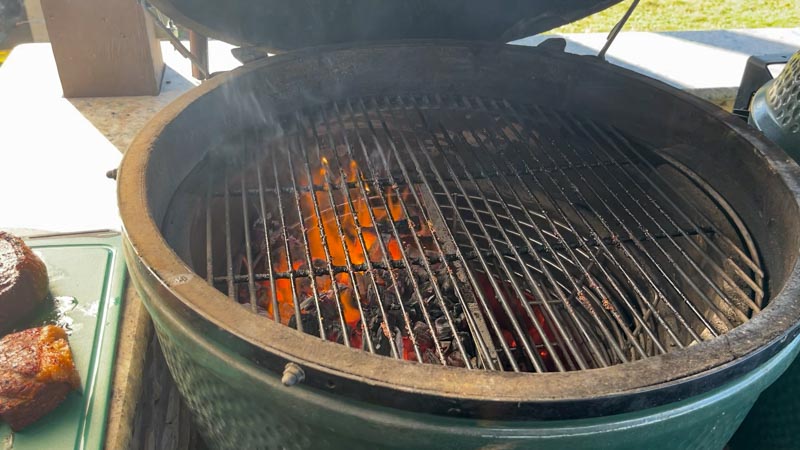
To achieve the best results, you must remove the steaks from the Big Green Egg once they hit the target temperature and set them aside on a warm platter. You should immediately open both the top and bottom vents to their widest positions to allow the intake air to reach the charcoal basket. This technique ensures that your Two-Zone Grilling setup can climb rapidly from roasting temperatures to a searing-hot 500°F. Because the steaks are resting, the internal juices have time to redistribute while the fire becomes a powerful engine for the final crust. This process allows the fat cap to cool slightly before it meets the intense radiant heat of the direct coals. Once the dome thermometer indicates that the grill is screaming hot, you should prepare for the high-heat finish.
Step 10: The High-Heat Direct Sear and Final Rest
Mastering a professional-grade crust requires you to move with precision once the Big Green Egg reaches its searing threshold. You should place the Picanha steaks directly over the white-hot lump charcoal on the “hot side” of your basket setup. This process provides a way for the intense radiant heat to create a mahogany-colored crust without overcooking the tender center of the beef. You will find that cooking the steaks for exactly 90 seconds per side is the most effective method for rendering the fat cap into a crispy and delicious layer.
To achieve the best results, you must remove the steaks from the grill the moment the sear is complete and transfer them to a clean carving board. You should allow the meat to rest for at least 10 minutes to ensure that the internal juices redistribute throughout the muscle fibers. This technique ensures that your Two-Zone Grilling effort results in a succulent and edge-to-edge medium-rare finish. Because the Kick Ash Basket and Divider allowed for such a clean separation of heat, you now have the perfect reverse seared steak. This process allows the seasoning to meld with the smoky essence of the charcoal for an unrivaled flavor profile. Once the rest is finished, you should slice the Picanha against the grain for the ultimate backyard dining experience.

Final Thoughts: The Power of the Two-Zone System
Mastering How to Master Two-Zone Grilling: Reverse Seared Picanha on the Big Green Egg transforms your backyard cooking from a hobby into a precision craft. You should view the Kick Ash Basket and Divider as more than just accessories because they provide the mechanical separation needed for professional-grade temperature control. This process provides a way for you to stop guessing about your internal temperatures and start cooking with absolute confidence. You will find that the ability to shift instantly from a low-and-slow roast to a screaming-hot sear is the secret to a world-class crust. Because the Picanha is such a succulent cut of beef, it deserves the refined heat management that only a divided firebox can offer.
To achieve the best results, you must commit to the “Grilling by Feel” philosophy by understanding how your equipment responds to every adjustment. You should incorporate the Kick Ash Can into your routine to ensure that your airflow remains consistent and your firebox stays clear of performance-robbing debris. This technique ensures that your Two-Zone Grilling setup is always ready for a high-heat challenge at a moment’s notice. Because a clean and organized fire is the foundation of flavor, this system provides a way to elevate every meal you prepare on the Big Green Egg. This process allows you to spend less time on maintenance and more time enjoying the perfectly rendered fat and tender meat of a masterfully seared Picanha.
The Kick Ash System: Key Benefits at a Glance
| Feature | Primary Benefit | Why It Matters |
| Kick Ash Basket | Superior Airflow | Replaces the restrictive cast iron grate for faster temp spikes. |
| Adjustable Divider | Instant Two-Zone Heat | Creates a dedicated “cool side” for roasting and a “hot side” for searing. |
| Kick Ash Can | Clean Burn Environment | Collects spent ash for easy disposal and prevents intake blockages. |
| The “Shake” | Fuel Preservation | Sifts out dust while leaving usable lump charcoal for your next cook. |
People Also Ask (PAA)
- Can I do a reverse sear without a basket divider?You can use a ConvEGGerator for indirect heat, but you must remove the hot stone mid-cook to reach searing temperatures. This process requires heavy-duty gloves and a safe place to set a 500°F ceramic plate. You will find that using a Kick Ash Divider is a much safer and faster method for two-zone cooking.
- What is the best temperature for a reverse sear on the Big Green Egg?You should aim for an indirect roasting temperature of 250°F to 300°F to bring the meat up slowly. This technique ensures that the muscle fibers remain relaxed and juicy. Once the meat hits 115°F, you must increase the grill to 500°F or more for the final 90-second sear.
- Why is airflow so important for the Big Green Egg?Airflow is the lifeblood of your fire because it controls the rate of combustion in your lump charcoal. You must keep the firebox free of ash to ensure the oxygen can reach the fuel quickly. Because the Kick Ash Basket allows air to move freely around the coals, you can reach high searing temperatures much faster than with a standard grate.