
This post contains affiliate links. Please see our disclosure policy.
Combining modernist cuisine with “tried and true” BBQ is no easy task. Figuring out how to fuse new world with old world techniques is a great challenge and one I took on this past weekend. Thinking through the best way to use my Sous Vide Supreme with a Brisket Flat has been on my todo list for awhile. Certainly cooking the flat using the sous vide machine would produce moist and tender brisket, but how would I get that traditional smoke flavor? Smoke it first then sous vide or the other way around? Well, this post will walk you through the process and report the results. Now sit back, grab an ice cold Lone Star beer, and enjoy this post for Smoked Sous Vide Brisket Flat.
Table of Contents
- Step 1: Trimming the Brisket Flat
- Step 2: The Seasoning
- Step 3: Sealing for the Bath
- Step 4: The 36-Hour Water Bath
- Step 5: The Chill and Prep
- Step 6: Setting the Stage on the Big Green Egg
- Step 7: The Final Smoke and The Rest
- The Final Verdict: Modernist BBQ at Its Best
- The Ultimate Sous Vide BBQ Brisket Flat on the Big Green Egg Recipe
Get My NEW Book
The Ultimate Big Green Egg Cookbook

What is Sous Vide?
If you are new to the world of modernist cooking, “sous vide” is French for “under vacuum.” It involves sealing food in a bag and immersing it in a water bath held at a very precise temperature. Unlike a smoker or an oven, where the air temperature fluctuates, a sous vide immersion circulator or water oven keeps the temperature within a fraction of a degree.+2
When it comes to a notoriously lean and finicky cut like a brisket flat, this precision is a lifesaver. It allows us to hold the meat at the exact temperature where collagen breaks down into gelatin without ever crossing the line into “dry and crumbly” territory.
The Strategy: Smoke vs. Bath
The biggest debate in the sous vide BBQ community is the order of operations. Should you smoke first to get the flavor, or smoke last to get the bark? For this cook, I decided to go sous vide first.
By starting with the water bath, we focus entirely on the science of the meat. Holding the brisket at a steady temperature for 36 hours allows us to perfectly tenderize the lean flat without any risk of the exterior drying out or getting “over-smoked” in a traditional pit environment. Once the texture is locked in, we use the Big Green Egg to finish the job.
By smoking the brisket after it comes out of the bath, we achieve two major goals. First, the chilled meat from the refrigerator is primed to absorb smoke particles as it warms back up. Second, this final stage on the Big Green Egg is what creates that essential, crusty bark that every BBQ lover craves. We use the sous vide for the “tender” and the Big Green Egg for the “smoke.”
Why the Brisket Flat?
Most people struggle with the flat because it is the leanest part of the cow. In a traditional 12 hour smoke, the window between “tough” and “dry” is incredibly small. Using the sous vide method removes that stress entirely. You are essentially “fixing” the texture in the water bath so that the grill only has to worry about the flavor.
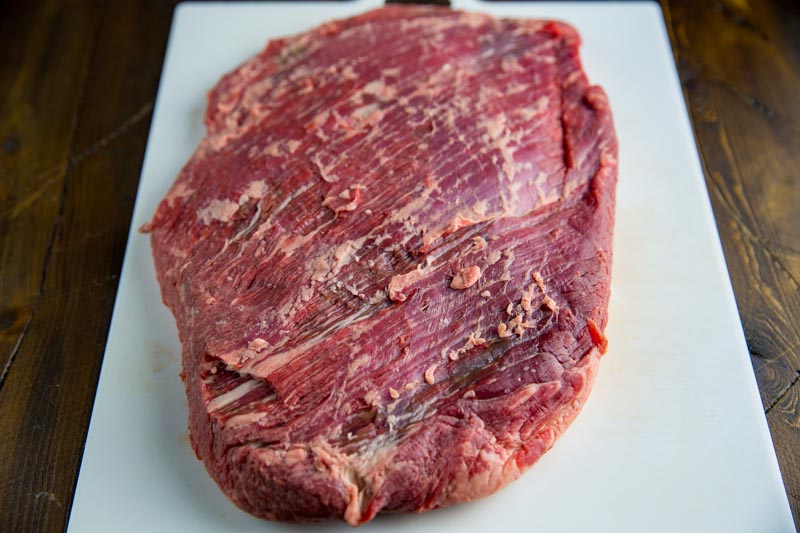
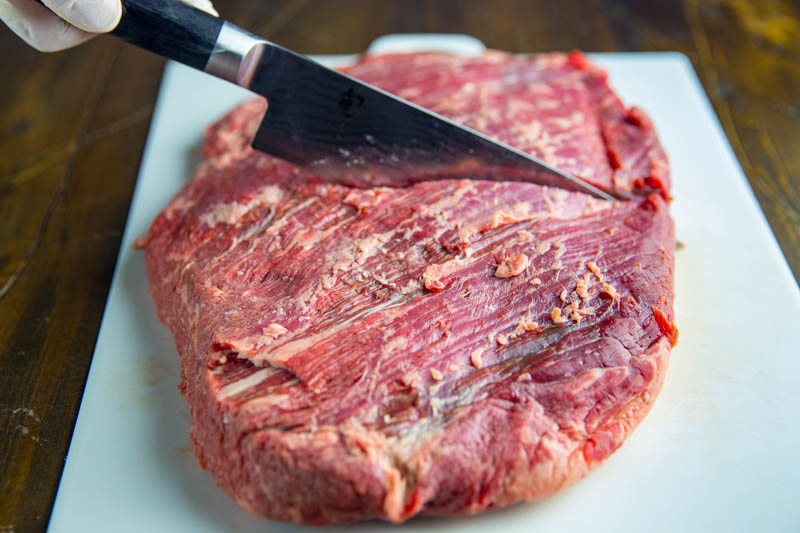
Step 1: Trimming the Brisket Flat
Step 1: Trimming and Sizing the Flat
Trimming a brisket flat is all about precision. Since we do not have the fatty “point” to rely on for moisture, we have to be strategic with how much fat we leave behind to protect the meat during the smoking phase.
- The Fat Cap: Flip the brisket over and trim the fat cap until it is a uniform 1/4 inch thick. This layer acts as a heat shield on the Big Green Egg and provides just enough rendered fat to keep the exterior of the flat basted.
- The Meat Side: On the opposite side, remove any “silver skin” or heavy patches of hard fat. You want the meat exposed so that your dry rub can penetrate the muscle and the smoke can adhere directly to the beef.
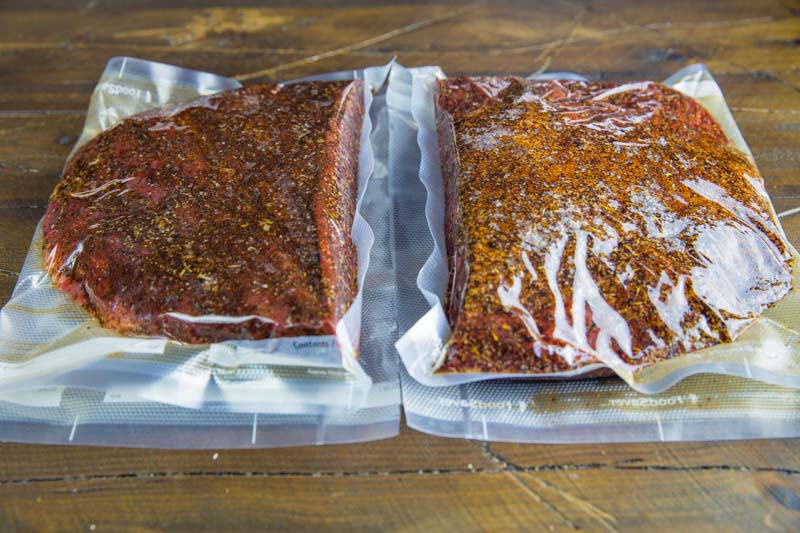
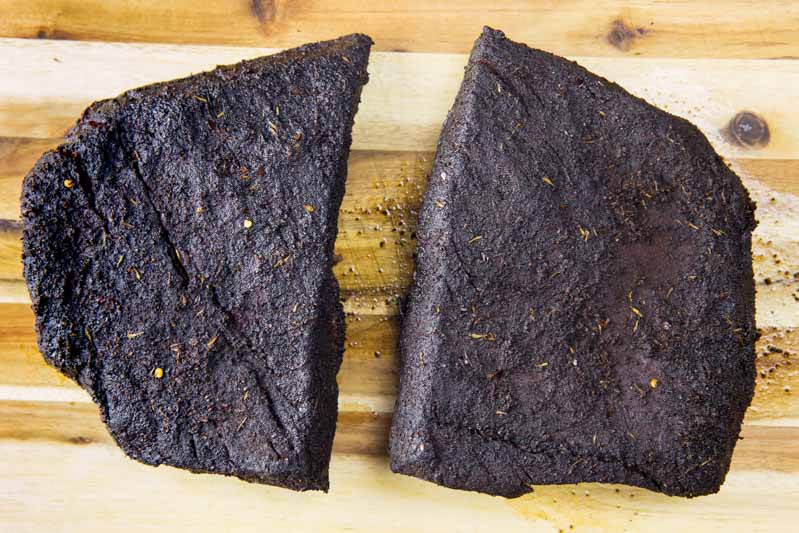
- The Sizing: Because we are using a sous vide environment later, you need to think about the dimensions of your water oven or immersion bags. Cut the flat into two separate pieces. This makes the brisket much easier to handle, ensures it fits perfectly into the sous vide bags, and allows for more surface area to develop that beautiful bark.
Why Cut the Flat?
Cutting the brisket in half serves a dual purpose. Beyond just fitting into the Sous Vide Supreme or a vacuum bag, it actually helps with the cook. Brisket flats can be awkwardly long and tapered. By dividing the meat, you can ensure each section is submerged properly in the water bath, leading to a perfectly even cook with no “cold spots” or air pockets in the bag.
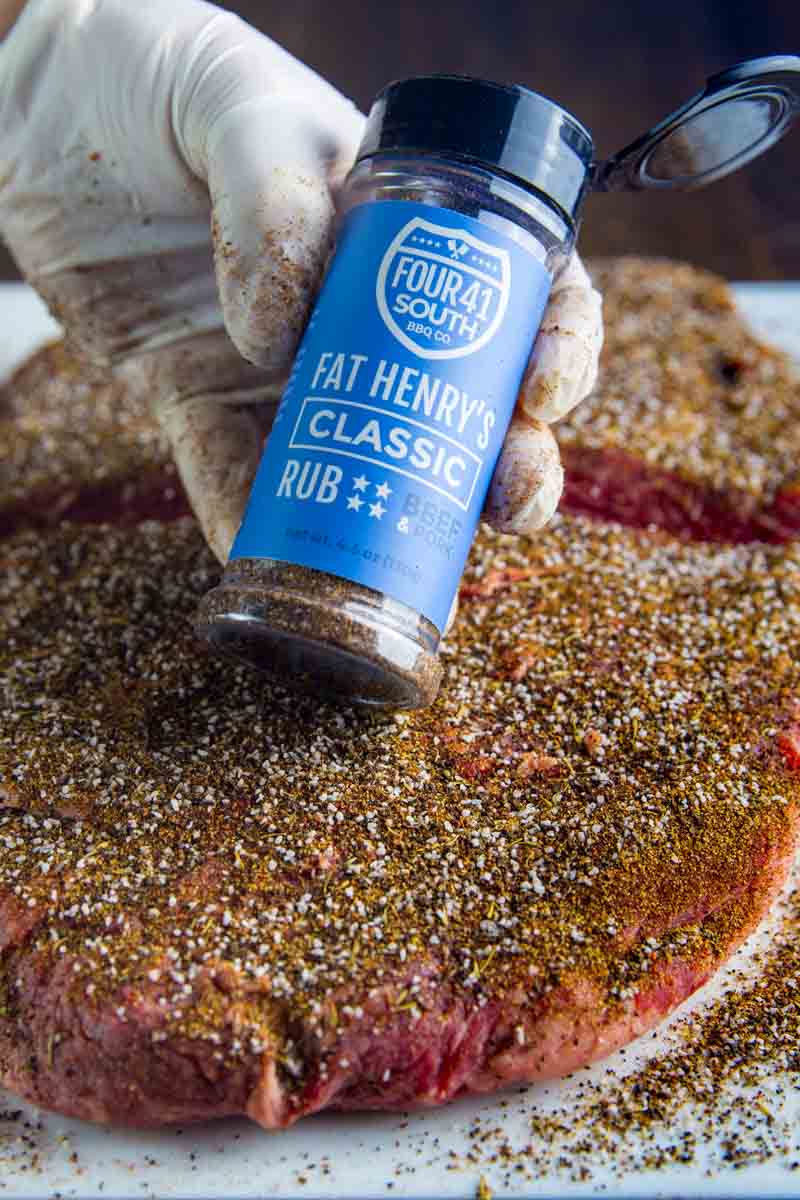
Step 2: The Seasoning
Once your brisket is trimmed and sized, it is time to build the flavor profile. Brisket can handle a lot of seasoning, so do not be shy here. You want to apply your rub liberally to all sides, including the edges.
- The Choice Rub: For this cook, I used Fat Henry’s Classic Rub from Four41 South BBQ. It is incredibly delicious and provides a great balance of savory notes that complement the beef without masking the smoke.
- Other Heavy Hitters: If you do not have Fat Henry’s on hand, other popular brisket rubs like Meat Church Holy Cow or Killer Hogs TX Brisket Rub are excellent choices for creating a deep, dark bark.
- The Classic DIY (SPG): If you want to keep it traditional, you can never go wrong with the “Texas Trinity” of Salt, Pepper, and Garlic. Use a 1:1 ratio of Kosher salt and 16-mesh coarse black pepper, then add a half-part of garlic powder.
Why Liberal Application?
The seasoning does more than just add flavor; it is the foundation of the “bark.” As the salt draws moisture to the surface and the pepper catches the smoke, they form a crust that protects the interior of the meat. Since a brisket flat is quite thick, you need a heavy layer of seasoning to ensure that every bite has the perfect amount of salt and spice to balance out the richness of the beef.
Step 3: Sealing for the Bath
Once the brisket flat is evenly covered in the rub, it is time to prep it for its long stay in the water bath. This step is about more than just packaging; it is about creating the perfect environment for the beef to transform.
- The Vacuum Seal: Place each piece of the seasoned brisket into a heavy-duty sous vide bag. Use a vacuum sealer to remove all the air, creating a tight seal.
- Double Check the Seal: Because this is a long cook (36 hours), I often recommend a double seal on each end of the bag. The last thing you want is for a seal to fail halfway through the process, allowing water to get to your brisket.
- The Flavor Lock: By sealing the meat while it is raw and freshly seasoned, you are essentially forcing those spices into the surface of the beef. As the meat warms up in the water bath, the juices will mingle with the rub, creating a concentrated “liquor” that marinates the brisket from the inside out.
Why Seal Before Smoking?
You might notice we are sealing the meat before it hits the Big Green Egg. While many people smoke first then sous vide, sealing the seasoned raw meat first allows the salt to begin dry-brining the brisket immediately. This ensures that the moisture stays locked within the muscle fibers during the long 36-hour tenderizing process.
Step 4: The 36-Hour Water Bath
Now we enter the patience phase. This is where the magic of the Sous Vide Supreme takes over, doing the heavy lifting that usually requires a sleepless night by the smoker.
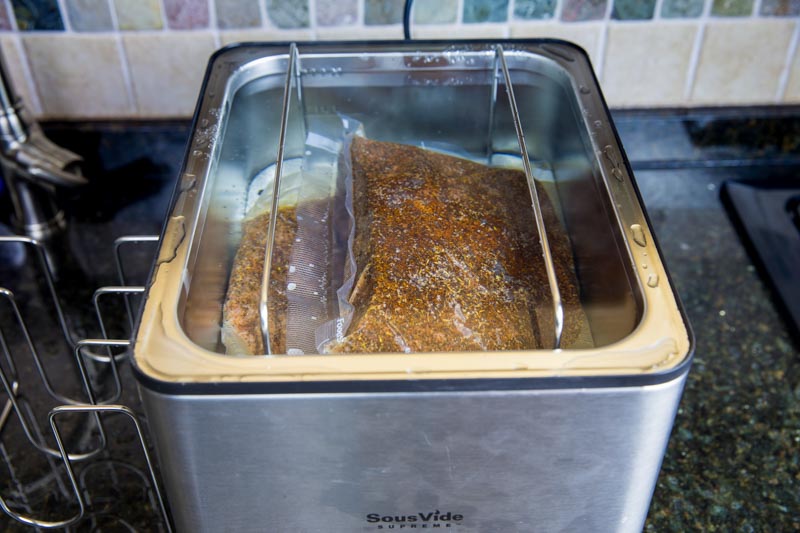
- The Temperature: Preheat your sous vide water bath to 155°F. At this specific temperature, you are high enough to render the fat and break down the tough connective tissue (collagen), but low enough to keep the muscle fibers from drying out.
- The Submerge: Once the water has reached 155°F, submerge the vacuum-sealed brisket pieces. Ensure they are fully underwater. If the bags try to float, you can use a sous vide rack or even a heavy kitchen utensil to keep them weighted down.
- The Duration: To get a traditional brisket texture that is tender enough to pull apart but still holds its shape for slicing, let the flat cook for 36 hours.
Why 155°F for 36 Hours?
This is the “sweet spot” for brisket flats. In a traditional smoker, you have to push the meat up to 203°F to break down the collagen quickly. However, by using the sous vide, we use time instead of high heat. Holding the beef at 155°F for 36 hours achieves the same level of tenderness as a traditionally smoked brisket but results in a much juicier slice because the meat never experienced the moisture loss associated with higher temperatures.
A Pro Tip for the Long Haul
Because 36 hours is a long time, water evaporation can be an issue. If your sous vide container does not have a tight-fitting lid, cover the top with plastic wrap or use “sous vide balls” to trap the steam. This prevents the water level from dropping below the minimum line and keeps your machine running smoothly throughout the weekend.
Step 5: The Chill and Prep
After 36 hours in the water bath, your brisket flat is perfectly tender, but it is not quite ready for the table. We need to reset the meat to prepare it for the smoke.
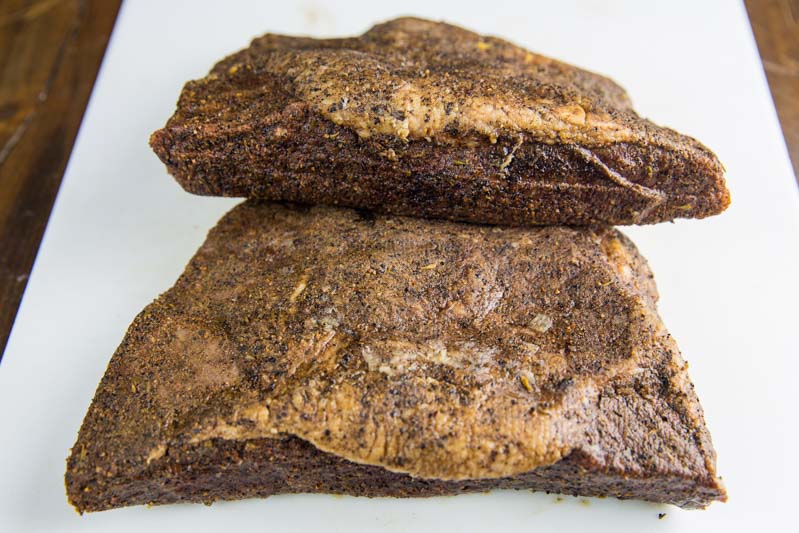
- The Cold Crash: Remove the sealed bags from the sous vide and place them directly into your refrigerator overnight. Chilling the meat serves a vital purpose: it firms up the fat and muscle, making the brisket easier to handle and ensuring it does not overcook when it hits the heat of the Big Green Egg.
- Save the “Liquid Gold”: When you are ready to cook the next day, carefully cut open the bags and pour the liquid into a container. Do not throw this away. This is concentrated beef essence seasoned with your rub. It makes an incredible base for a sauce, a mop, or even a flavorful addition to your next batch of chili.
- Dry the Surface: Take the brisket halves out and pat them completely dry with paper towels. Removing the surface moisture is essential for getting a great bark. While the meat is air-drying on the counter, go ahead and fire up your smoker.
Why the Overnight Chill?
If you take a hot brisket straight from the sous vide to the smoker, the internal temperature will climb too quickly, and you will likely overcook the meat before the bark has a chance to form. By starting with a cold brisket, you give the Big Green Egg more time to apply smoke and develop a crust while the interior slowly returns to a perfect serving temperature. It is the secret to getting that traditional BBQ look on a sous vide cook.
Step 6: Setting the Stage on the Big Green Egg
With the brisket chilled and dried, it is time to introduce the element that sous vide simply cannot provide: deep, authentic wood smoke.
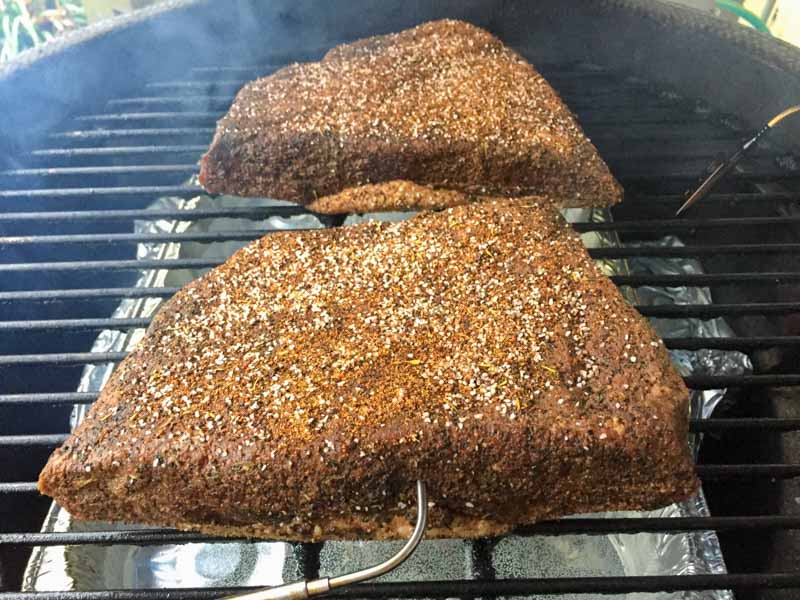
- The Setup: Configure your Big Green Egg for indirect cooking by using the convEGGtor (legs up).
- The Temp: Preheat the Egg to a steady 250°F. This is the classic “low and slow” temperature that allows the cold brisket to warm up gradually while the exterior begins to dehydrate and form a crust.
- The Wood Choice: For this cook, I used a combination of Hickory and Pecan wood chunks. Hickory provides that bold, traditional “bacon-like” smoke profile that stands up well to beef, while Pecan adds a subtle sweetness and helps develop a rich, mahogany color on the bark.
- The Moisture: Place a drip pan filled with water on top of the convEGGtor. This creates a humid environment inside the dome, which is essential for smoke adhesion. The moisture helps the smoke “stick” to the meat and prevents the exterior of the lean flat from becoming too leathery.
Why the Drip Pan?
A water pan does more than just add moisture. It acts as a thermal mass that helps stabilize the temperature of the Big Green Egg. More importantly, in a sous vide-first cook, the meat is already fully cooked and tender. The water pan ensures that the airflow inside the Egg doesn’t act like a convection oven and dry out those precious juices we spent 36 hours preserving.
Step 7: The Final Smoke and The Rest
This is the home stretch. We are no longer cooking for tenderness since the sous vide already handled that. Instead, we are cooking for temperature, color, and that signature BBQ crust.
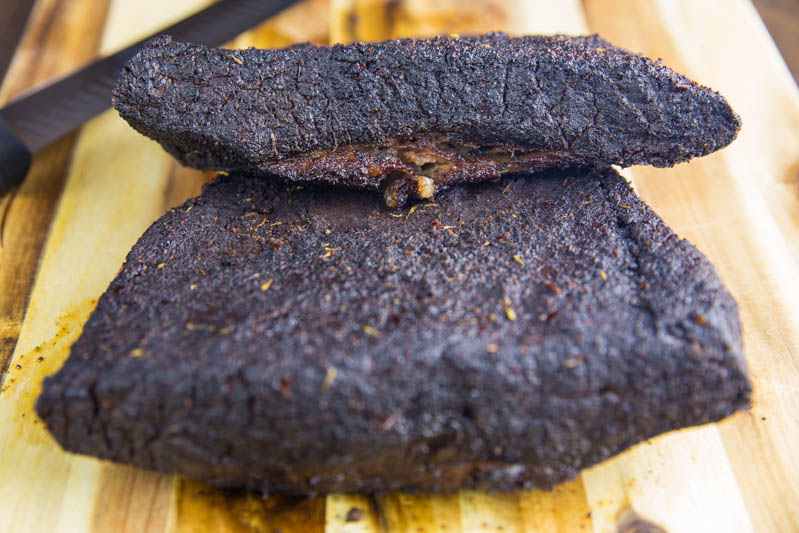
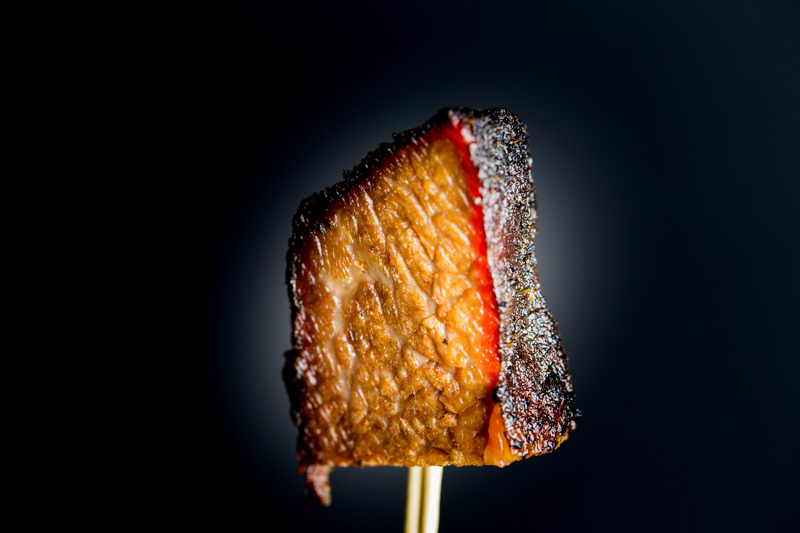
- The Smoke: Place your chilled brisket halves onto the cooking grid. Let them bathe in the hickory and pecan smoke for about 3.5 hours. You want to see the bark transform into a dark, textured surface that looks like it has been on the pit all day.
- The Pull: Keep an eye on the internal temperature. Once the brisket flat measures 185°F, it is time to pull it off the Egg. This temperature ensures the meat is hot all the way through and the exterior has set, without pushing it so far that you lose the moisture we locked in during the water bath.
- The Rest: This is the most underrated step in all of BBQ. Place the brisket on a cutting board and loosely cover it with a foil tent for 30 minutes. This allows the internal juices to redistribute. If you slice it immediately, all that “liquid gold” will run out onto the board, leaving you with dry meat.
Why 185°F?
In a traditional brisket cook, 185°F is usually the “stall” point where things get difficult. However, for a sous vide brisket, 185°F is the finish line. Because the connective tissue was already broken down during the 36 hour bath, we only need to reach 185°F to ensure the fat is soft and the meat is at a perfect serving temperature. It allows us to get the bark we want without the risk of overshooting and drying out the lean flat.
Serving Your Masterpiece
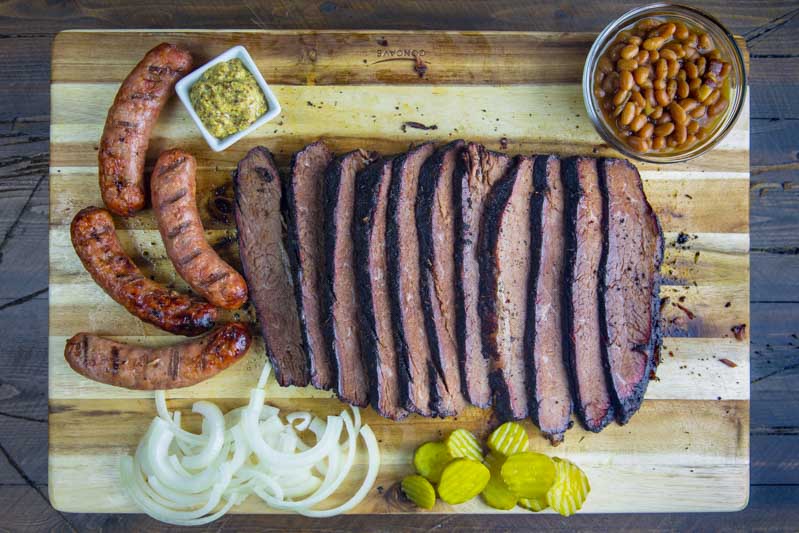
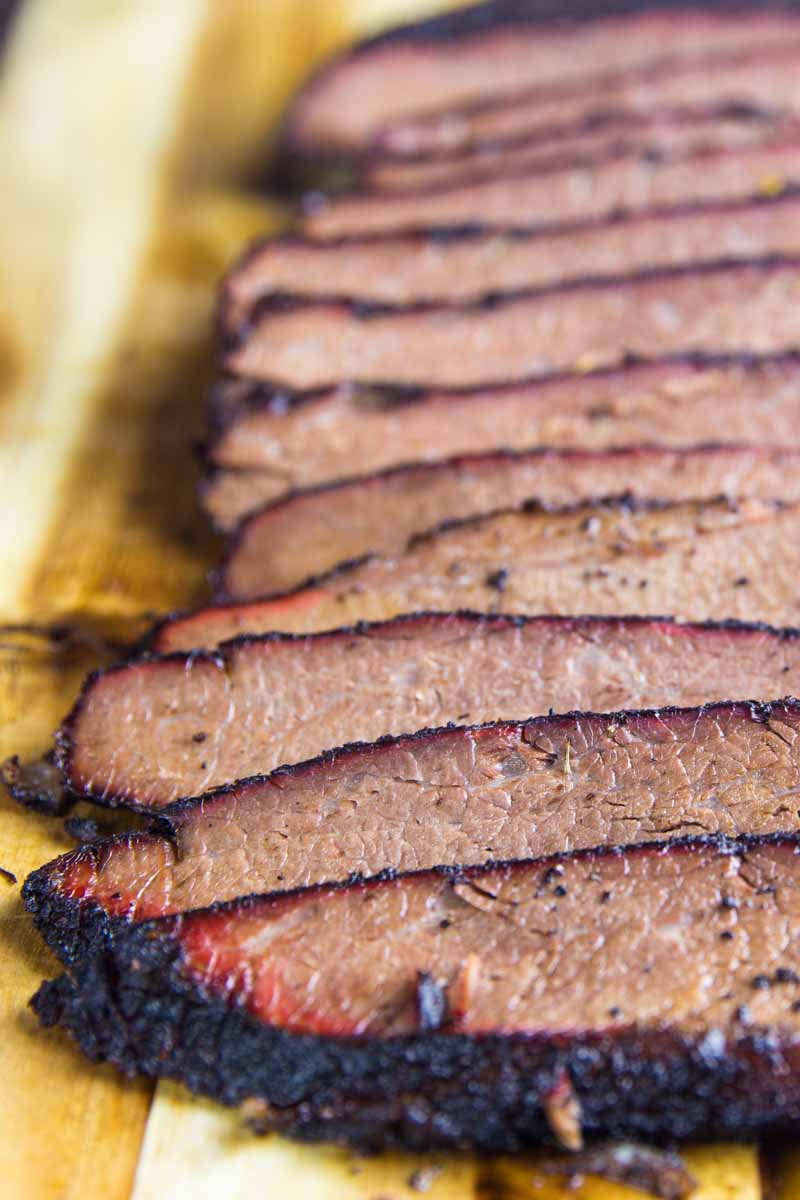
When the rest is over, slice the brisket flat against the grain into pencil-thick slices. If you saved that reserved liquid from the sous vide bags, you can warm it up and use it as a “jus” for dipping or pour a little over the sliced meat for an extra punch of flavor. The result should be a brisket that has the soul of a pit-smoked classic with the precision of a modern kitchen.
The Final Verdict: Modernist BBQ at Its Best
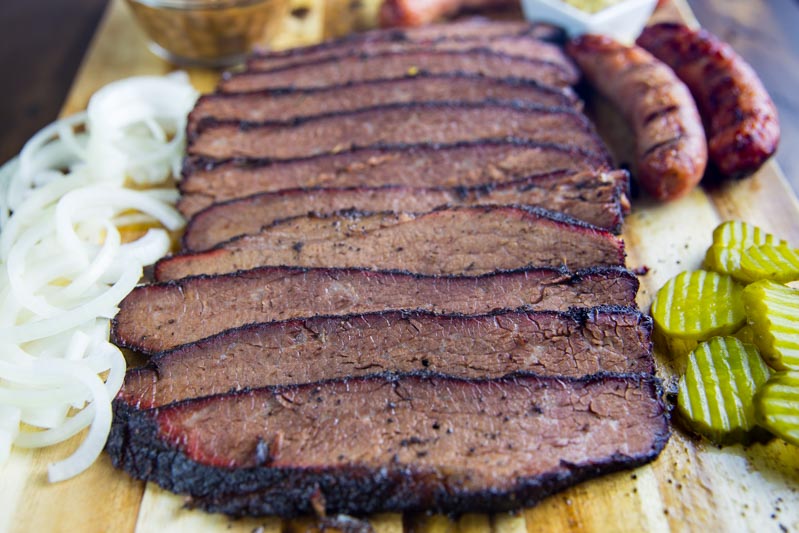
The payoff for 36 hours of patience was a spread that would rival any Texas smokehouse. The sliced brisket flat was served alongside some smoked brats that shared the Egg during the final leg of the cook, rounded out with classic sides of baked beans, onions, and pickles.
To bring it all together, I used the reserved beef drippings from the sous vide bag to create a homemade BBQ sauce. That “liquid gold” is packed with concentrated beef flavor and the essence of the Fat Henry’s rub, making it the perfect companion for the lean slices of flat.
Final Thoughts and Future Tweaks
I was pleasantly surprised with the quality of this brisket compared to others I have cooked before. The sous vide technique successfully produced a tender brisket flat that maintained its moisture, which is the biggest hurdle with this specific cut. The smoky flavor from the 3.5 hours in the Big Green Egg was solid and provided that authentic outdoor cooking profile I was looking for.
Barbecue is an ever-evolving journey, and I am already thinking about how to push this further. I think the next time I try this, I will smoke the brisket first, cool it, seal it, and then sous vide. Finally, I would finish it back on the smoker for a quick sear to reset the crust. More to come on that experiment!

The Ultimate Sous Vide BBQ Brisket Flat on the Big Green Egg
Equipment
- 1 Sous Vide Machine
- 1 Vacuum Sealer
Ingredients
- 5-7 pound Brisket Flat
- 1/2 cup BBQ Rub
Instructions
- Trim & Size: Trim the fat cap to 1/4 inch and remove silver skin from the meat side. Cut the flat in half to fit your sous vide bags.
- Season & Seal: Apply rub liberally to all sides. Vacuum seal each half and let rest in the fridge for at least 1 hour (or up to overnight).
- The Bath: Submerge in a 155°F water bath for 36 hours.
- The Chill: Remove bags and place in the refrigerator overnight. This is vital for the final smoke texture.
- The Smoke: Set the Big Green Egg to 250°F indirect with a water pan. Pat the brisket dry and smoke for 3.5 hours until the internal temp hits 185°F.
- The Rest: Tent with foil for 30 minutes. Slice against the grain and serve.
Nutrition information is automatically calculated, so should only be used as an approximation.


Wow, I’ve been itching to cook something sous vide and love to smoke meat. Might be time to pick up an Anova and get try this out – thanks for sharing!
The fusion of smoking meat and sous vide is a fun journey! Lots to try and to learn. Let me know how it turns out for you.
I’m getting ready to try a smoked sous vide brisket. I have done ribs many times with excellent results. I’m smoke for 3’hours at 225 and then sous vide for 16-24 hours at 155. I then glaze with sauce on grill or under broiler for a couple of minutes. Great flavor and super tender.
I’ve seen a lot of sous vide brisket tutorials and this is the only one that looks like central Texas brisket. Looks fantastic.. I’m curious if you’ve had a chance to try the smoke>sous vide>smoke yet to impart more smoke into the meat?
No I haven’t and good catch. Now I’m motivated to do this… Thank You!
Why use the sous vide method when you are going to cook it for 3hrs at much higher temperatures to finish? Genuinely curious. Thanks!
Simple answer is to slowly render the fat in that tough cut of meat. This essentially braises the meat from the inside out. After your sous vide the brisket flat you finish it off on the smoker to get that true BBQ flavor.
I’m about to try this and I just realized it said to cool brisket overnight. Is that part necessary or can it go straight on the smoker to finish?
It can go right in to the smoker to finish!
It sure can! I loved how mine turned out. I think I crushed it and I can’t wait to cook another one. I’ve posted a link to the picture of my finished product. Check it out.
https://instagram.com/p/BgxBJbpDjvo/
Sorry I forgot to give a rating for the recipe. 5⭐️
What temp did you do for 24 hours? Same 155?
I’ve now done this method at least 5 times. Absolutely awesome! I’ve even frozen the meat in the bags after being sous vide and thawed it then smoked it and it came out perfect.
Awesome job my man!
I’m doing a brisket right now, iv got it in the big green egg first at 225 for 3 hours with apple wood, next will be sous vide for 36 hours.
We will be having a big family gathering up camping so I won’t have the green egg to finish so I’m planning on using a charcoal grill for about one hour
First brisket ever.
I using sous vide/ BGE together on steaks and ribs and love the results.
Sounds great!
Loved this recipe. I had a 2.5 lb brisket flat with a small layer of fat on one side. I covered with my own rub and vacuum packed. I set the Anova at 155 degrees and cooked for 32 hours instead of 36. The brisket had shrunk and just looked done so pulled it at the 32 hours and dropped into an ice bath. Let it set for awhile and popped it into the fridge until the next day. Hubby got the Big Green Egg up and stabilized at 250 degrees with indirect heat and a pan of water on the pacesetter. He smoked for 2 hours and we swapped in aluminum foil and a towel for and hour. Perfect tenderness!!!
I am so happy this worked for you!
Hey man, thoroughly love your site just for the fact you don’t write a huge 10 pages on how brisket affected your life and whatever else the bloggers feel they must do for sake of “the algorithm” – Came here looking for some answers and think I’m on the right path, but wanted to ask you: Why SV then smoke as opposed to smoke then SV? I tried a 48 SV followed by a few hour intense smoke and the results were good, but not great/no smoke ring… And I saw someone comment above about smoke then SV then smoke again… any feedback on what is best in your experience? Thanks in advance!
Thanks for the kind feedback. I haven’t tried the other way around though I should. The reason I did it this way in the post is to ensure maximum tenderness with smoke flavor. The smoke ring doesn’t correlate too flavor at all, just shows proper technique. So, if you are looking for tenderness and smokiness you have found the right recipe!
Chris,
Thank you for the article. I have cooked at least three brisket flats at 155 for 36 to 44 hours (sous vide). On all three, I would then refridgerate the brisket overnight (or for a full day – in the bag with all the juices) and then smoke the brisket the next day on a pitboss smoker. I would cook the brisket until the internal tempurature was around 145 to 155F (usually about 1.5 to 2 hours), then rested the brisket in a cooler for several hours afterwards. All three flats had good flavor – but where quiet dry. Any ideas on what I am doing wrong? The brisket is trimmed choice brisket from Costco, so I dont think it is the meat quality. Ive read on other forms you dont want to take the interanl temp of the brisket past the sous vide temp – but could this be wrong? Your thoughts are greatly apprecaited.
Thank you very much, and have a great day!
Well, choice grade isn’t well marbled so that could be an issue. Have you tried this with a prime cut? Flats are typically the leanest part of the brisket so meat grade makes a big difference.
Thank you for the response Chris. No I have not tried it with Prime cuts….I thought process is if I can master choice grade brisket flats (the leanest part of the brisket), then cooking a prime grade brisket should be easy!
I am blessed enough to be able to cook a brisket flat once a week for a work meeting. This last week, I only cooked the brisket at 155F for 24 hours (instead of 36 to 44 hours) – then chilled – then smoked it until the internal tempurature reached 180F. It came out much juicer than the previous briskets. So I was either sous viding the brisket for to long – or not cooking it on the smoker afterwards long enough.
Next week I will cut the flat in half and sous vide one at 24 hours and the other at 48 hours to see if the sous vide time makes a large difference……I will keep you updated.
Thank you very much Chris!
Love to hear more about your various trials!