
This post contains affiliate links. Please see our disclosure policy.
The Texas Trophy: Smoked Wagyu Beef Plate Short Ribs
Welcome back to the pit! One of the absolute perks of working with the fine folks at Snake River Farms is getting to cook “bucket list” cuts of beef like this. Today, we are firing up the Big Green Egg for a masterpiece: a massive rack of American Wagyu Black Grade Beef Short Ribs.
If you’ve never cooked a full Plate Rack, get ready for a game-changer. These are meatier, richer, and far more imposing than any pork rib you’ve ever encountered. In the BBQ world, we often call these “Dino Bones,” but that’s only half the story. The Black Grade marbling from Snake River Farms takes these to a level of decadence that words can barely describe.
Imagine the most tender, fatty point of a Texas-style smoked brisket, but concentrated onto a single bone and served “on a stick.” That is the experience waiting for you here… a deep, peppery bark on the outside and a buttery, melt-in-your-mouth interior that only Wagyu can deliver.
Now sit back, grab an ice-cold Shiner Bock, and enjoy this guide to mastering Smoked Wagyu Beef Plate Short Ribs on the Big Green Egg.
Table of Contents
- Step 1: Unpacking and “The Cold Reveal”
- Step 2: The Essential Trim
- Step 3: The Slather and the “Dalmatian” Seasoning
- Step 4: Lighting the Fire and The Wait for “Blue Smoke”
- Step 5: The Rhythm of the Smoke (Monitoring & Spritzing)
- Step 6: The Milestone—Checking Temperature and Wrapping
- Step 7: The “Texas Crutch”—Braising for Success
- Step 8: The Finish Line—Probe Tenderness and The Rest
- Step 9: The Reveal and Slicing
- Smoked Wagyu Beef Plate Short Ribs Recipe
Get My NEW Book
The Ultimate Big Green Egg Cookbook

Why “Black Grade” Matters
Before we rub these down, it’s worth noting what makes the Black Grade special. While all American Wagyu is superior to standard grocery store beef, Black Grade sits at the top of the scale (surpassing Prime). It features a higher marbling score, which means as these ribs smoke, the intramuscular fat liquefies, essentially “confit-ing” the meat from the inside out.
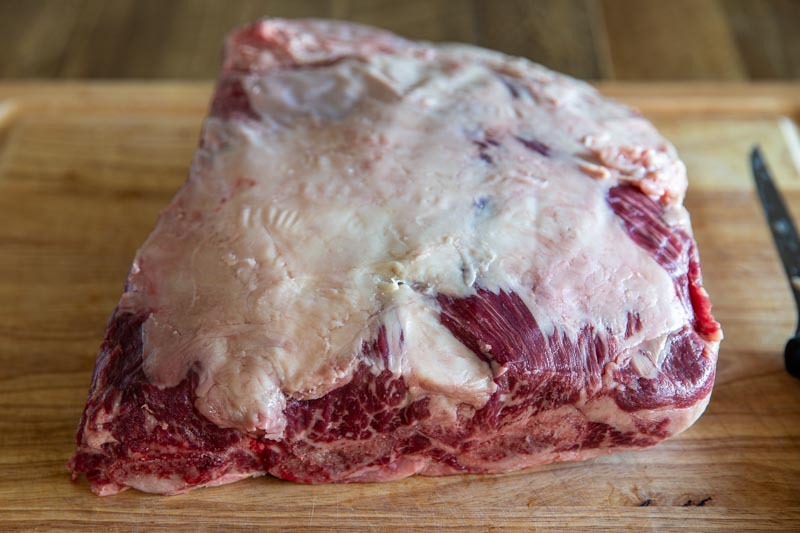
Step 1: Unpacking and “The Cold Reveal”
When your Snake River Farms Black Grade ribs arrive, the first thing you’ll notice is the weight. These racks are dense, heavy, and cold-packed to preserve that incredible marbling.
The Unpacking: Remove the ribs from the vacuum-sealed packaging over a sink or a rimmed baking sheet to catch any excess juices. Use a paper towel to pat the entire rack bone-dry.
Pro Tip: Unlike the Picanha we talked about in another post, keep these ribs cold right up until they go on the smoker. Cold meat attracts more smoke, and since we want a long, 8-12 hour cook, starting with a chilled rack helps us build that iconic smoke ring.
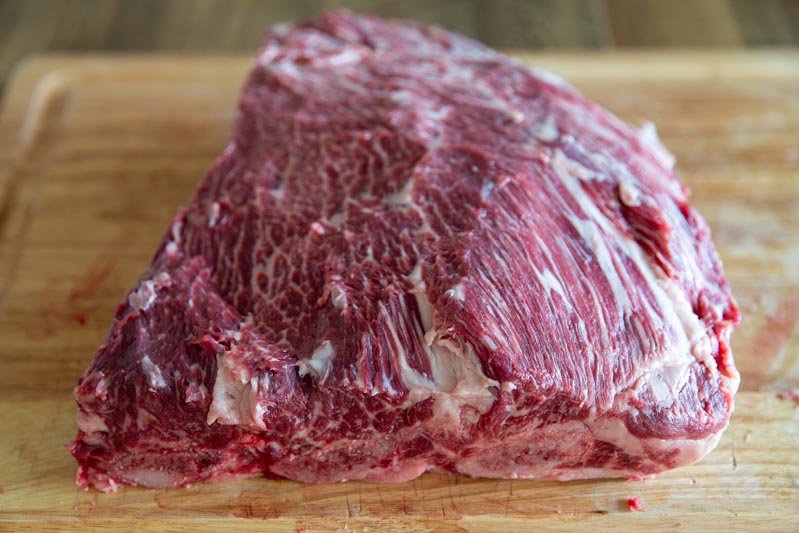
Step 2: The Essential Trim
American Wagyu beef ribs are naturally well-proportioned, but because they are “Plate” ribs, they come with some heavy-duty armor that we need to address.
The Top Side (The Meat Side)
Look at the top of the meat. You will likely see a thick, white layer of silver skin and some “hard” exterior fat.
- The Silver Skin: Use a sharp boning knife to shave this away. Silver skin is a protein-based membrane that won’t melt; if you leave it on, your rub will stick to the membrane instead of the meat, and it will create a chewy barrier.
- The Hard Fat: Trim away any thick, waxy fat deposits. You want to see that beautiful Wagyu marbling peeking through the red muscle. Leave about 1/8 to 1/4 inch of the softer fat—this will render down and baste the ribs.
The Bone Side (The Membrane Question)
This is the great BBQ debate!
The Hack: If you want to ensure the smoke reaches the bone side, just use your knife to score a “crosshatch” pattern into the membrane without removing it.
My Recommendation: For beef ribs, leave the membrane on. Unlike pork ribs, where the membrane is paper-thin and annoying, the membrane on beef plate ribs is structural. These ribs are so heavy and get so tender that the membrane is often the only thing keeping the meat from falling off the bone and into the coals when you try to lift them.
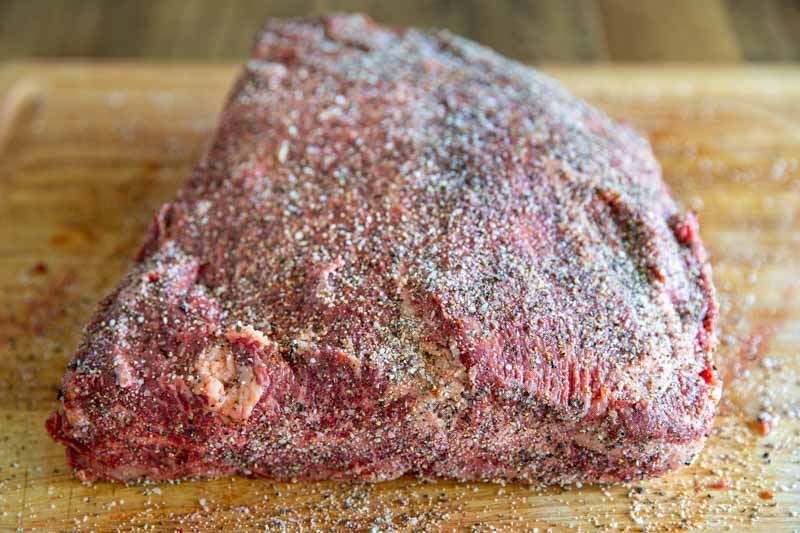
Step 3: The Slather and the “Dalmatian” Seasoning
Once the ribs are trimmed and prepped, it’s time to build the flavor. For a cut as prestigious as American Wagyu, we aren’t looking to hide the beef under a mountain of sugar or heavy spices. We want to enhance it using the classic Texas “Dalmatian” approach, named for the striking black-and-white contrast of salt and pepper.
The Slather: The Foundation for the Bark
Before the seasoning goes on, you need a “binder” or a slather. This creates a tacky surface that allows the heavy grains of pepper to adhere to the meat through hours of smoke and rendering.
- The Options: Use hot sauce or yellow mustard as a slather.
- Don’t Worry about the Heat: If you choose hot sauce (like Frank’s RedHot or a vinegar-based Louisiana style), the capsaicin heat will largely cook off, leaving behind a subtle acidity that helps tenderize the surface. If you use mustard, the “mustard” flavor disappears entirely, leaving only a perfect crust.
- The Application: Apply a very thin layer, just enough to make the meat look wet. You don’t want it dripping; you just want a “glue.”
The Seasoning: The 50/50 Mix
For the seasoning, we are going traditional. Apply a 50/50 mix of Kosher salt and coarse ground pepper to all sides of the beef ribs.
- The Salt: Use a coarse Kosher salt (like Morton or Diamond Crystal). The large grains dissolve slowly, drawing moisture to the surface to create a brine that then re-absorbs into the meat.
- The Pepper: This is the most important part. Use 16-mesh coarse ground black pepper. Fine table pepper will make the ribs too spicy and won’t create a crust. Coarse pepper provides that “bark” texture and the savory “crunch” that defines a great beef rib.
- Coverage: Don’t be shy! These are massive, thick bones. Season the top, the bottom, and especially the meaty sides. Unlike a thin steak, these ribs have enough mass to handle a heavy coating of seasoning.
Pitmaster Tip: After seasoning, let the ribs sit on the counter for about 20 minutes. You’ll see the meat start to look “sweaty” as this is the salt working its magic. When the rub looks wet, it’s locked on and ready for the smoke.
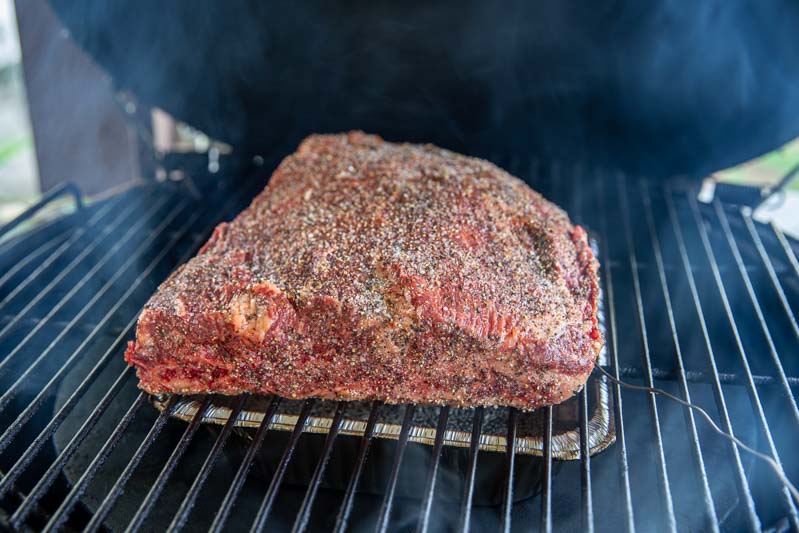
Step 4: Lighting the Fire and The Wait for “Blue Smoke”
With the ribs seasoned and resting, it’s time to prep the Big Green Egg for the long haul. Because we are looking at a 6-to-9-hour cook, your fuel and airflow management are the keys to a successful “set it and forget it” experience.
Building the Fire for Longevity
- The Fuel: Fill your firebox with high-quality lump charcoal. My preference is Fogo Premium Hardwood Lump as the large pieces provide excellent airflow and a long, consistent burn that won’t flake out halfway through the cook.
- The Wood: For American Wagyu, you need a wood that can stand up to the beef without overpowering it. Post Oak is the gold standard for Texas beef ribs; it provides a mellow, sweet smoke that perfectly complements the 50/50 salt and pepper rub. Bury 3–4 fist-sized chunks throughout the charcoal so they ignite at different stages of the cook.
Stabilizing and Creating the Environment
Light the charcoal in the center and let the temperature stabilize at 275°F. Once you’ve reached your target, it’s time to configure the “oven”:
- The ConvEGGtor: Insert the ConvEGGtor (legs up) to create the indirect heat needed for slow roasting.
- The Water Pan: Place a drip pan or a dedicated water pan on top of the ConvEGGtor. Fill it with hot water. This adds much-needed moisture to the cooking environment, which prevents the exterior of the Wagyu from drying out during the long smoke and helps the smoke “stick” to the meat.
- The Clean Smoke: Close the lid and watch the daisy wheel. You are waiting for the “thick white smoke” to dissipate. When you see thin, wispy blue smoke (or almost no visible smoke at all, just the smell of wood), your Egg is ready.
Why Blue Smoke? Thick white smoke is “dirty” and contains creosote, which can give your meat a bitter, medicinal taste. Thin blue smoke indicates a clean-burning fire that will deliver a sweet, aromatic flavor.
The Long Haul
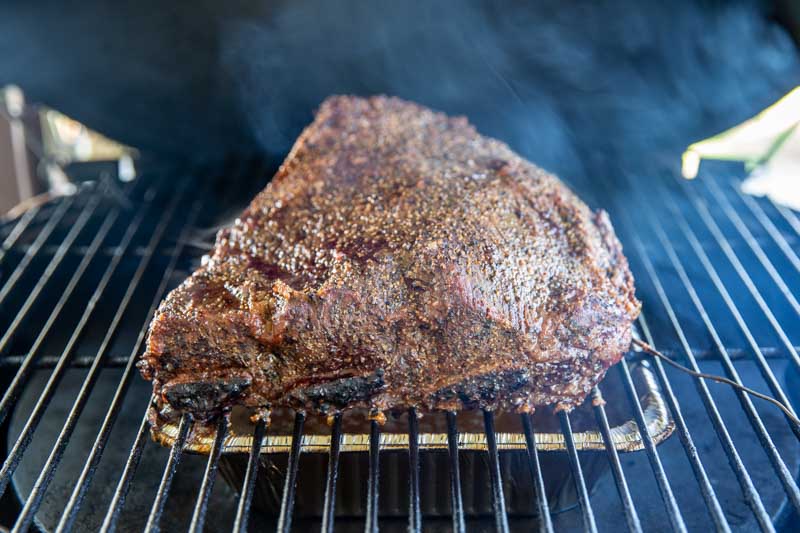
Place the rack of ribs bone-side down in the center of the grate. Close the dome and resist the urge to peek! For the first 3 hours, the Egg will do all the work. We are looking for that internal temperature to climb steadily while the bark begins to set into a deep mahogany crust.
Step 5: The Rhythm of the Smoke (Monitoring & Spritzing)
Once those Wagyu ribs are nestled inside the Egg, the most important thing you can do for the first hour is nothing. Resisting the urge to “peek” keeps your temperature stable and allows the heat to begin the critical process of rendering the surface fat and setting the bark.
The One-Hour Rule
Let the ribs smoke undisturbed for at least the first hour. This initial “blast” of heat and clean blue smoke is what creates the foundation for your crust. If you open the dome too early, you lose the humidity we’ve built up with the water pan and stall the browning process.
The Hourly Check & The Spritz
After that first hour, you become a guardian of moisture. Every hour on the hour, lift the lid quickly to inspect the surface of the meat.
- What to Look For: You are looking for dry patches or areas where the “Dalmatian” rub looks like it’s becoming “dusty” rather than “tacky.” Wagyu has a lot of internal fat, but the moving air inside the Egg can still dry out the exterior edges.
- The Spritz: If the surface looks dry, spritz with water.
- Why Water? While some use apple juice or vinegar, plain water is often best for Wagyu Dino Bones. It keeps the meat moist without adding sugars that might burn at 275°F or masking the natural beefy flavor of the Black Grade Wagyu.
- The Benefit: Spritzing serves two purposes: it cools down the surface slightly to prevent overcooking the edges, and it creates a “sticky” surface for more smoke particles to cling to, deepening your smoke ring.
Ballpark Cook Times
Because these Snake River Farms Plate Ribs are so thick, they require patience. While every cow is different, here is what you can generally expect when running your Egg at 275°F:
| Weight of Rack | Estimated Cook Time | Milestone |
| 4 – 5 lbs | 5 – 6 Hours | Bark starts to harden around Hour 3 |
| 6 – 7 lbs | 7 – 9 Hours | Significant “bone pull-back” around Hour 5 |
| 8+ lbs | 9+ Hours | The “Texas Stall” may occur around $165^{\circ}\text{F}$ |
Step 6: The Milestone—Checking Temperature and Wrapping
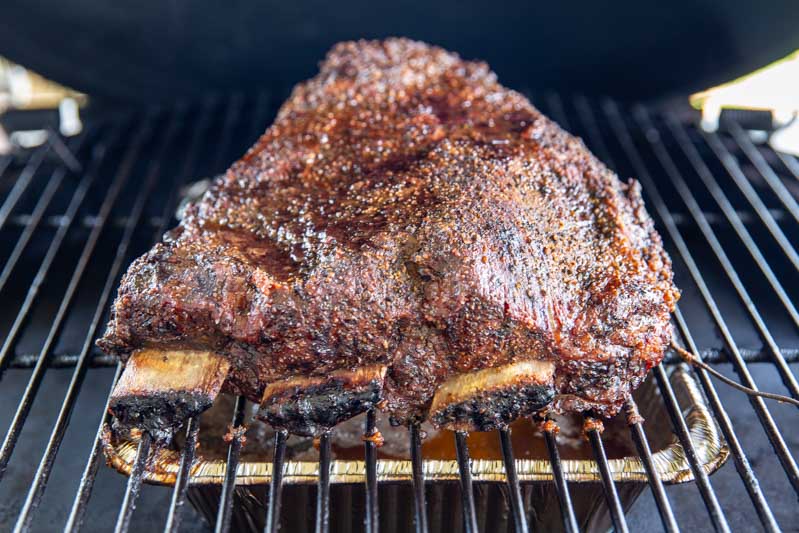
At the 3-hour mark, it’s time for a critical status check. By now, the heavy smoke and the steady 275°F heat of the Big Green Egg should have worked their magic on the exterior of the rack.
The Status Check: Color and Temp
Open the dome and look for two specific indicators:
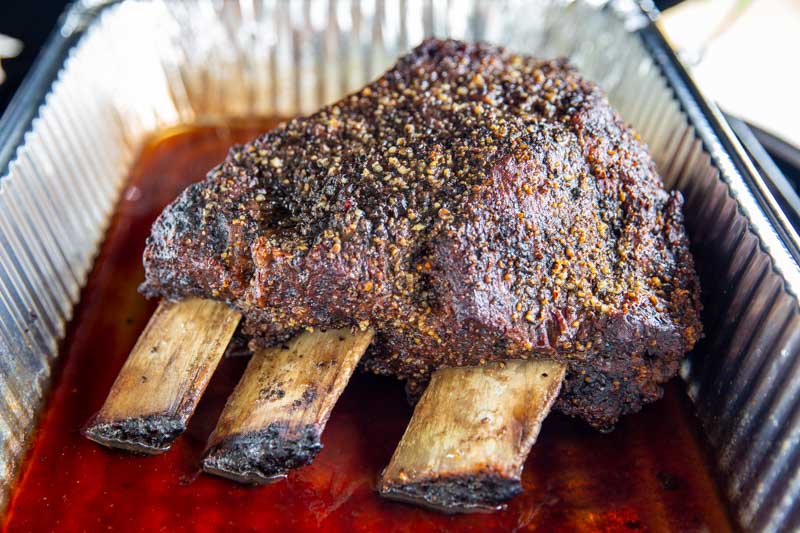
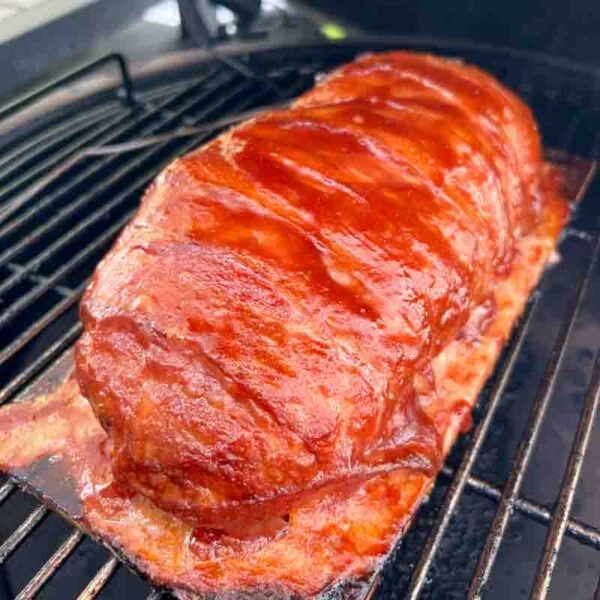
- The Bark: The ribs should no longer look “raw” or “wet.” Instead, they should have developed a dark, mahogany color. This is the bark… a delicious combination of the rendering Wagyu fat, the coarse black pepper, and the smoke.
- The Internal Temp: Using a fast and accurate digital thermometer like a ThermoPop, probe the thickest part of the meat between the bones. You are looking for an internal temperature of 165°F.
The “Texas Stall” and Why We Wrap
At around 165°F, beef ribs often hit “the stall.” This is where the moisture evaporating from the surface of the meat cools it down as fast as the grill can heat it up, causing the internal temperature to plateau for hours.
To push through the stall and preserve the incredible juiciness of the Snake River Farms Wagyu, it is now time to wrap.
How to Wrap Like a Pro
The Seal: Wrap the ribs tightly, ensuring there are no holes for steam to escape. You want the meat to essentially “confit” in its own rendered fat for the remainder of the cook.
The Material: Use a large double-layer of heavy-duty aluminum foil or pink butcher paper. Foil will “braise” the ribs slightly, making them incredibly tender and shortening the cook time. Butcher paper will breathe more, preserving that crunchy bark you worked so hard to build.
The “Liquid Gold” Addition: Before sealing the wrap, some pitmasters add a tiny splash of beef broth or even a little more Shiner Bock. However, with Wagyu Black Grade, the ribs will produce plenty of their own moisture.
Step 7: The “Texas Crutch”—Braising for Success
For this specific cook, we are utilizing a variation of a classic BBQ technique known as the “Texas Crutch.” While some pitmasters wrap the meat tightly in foil like a burrito, we are going to take it a step further to ensure these Wagyu ribs stay incredibly succulent.
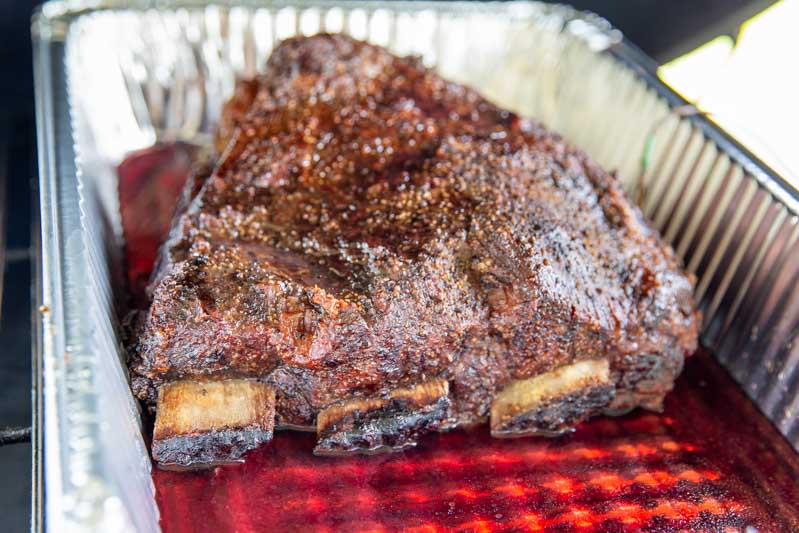
The Pan and Braise Method
Instead of wrapping the ribs directly, place the entire rack into a heavy-duty aluminum pan. This pan acts as a reservoir for all the rendered Wagyu fat and the braising liquid, ensuring nothing escapes into the coals.
- The Liquid: Add 1 cup of red wine (a bold Cabernet or Malbec works beautifully) or beef broth to the bottom of the pan.
- The “Buddha” Tip: I love using red wine here because the tannins and acidity provide a sophisticated counterpoint to the rich, buttery fat of the Black Grade Wagyu.
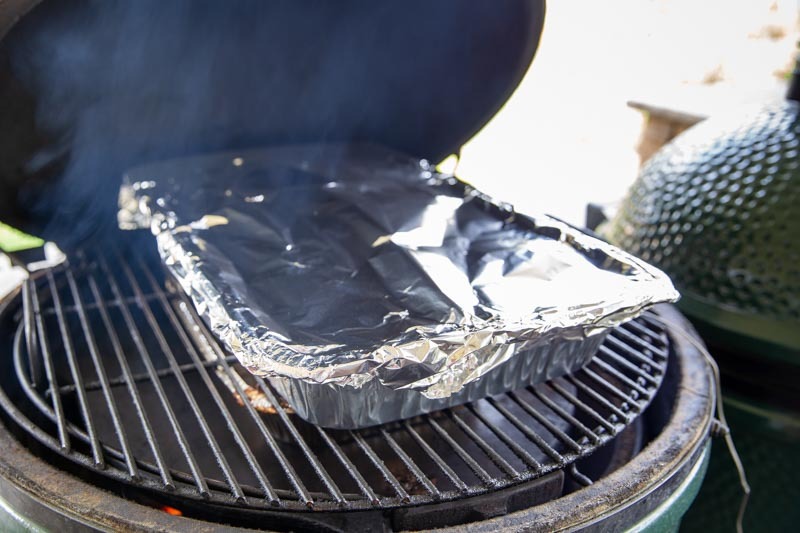
- The Seal: Cover the top of the pan tightly with a double layer of aluminum foil. You want to create a pressurized steam environment.
Why We “Crutch”
The Texas Crutch serves two vital purposes for Dino Bones:
Tenderizing the Muscle: The combination of the red wine and the steam helps break down the heavy connective tissues and collagen found in plate ribs. It essentially “confits” the meat in a bath of wine and rendered Wagyu gold, resulting in that legendary “pull-apart” texture.
Speeding Up the Cook: By trapping the steam and heat, you bypass “the stall” entirely. The internal temperature will begin to climb much faster than it would if the ribs were left exposed on the grate.
Step 8: The Finish Line—Probe Tenderness and The Rest
After a few hours in the “Texas Crutch,” your kitchen (and your backyard) will smell like a five-star steakhouse. But don’t let the aroma rush you; the final 1% of the cook is where the magic truly happens. You aren’t just looking for a number on a screen; you are looking for a feeling.
The Two Rules of “Done”
To know when these Wagyu Dino Bones are ready to pull, you must hit two specific markers:
- The “Probe Tender” Test: Take your ThermoPop and insert it through the foil into the thickest part of the meat between the bones. You aren’t just looking at the digits… you are feeling the resistance. You want the probe to slide in and out like it’s going into a room-temperature tub of butter. If there is any “tug” or “grab” from the muscle fibers, they need more time.
- The Temperature Window: While “feel” is king, the science usually lands between 204°F and 208°F. Because of the intense marbling in the Snake River Farms Black Grade beef, these ribs can handle (and often require) those higher temps to fully liquefy the intramuscular fat.
The Most Important Step: The Rest
Once you’ve achieved that “buttery” probe feel, pull the pan from the Big Green Egg. Do not unwrap them.
Place the foil-covered pan into a dry cooler (like a Yeti or any insulated chest) and let them rest for 1–2 hours.
The Result: During this rest, the muscle fibers relax and reabsorb the braising liquid and rendered fat. If you slice them immediately, the juices will run out, and the meat will tighten up. After a 2-hour rest, the meat will stay glistening and moist from the first bite to the last.
Why the Cooler? This is called “faux-cambroing.” The insulation allows the temperature to drop incredibly slowly.
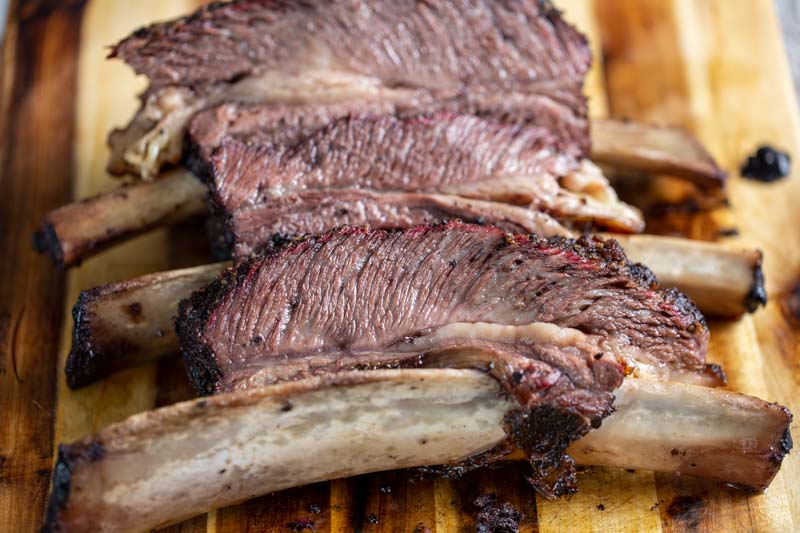
Step 9: The Reveal and Slicing
When it’s finally time to eat, carefully unwrap the ribs, watch out for the steam, and lift the rack onto a large cutting board.
- The Slicing: Because these are Plate Ribs, you don’t need to be fancy. Simply slice down between the bones to create individual “Dino Bones.”
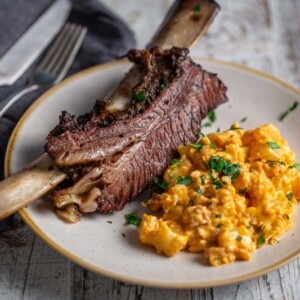
- The Presentation: Serve them bone-in. There is nothing quite like the sight of a single, massive Wagyu rib with a deep smoke ring and a glistening mahogany bark sitting on a plate.
The combination of the Big Green Egg’s wood-fired flavor, the red wine braise, and the world-class Snake River Farms Wagyu creates a BBQ experience that your guests will be talking about for years.

Smoked Wagyu Beef Plate Short Ribs
Ingredients
- I rack of Snake River Farms America Wagyu Beef Short Ribs
- 1/4 c kosher salt
- 1/4 c coarse ground black pepper
- 1 c red wine
Instructions
- Trim the fat off the meat side until you can see the marbling of the beef
- Leave the bone side alone as you want the membrane in place to hold the ribs together
- Slather with hot sauce (or mustard) as a binder for the seasoning
- Use a 50/50 mix of salt & pepper and spread evenly on all surfaces of the beef ribs
- Let sit at room temp as you setup the smoker
- Light the Big Green Egg using post oak wood chunks to 275°
- Put the ConvEGGtor in for indirect cooking
- Place water pan on top of ConvEGGtor underneath the grill grate
- When the temp stabilizes and you see a thin line of blue smoke streaming from the top it is time to put the ribs inside
- Place the ribs on the grilling grate bone side down and let smoke for an hour before checking
- Look to see if the rib surface is drying out and spray with a mist of water (you can use a mix with cider vinegar if you wish)
- After 3 hours in the smoke the meat should measure 165° and it is time to wrap
- Place the ribs in an aluminum pan with 1 cup of red wine (or beef broth) and seal with foil
- Let this cook for another 2-3 hours until the meat is probe tender and measures 204°
- Wrap and place in cooler for another 1-2 hours
- Slice and serve
Nutrition information is automatically calculated, so should only be used as an approximation.


Thanks for that!
You’re welcome ?
Just follow the recipe and you’ll have outstanding ribs.
Thanks brother!
Do you recommend a dry brine on the ribs the day before your cook? If so, trim the fat first or no? Thanks!
Dry brining always makes things better… so yes! And yes trim the fat as it’s not needed on the beef ribs.
Followed the recipe exactly and the ribs were awesome. Thank you.
I am glad this worked for you!
Hi Chris, I’m The BarbBQ Mistress. Your guidance was great and the wagyu short ribs were excellent. I’m still figuring out this Big Green Egg and your tips are priceless.
Thanks for the kind words and positive energy!
I just tried your smoked beef short ribs recipe, and they were an absolute hit! The flavors were incredible, and the meat was so tender. I love how you broke down the process step-by-step. Can’t wait to try more of your recipes on the Big Green Egg!
Thanks for posting this!
This smoked beef short ribs recipe looks absolutely mouthwatering! I can’t wait to try it on my Big Green Egg this weekend. The tips on seasoning and cooking time are super helpful. Thanks for sharing!
Thank you 🙏
You always have a great recipe with quality meat. I like that a lot