
This post contains affiliate links. Please see our disclosure policy.
Learning How to Master Rotisserie Chicken on the Big Green Egg requires more than just a motor and a spit; it requires a deep understanding of fire management within the ceramic walls of the grill. While a rotisserie attachment like the Joetisserie promises a self-basting and juicy bird, many pitmasters fall into the trap of scorching their dinner on the first attempt. You should view my early experience as a masterclass in what happens when you have too much fuel and too little separation between the heat and the poultry. This process provides a way for you to learn from my “burnt” bird so that your first rotisserie chicken features a perfect, mahogany skin rather than a blistered exterior. You will find that the intense convection of the Egg, combined with a rotating spit, creates a succulent result that no kitchen oven can ever match.
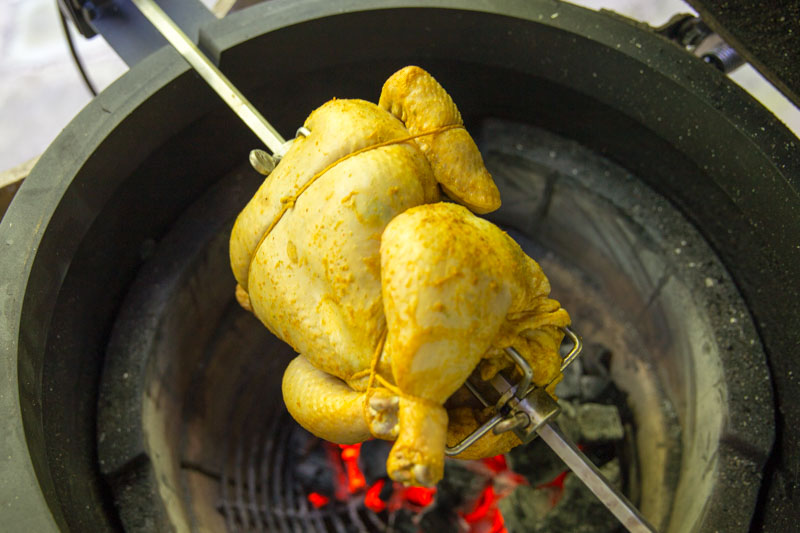
The secret to a successful rotisserie cook lies in the “Banked Coal” technique and precise vent control. You should avoid the temptation to fill the entire firebox with lump charcoal, as the direct radiant heat will char the delicate skin long before the dark meat reaches its safe temperature. Because the Big Green Egg holds heat so efficiently, a small and concentrated pile of charcoal pushed to the back of the firebox creates the ideal indirect environment for a slow-roasted finish. This technique ensures that your chicken remains moist and tender while the skin renders into a thin, crispy shell. Prepare to stabilize your temperature at 300°F and follow our definitive guide to avoiding the most common rotisserie mistakes.

Table of Contents
Get My NEW Book
The Ultimate Big Green Egg Cookbook

Step 1: Banking the Coals for Success
Achieving a professional-grade rotisserie finish requires you to manipulate the firebox to create a “safe zone” for the meat. You should start by loading your Big Green Egg with a moderate amount of fresh lump charcoal, but you must push the pile entirely to the back of the grill. This process provides a way for the heat to radiate off the ceramic walls rather than hitting the chicken with direct, rising flames. You will find that banking the coals prevents the flare-ups caused by dripping chicken fat hitting the fire. Because you are using the Joetisserie, the lack of a ConvEGGerator makes this offset charcoal placement the most critical step for success.
Step 2: Trussing and Balancing the Spit
Mastering the rotation of the bird requires you to secure the wings and legs tightly against the body with butcher’s twine. You should focus on creating a compact “torpedo” shape to ensure the chicken spins with a consistent rhythm on the motor. This process provides a way to prevent loose limbs from flopping and burning as they pass closest to the hot coals at the back of the Egg. You will find that a well-balanced spit puts less strain on the Joetisserie motor and ensures an even cook from breast to thigh. Because the center of gravity matters, you must slide the forks deep into the meat to lock the bird firmly in place.
Step 3: Managing the 300°F Threshold
Achieving a golden-brown skin requires you to resist the urge to cook at high “roasting” temperatures above 350°F. You should aim for a steady dome temperature of 300°F to allow the fat under the skin to render out slowly and completely. This technique ensures that your Rotisserie Chicken on the Big Green Egg stays juicy while the skin remains bite-through tender. Because I originally used too much charcoal, the exterior of my chicken scorched before the internal temperature reached its target. This process allows you to monitor the color of the bird and adjust your top vent to slow the cook if the skin begins to darken too quickly.
Step 4: Pulling at the Perfect Temp
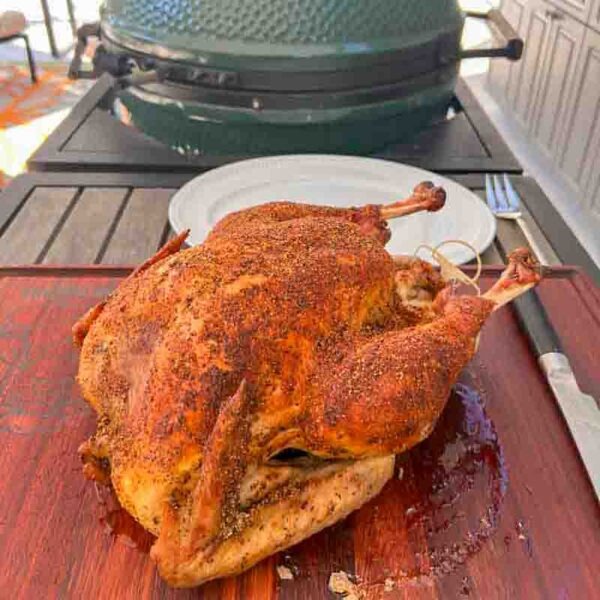
Mastering the final stage requires you to use an instant-read thermometer to verify the internal temperature of both the breast and the thigh. You should pull the chicken off the spit when the breast measures 160°F and the thigh hits 175°F. This process provides a way for the carryover heat to bring the bird to a safe and succulent finish during the rest. You will find that the spinning motion of the rotisserie continues to baste the meat even as you move it to the carving board. Because you avoided the direct heat of a full firebox, your chicken will feature a professional mahogany glow that is free of charred or bitter spots.
Final Thoughts: Mastering the Spin for a Professional Finish
Mastering How to Master Rotisserie Chicken on the Big Green Egg is a journey that often begins with a few charred lessons and ends with the most succulent poultry you have ever tasted. You should embrace the learning curve of fire management because the reward of a self-basted, wood-fired bird is worth every adjustment to your charcoal pile. This process provides a way for you to transform a simple grocery store chicken into a centerpiece that features a thin, glass-like skin and incredibly moist dark meat. You will find that once you control the radiant heat of the ceramic walls, the Joetisserie becomes the most used accessory in your outdoor kitchen. Because you now understand the “Banked Coal” method, you can replicate this gourmet result for your family without the fear of a burnt exterior.
To complete your rotisserie feast, you must consider the proper resting period to ensure the juices stay locked within the breast meat. You should let the chicken rest for at least 15 minutes on the spit or a warm platter before you begin carving. This technique ensures that your Rotisserie Chicken on the Big Green Egg remains juicy from the first slice to the last. Because the rotating motion keeps the fats in constant movement, the skin stays seasoned and flavorful throughout the resting phase. This process allows the smoky cherry wood essence to settle into the meat for a sophisticated and balanced flavor profile. Once you master the temperature and the trussing, you should serve this masterpiece with roasted root vegetables or a fresh chimichurri sauce for the ultimate backyard dinner.
People Also Ask (PAA)
- Why did my rotisserie chicken skin burn so fast? You likely used too much charcoal or placed the fire directly under the bird. You must bank your coals to the back of the firebox to create an indirect heat environment that allows the skin to render slowly at 300°F.
- Do I need to use the ConvEGGerator with a Joetisserie? You should not use the ConvEGGerator because the Joetisserie ring creates a gap that prevents the stone from sitting properly. This process requires you to use the “Banked Coal” method to protect the meat from direct flames while still benefiting from the ceramic convection.
- How do I keep the chicken from flopping on the spit? You must truss the bird tightly with butcher’s twine and lock the rotisserie forks deep into the breast and thigh meat. This technique ensures a balanced rotation which prevents the motor from straining and guarantees an even cook on all sides of the poultry.


made for the KamadoJoe, but does it fit the large BGE
Correct!
Just bought one for my large BGE, and it doesn’t fit perfect in the front. Small gap when I close the lid, not sure this matters because of the hole where the spit is anyway but just curious if you found that to be the case with yours?
I did not have that issue. Perhaps adjust the bands?