
This post contains affiliate links. Please see our disclosure policy.
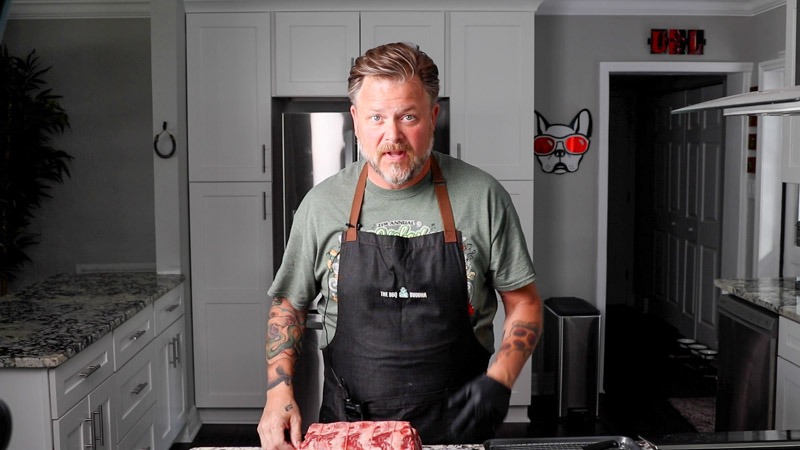
When it comes to the holidays, the stakes are a little higher. You want a centerpiece that stops the conversation when it hits the table, a meal that feels like a true celebration. While turkey has its place in November, a Bone-In Prime Rib Roast is the undisputed king of the December holiday table.
There are plenty of ways to cook a roast, but if you want that perfect edge-to-edge pink center, a crust that’s packed with herbal richness, and that unmistakable hint of wood-fired soul, the Big Green Egg is your best friend. This isn’t just a recipe; it’s a foolproof method to ensure you aren’t stressed out while your guests are hovering in the kitchen.
We’re talking about a dry-brined, garlic-herb butter-crusted masterpiece that uses the ceramic power of the Egg to roast with unmatched precision. It’s decadent, it’s beautiful, and it’s surprisingly simple if you follow the right steps.
So, let’s leave the kitchen oven for the side dishes. Pour yourself a deep, earthy glass of Malbec, take a deep breath, and let’s walk through how to command the grill for the ultimate holiday Prime Rib.
Table of Contents
Get My NEW Book
The Ultimate Big Green Egg Cookbook

Why This Recipe is the Winner
- The Dry Brine: We start 24 hours out to lock in moisture and season the meat deep into the center.
- The Crust: A heavy slather of herb-infused butter and Dizzy Pig Cow Lick creates a savory “bark” that rivals any high-end steakhouse.
- The Clean Smoke: A kiss of pecan wood provides a subtle sweetness that complements the rich marbling of a Snake River Farms roast.
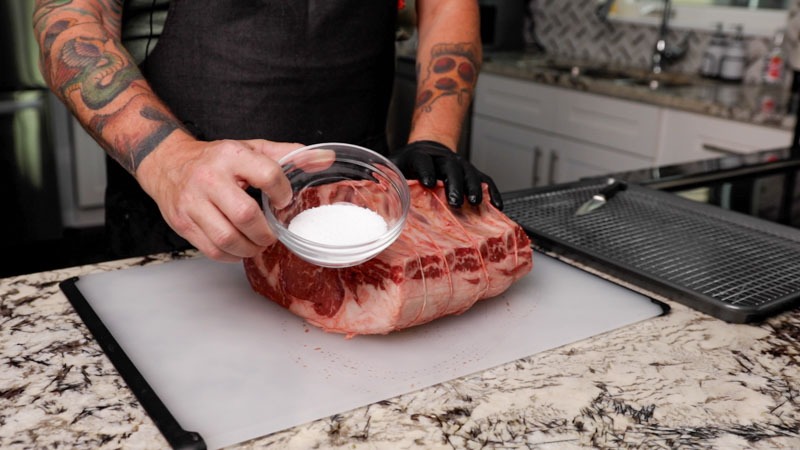
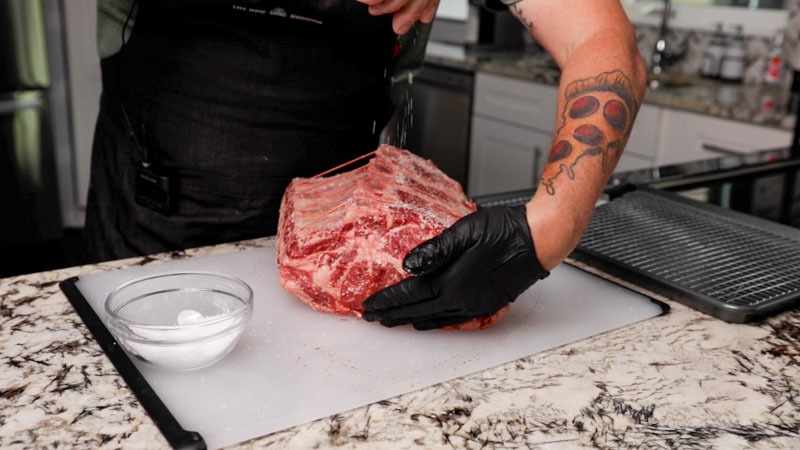
Dry brine the roast
If you want to move from a “good” roast to a “legendary” one, it all starts 24 hours before the fire is even lit. When you take that Prime Rib out of the packaging a full day early, you aren’t just getting a head start… you are performing a culinary magic trick called Dry Brining.
After you’ve patted the exterior bone-dry with paper towels, you’re going to salt the roast generously on all sides. This sets off a fascinating process: the salt draws moisture out of the meat, dissolves into a concentrated brine, and then is reabsorbed deep into the muscle fibers through osmosis.
Why Dry Brining is a Game-Changer
- Deep Seasoning: Unlike a last-minute seasoning that only sits on the surface, dry brining ensures the salt penetrates deep into the center of the roast. Every bite will be perfectly seasoned, not just the crust.
- The Ultimate Crust: By leaving the roast uncovered in the fridge for 24 hours, the cold air dehydrates the surface. This “parched” skin is exactly what you need to achieve a world-class, dark, savory crust. If the surface is wet, it steams; if it’s dry, it sears.
- Tenderness: The salt helps break down the tightly wound proteins in the beef, resulting in a more tender, “melt-in-your-mouth” texture once it hits the plate.
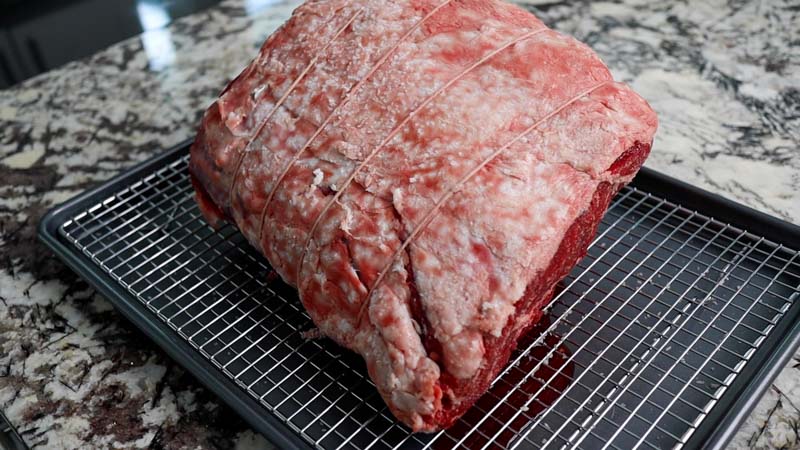
Simply place your salted roast on a wire rack set over a sheet pan and let it sit in the back of the fridge. This airflow is key, it ensures the bottom is drying out just as much as the top. Trust me, this is the single most important step for a holiday-worthy Prime Rib.
Precision is everything when you’re dealing with a premium cut of beef like this. Before that roast goes into its 24-hour nap in the fridge, there are two mechanical steps you cannot skip: seasoning by the numbers and trussing for success.
The Golden Ratio: 1 Teaspoon per Pound
Don’t just “eyeball” the salt. For a holiday centerpiece, you want consistency. Use 1 teaspoon of Diamond Crystal Kosher Salt per pound of meat. Why Kosher salt? Its coarse grains are easier to pinch and distribute evenly, and it lacks the harsh, metallic “iodized” taste of table salt. As you sprinkle, held your hand about 10–12 inches above the meat, this “snowing” technique ensures every square inch of the fat cap and the sides are covered. This measured approach guarantees the meat is seasoned perfectly to the bone without ever becoming oversalted.
The Truss: Tie it to Fly it
Prime rib is a massive muscle, and as the heat of the Big Green Egg begins to render the fat and relax the proteins, the roast will naturally want to spread out and “flatten.” To prevent this, you need to tie the roast with butcher’s twine.
- Hold the Shape: By tying the roast tightly between each bone, you “train” the meat to stay in a compact, cylindrical shape.
- Even Cooking: A uniform shape means uniform cooking. If one end is thinner than the other, it’ll overcook before the center is ready. Tying it keeps the thickness consistent from end to end.
- The Bone-In Advantage: If you’re using a “standing rib roast” where the bones have been cut away and tied back on, the twine is what holds that flavorful bone structure against the meat, acting as a natural heat shield and flavor conductor.
Simply loop the twine between each rib bone and pull it snug (but not so tight that it cuts into the meat). It’s a small detail that makes the difference between a roast that looks “rustic” and one that looks like it came from a high-end Manhattan steakhouse.
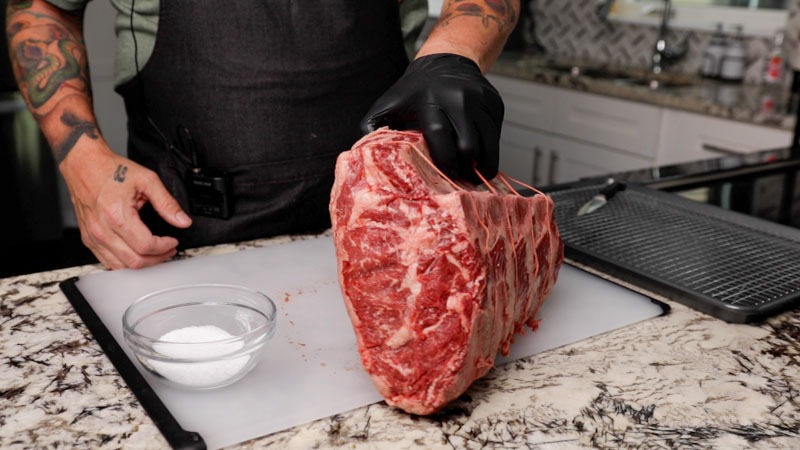
Once the roast is tied and your salt is measured, it’s time to commit to the process. Cover all sides of the roast generously with the kosher salt, making sure to get the ends and the fat cap. Place the meat onto a baking pan fitted with a wire rack and slide it into the fridge, uncovered, for a full 24 hours.
This is where the magic happens. I tell people all the time: this dry brining technique is a non-negotiable step. While it might seem like you’re just “waiting,” the salt is actually working overtime to transform the texture of the beef. It does three critical things simultaneously:
- It Tenderizes: The salt slowly breaks down the tough muscle proteins, ensuring every slice is butter-tender.
- It Locks in Flavor: By drawing the seasoning deep into the interior, you aren’t just tasting salt on the surface; you’re tasting a deeply seasoned, beefy profile in every bite.
- It Makes the Meat Juicier: It sounds counterintuitive to “dry” the meat to make it juicy, but dry brining actually changes the protein structure so the meat holds onto its natural juices more effectively during the cook.
This step shouldn’t be skipped! That 24-hour rest is the difference between a standard Sunday roast and a holiday masterpiece that people will be talking about for years.
Prep the Bone-in Prime Rib Roast
Once that 24-hour dry brine is complete, you’ll notice the meat has taken on a darker, richer color and the surface looks tight and dry, this is exactly what you want. But don’t go rushing from the fridge straight to the fire.
Take the meat out of the fridge a full 2 hours before you plan to put it on the Big Green Egg. This is often called “tempering” the meat, and it’s a critical bridge between the cold fridge and the hot grill. Here is why those 120 minutes on the counter matter so much:
- Taking the Chill Off: A large bone-in roast is a massive heat sink. If you put a 38°F roast into a 325°F environment, the outside will inevitably overcook and turn grey before the center even begins to warm up. By letting it sit out, you bring the internal temperature up closer to room temperature, ensuring a much more even cook.
- Edge-to-Edge Pink: Tempering is the secret to avoiding that thick “grey ring” of overcooked meat just under the crust. The closer the starting temp of the meat is to your target finishing temp, the more uniform that beautiful medium-rare pink will be from the edge all the way to the bone.
- Better Fat Rendering: Allowing the fat cap to soften slightly at room temperature helps it render more efficiently once the heat hits it, leading to a better “melt-in-your-mouth” experience and a superior crust.
While the meat is tempering, this is the perfect time to prep your garlic-herb butter slather and get your Big Green Egg stabilized at your target temperature. By the time the Egg is ready, your roast will be, too.
Seasoning the roast
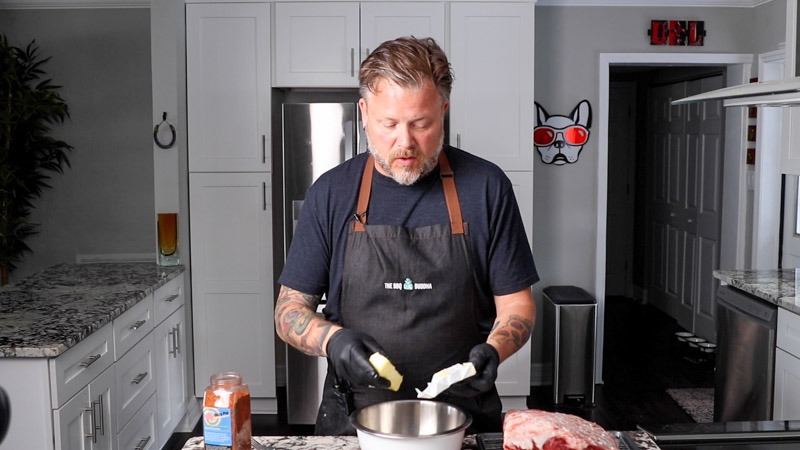
While the roast is tempering on the counter, it’s time to prepare the “secret sauce” that defines the crust of this bird… or in this case, this massive hunk of beef. We’re talking about a Garlic-Herb Butter Slather that acts as both a self-basting mechanism and a flavor powerhouse.
To get started, you’ll need 2 sticks of unsalted butter, softened to room temperature so it’s easy to work with. Into that butter, you’re going to fold in:
- 8–10 Cloves of Minced Garlic: Yes, it sounds like a lot, but this is a large roast. The garlic mellows as it roasts, creating a sweet, savory profile that is classic for Prime Rib.
- 2 Tablespoons Fresh Minced Herbs: I recommend a blend of rosemary, thyme, and sage. These “hard” herbs hold up beautifully to the heat of the Big Green Egg.
- 2 Tablespoons Beef Seasoning: For this cook, I am using Dizzy Pig Cow Lick. It has a peppery, robust profile that was practically designed for high-quality beef.
Why the Butter Slather Matters
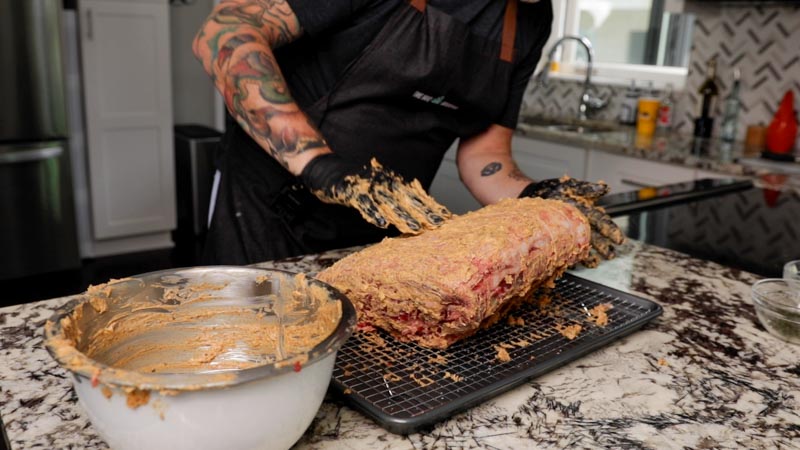
Because we’ve already salted the meat during the dry brine, this butter mixture is all about texture and aromatics. As the roast cooks, the butter melts and slowly trickles down the sides of the meat, keeping it moist while the herbs and garlic get “fried” into the surface. This creates a thick, flavorful crust (the crust-to-die-for) that provides a sharp contrast to the tender, pink meat inside.
Pro Tip: Don’t be shy with the application. Use a spatula or your hands to apply a thick, even layer over the top fat cap and the ends of the roast. This is the “armor” that will protect the meat while infusing it with steakhouse-level flavor.
Mix all the ingredients thoroughly with the butter.
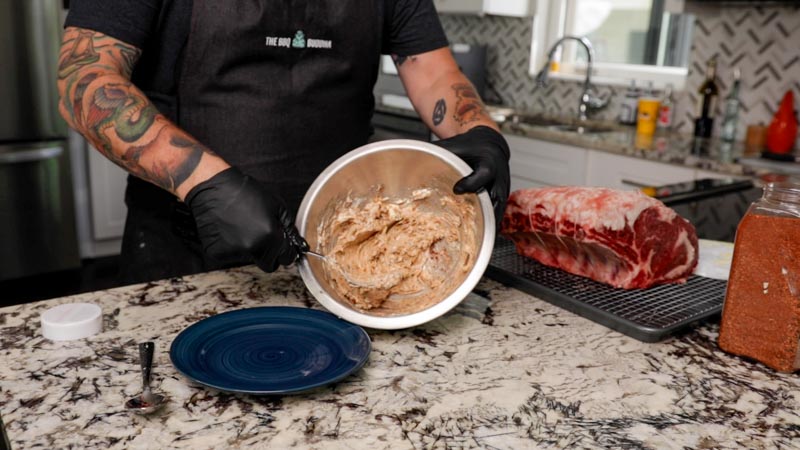
Next, rub the butter on all surfaces of the rib roast.
Setting up the Big Green Egg
With the roast slathered and ready, it’s time to dial in the “engine” of this cook. Setting up the Big Green Egg correctly is the difference between a clean, aromatic roast and one that tastes like heavy soot.
The Foundation: Clean Fire & Subtle Smoke
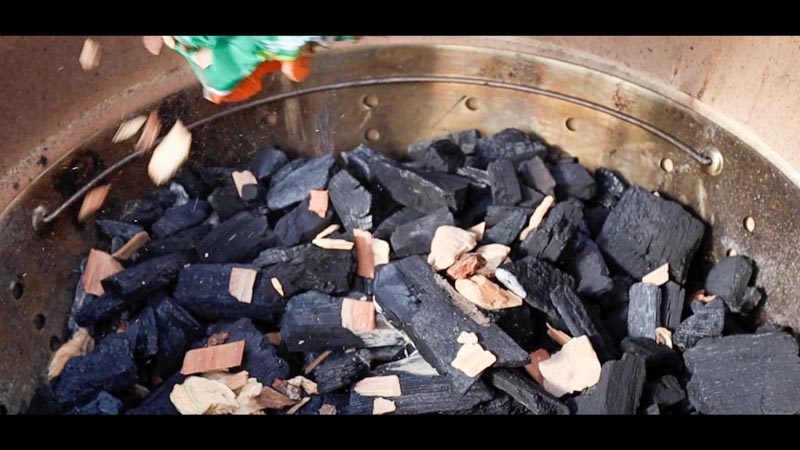
Start by filling the firebox with high-quality lump charcoal. You want a full load here to ensure a consistent, steady heat source for the duration of the roast. Light the charcoal in the center and let it burn for about 10 minutes with the dome open. This allows the core of the fire to establish itself.
Once you have a small, glowing bed of coals, it’s time for the flavor. Add a handful or two of Pecan wood chips directly onto the lit coals. I choose Pecan for Prime Rib because it offers a sophisticated, slightly sweet smoke profile that doesn’t overpower the natural richness of the beef the way Hickory or Mesquite might.
The Indirect Setup
Since we want to roast this beef (not grill it over an open flame) we need to transform the Egg into a convection oven.
- Insert the ConvEGGtor: Place it with the legs facing up. This creates the heat shield necessary for indirect grilling.
- The Drip Pan: I highly recommend placing a disposable foil pan on top of the ConvEGGtor (under the grate) to catch the rendering butter and beef fat. This keeps your Egg clean and prevents any “bad smoke” from fat burning on the hot ceramic.
- The Grate: Set your stainless steel cooking grate on top of the ConvEGGtor legs.
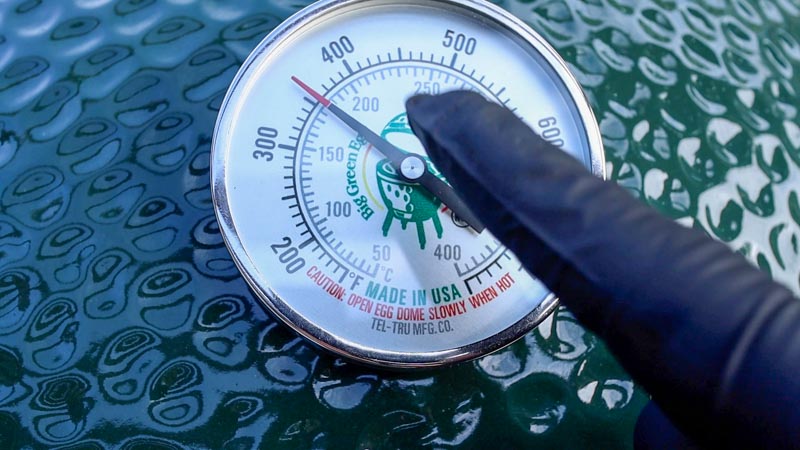
Stabilizing at 350°F
Close the lid and begin adjusting your vents. Your goal is a rock-solid 350°F. This temperature is the “sweet spot” for Prime Rib on the Big Green Egg; it’s high enough to sizzle that herb-butter crust and render the fat, but gentle enough that it won’t dry out the interior.
Once the blue smoke is wispy and thin (not thick and white) and your temp has been stable for at least 15 minutes, it’s time to place your rib roast in the center of the grate.

Cooking Times for Grilled Bone-In Prime Rib Roast
Timing is everything when you are the lead cook for a holiday meal. One of the most common questions I get is, “How long is this giant roast going to take?” While every fire and every piece of meat behaves a little differently, having a reliable roadmap is the key to serving dinner on time rather than three hours late.
Because we are roasting at a consistent 350°F on the Big Green Egg, we can estimate our timeline based on the weight of the roast. However, remember that these times are guidelines; the real secret to a perfect Prime Rib is cooking to internal temperature, not just the clock. To hit that perfect medium-rare, you want to monitor your progress every 30 minutes to ensure you’re on track for that target 125°F pull temp.
Use the chart below to plan your day, from lighting the charcoal to the final rest.
| Roast Weight | Cooking Time | Internal Temp |
|---|---|---|
| 4 lbs | 1.5 – 2 hours | 125°F (Medium Rare) |
| 6 lbs | 2 – 2.5 hours | 125°F (Medium Rare) |
| 8 lbs | 2.5 – 3 hours | 125°F (Medium Rare) |
| 10 lbs | 3 – 3.5 hours | 125°F (Medium Rare) |
| 12 lbs | 3.5 – 4 hours | 125°F (Medium Rare) |
Cooking the Prime Rib Roast
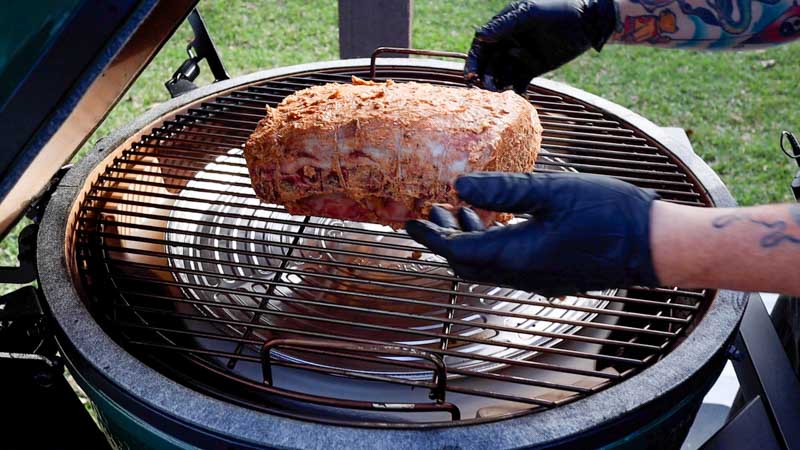
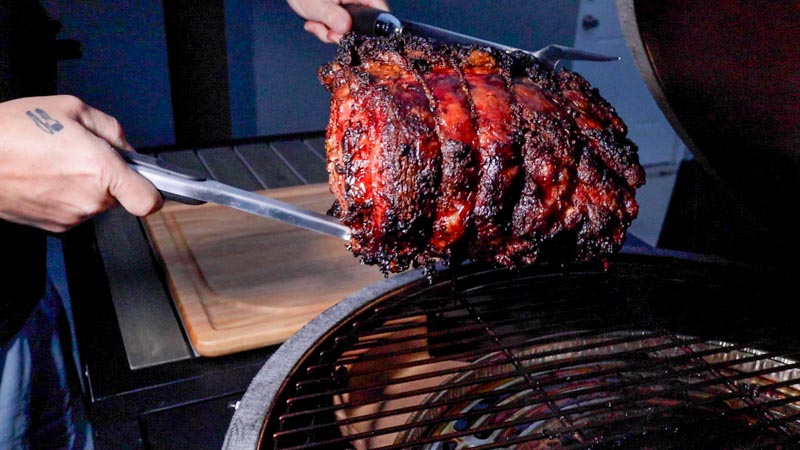
Once the Egg is dialed in at 350°F, it’s time for the moment of truth. Place your roast onto the center of the grate, bone-side down. Positioning the roast with the ribs facing the fire is a strategic move. Those thick bones act as a natural heat shield, protecting the delicate eye of the rib from the most direct heat source below. This allows the internal temperature to rise slowly and evenly, which is the secret to that edge-to-edge pink perfection we’re chasing.
Now comes the hardest part: let it cook for an hour undisturbed. In the world of BBQ, we have a saying: “If you’re lookin’, you ain’t cookin’.” Every time you lift the lid of the Big Green Egg, you lose that carefully stabilized convection heat and the aromatic pecan smoke you’ve worked so hard to build. By leaving the dome closed for at least the first sixty minutes, you allow:
- The Crust to Set: The garlic-herb butter needs uninterrupted heat to begin “frying” onto the surface of the meat, forming that savory, crusty bark.
- The Smoke to Infuse: This first hour is when the meat is most receptive to the subtle, sweet notes of the pecan wood.
- Heat Stability: The ceramic walls of the Egg are doing the heavy lifting here, circulating heat like a professional oven. Keeping the lid shut ensures the temperature stays rock-solid.
Set your timer, keep your glass of Malbec topped off, and trust the process. After that first hour, you can start checking your internal temperature probes, but for now, let the Egg work its magic.
Once you hit that one-hour mark, the aroma wafting from the Egg is going to be incredible. The butter has melted into the herb crust, the garlic is toasted, and the pecan smoke has worked its way into the bark. But now we move from the “set it and forget it” phase into the precision phase.
From this point forward, you need to be diligent. Take an internal temperature of the roast every 30 minutes using a high-quality instant-read thermometer (like a Thermapen) or a remote probe system. You want to insert the probe into the thickest part of the roast, making sure you don’t hit a pocket of fat or rest the tip against the bone, which can give you a false high reading.
The Magic Number: 125°F
We are aiming for a pull temperature of 125°F. Here is why this specific number is the gold standard for holiday Prime Rib:
- Carryover Cooking: Once you take a massive roast off a 350°F grill, it doesn’t stop cooking. The residual heat on the exterior will continue to push inward. Pulling at 125°F allows the temperature to “carry over” another 5–10 degrees while the meat rests.
- The Perfect Medium-Rare: That carryover will land you right in the 130°F–135°F range, which is the sweet spot for Prime Rib. It’s warm enough to melt the intramuscular fat (marbling) so the meat is juicy, but cool enough to keep that gorgeous ruby-red center.
- Avoid the “Grey Ring”: If you wait until the roast hits 135°F on the grill, the carryover will push it toward Medium (145°F+), and you’ll lose that tender, buttery texture that makes Prime Rib so special.
Treat that 125°F mark as your finish line. As soon as your thermometer hits it, it’s time to get that roast off the heat and into the most important (and most often skipped) phase of the cook: the rest.

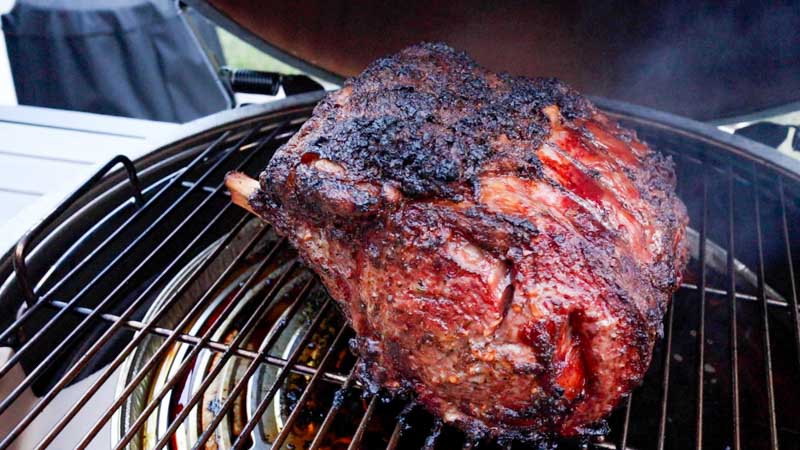
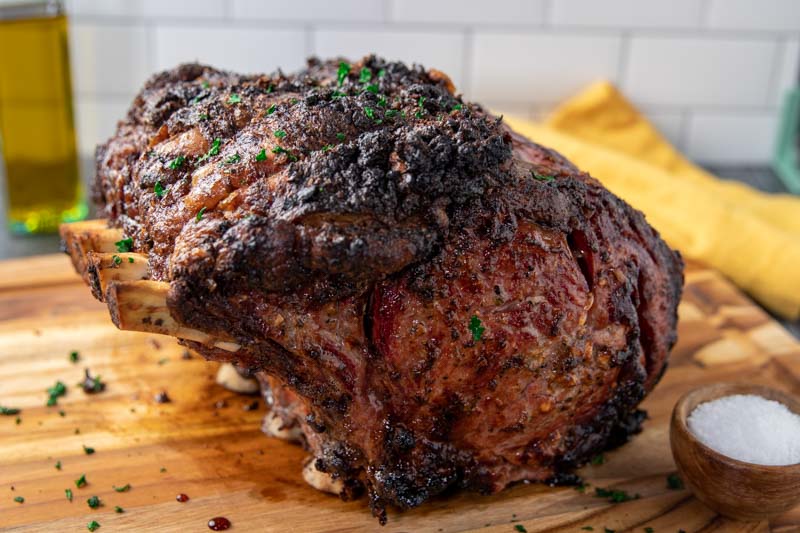
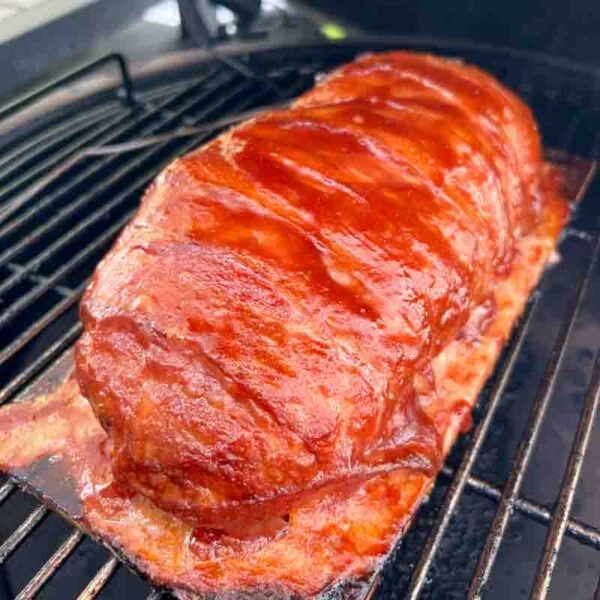
As you approach the two-hour mark, the transformation of the roast is nothing short of spectacular. The Big Green Egg has done its job, and the exterior should now be a deep, mahogany brown, crusted over with the toasted garlic, crisped herbs, and that Dizzy Pig Cow Lick seasoning.
The color of the exterior at this stage is your first indicator of success. That rich “bark” isn’t just for looks, it’s a concentrated layer of flavor that provides a sharp, savory contrast to the tender meat inside. The smell of the rendered beef fat mingling with the sweet pecan smoke will likely have your neighbors peaking over the fence.
The Home Stretch
While the roast looks like a finished masterpiece, remember that looks can be deceiving. Even if the outside looks perfectly charred and ready for the table, the thermometer is the only judge that matters. * Check the Ends: At the two-hour mark, the smaller end of the roast (the “taper”) will likely be further along than the thick center.
- The “Feel”: If you press on the exterior, it should feel firm and set—a sign that the butter slather has successfully fused with the beef to create that iconic steakhouse crust.
- Be Patient: If you’re sitting at 115°F or 120°F, resist the urge to crank the heat to “finish it off.” Let it coast those last few degrees at 350°F to ensure the transition from the crust to the center is as seamless and pink as possible.
You are minutes away from the finish line. Once that probe hits 125°F, you’ve officially conquered the cook.
Remove the Rib Roast and Rest
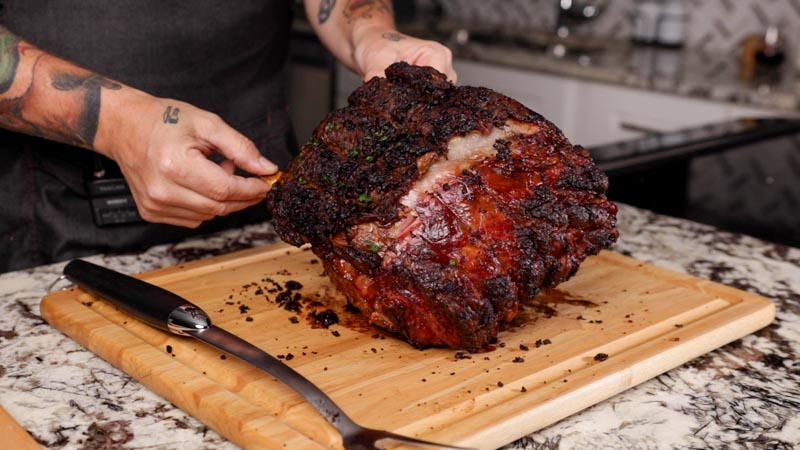
Around the 2.5-hour mark, you should hear the glorious sound of your thermometer alarm hitting that 125°F target. At this point, the exterior is a work of art (dark, crusty, and aromatic) while the inside is perfectly primed for a medium-rare finish.
Gently pull the roast from the Big Green Egg and transfer it to a large cutting board. Now, I’m going to ask you to do the hardest thing in all of outdoor cooking: Wait.
The Science of the Rest
You must let the roast rest for at least 20–30 minutes before you even think about picking up a carving knife. Here is why this is the most critical step of the entire holiday meal:
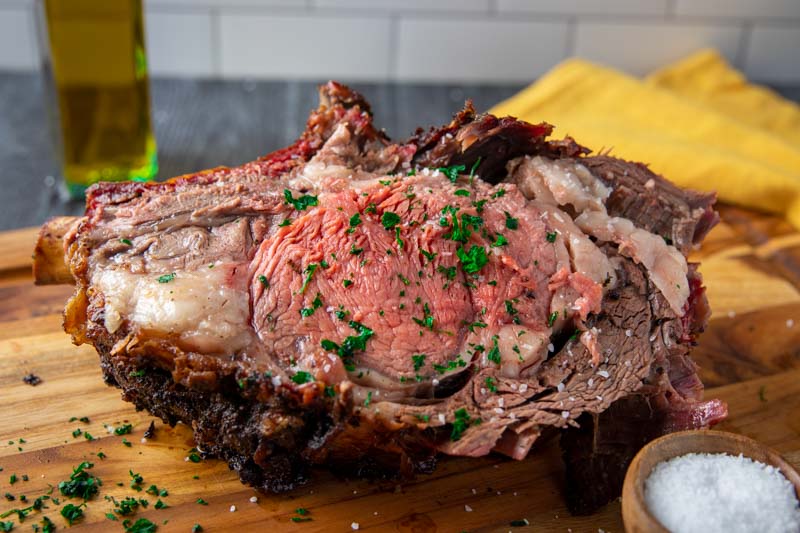
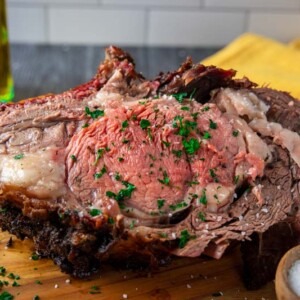
- Reabsorbing the Juices: While the roast was on the Egg, the heat pushed all the moisture toward the center. If you slice it immediately, those juices will come rushing out like a dam breaking, leaving you with a dry roast and a messy cutting board. Resting allows the muscle fibers to relax and reabsorb that “liquid gold,” ensuring every slice is incredibly succulent.
- The Carryover Finish: During this 20-30 minute window, the internal temperature will continue to rise (carryover cooking), peaking right around 130°F–135°F. This perfectly finishes the center while the rest of the meat stabilizes.
- Firming Up the Crust: The rest allows that herb-butter crust to firm up slightly, making it much easier to carve clean, beautiful slices without the bark falling off.
Pro Tip: You don’t need to tent it tightly with foil. In fact, doing so can trap steam and soften that amazing crust you just worked so hard to build. A loose piece of foil draped over the top (if it’s a cold kitchen) is plenty.
The Finish and Carving Instructions
When that timer finally goes off, and you see that internal temperature has peaked between 130°–135°F, congratulations… you’ve officially achieved the “Holy Grail” of holiday cooking. That carryover cooking has transformed your 125°F pull into a perfect, edge-to-edge medium-rare masterpiece.
Now, it’s time to turn that beautiful roast into the meal everyone has been waiting for.
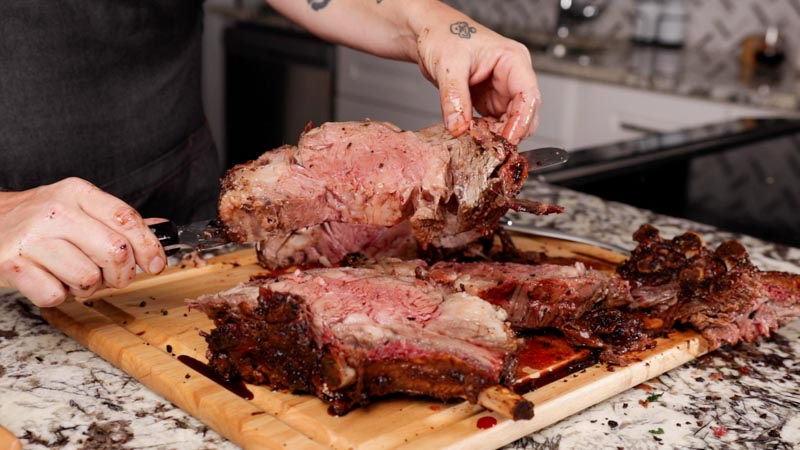
The Final Steps: From Board to Plate
- Remove the Twine: Carefully snip the butcher’s twine you tied 24 hours ago. You’ll notice the roast holds its shape perfectly now, thanks to the proteins setting during the cook and the rest.
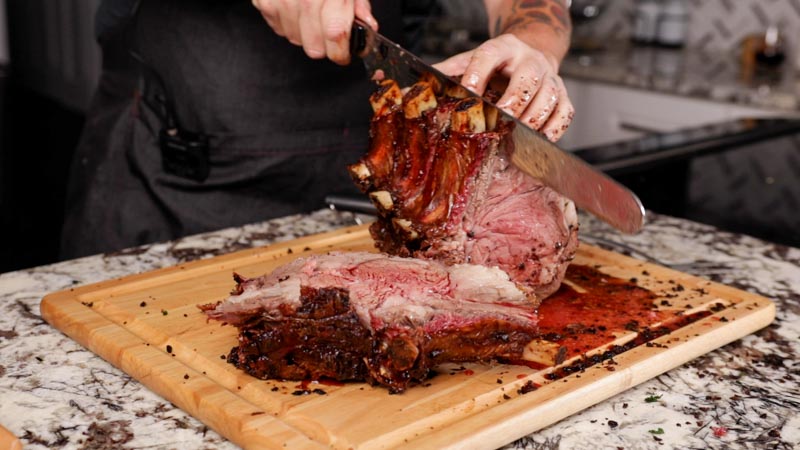
- Separate the Bones: If you cooked it “standing” with the bones attached, run your knife along the curve of the ribs to separate the meat from the bone rack. You can serve the bones separately (there’s always someone at the table who wants to gnaw on those flavorful ribs!) or save them for an incredible beef stock the next day.
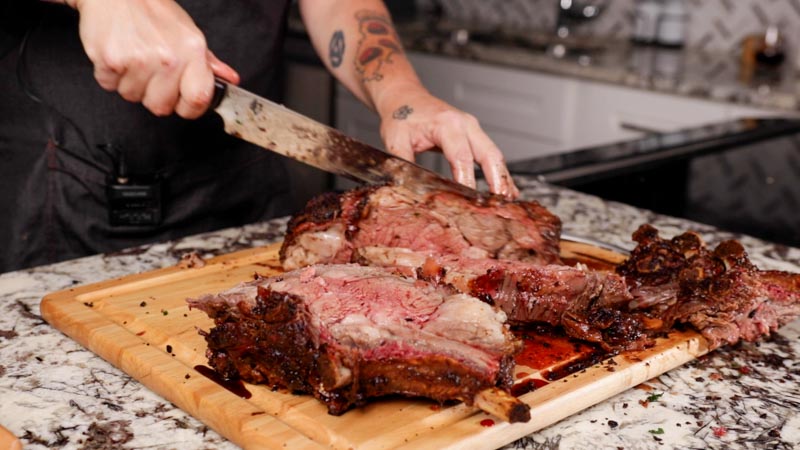
- Slice Against the Grain: Place the boneless roast on its flat side. Using a long, sharp carving knife, cut the prime rib into thick slices. For a true holiday feel, I like a “generous” cut, about 3/4 to 1 inch thick. Because of the rest, you’ll notice that the juices stay inside the meat, making every slice look like a ruby-red jewel.
- The Presentation: Arrange the slices on a warm platter. If you have any collected juices on the cutting board (the “jus”), drizzle them right back over the meat before serving.
The Result
What you’re serving is a roast that has been seasoned from the inside out via the dry brine, protected by a garlic-herb “armor,” and kissed by just enough pecan smoke to let your guests know this wasn’t done in a standard kitchen oven. It’s rich, it’s buttery, and it’s the ultimate way to say “Happy Holidays.”
Grilled Bone in Prime Rib Roast on the Big Green Egg
Ingredients
- 1 4- bone prime rib roast, 8-10 pounds
- 2 sticks unsalted butter
- 8-10 cloves garlic, minced
- 1 Tbs rosemary, minced
- 1 Tbs thyme, minced
- 2 Tbs Dizzy Pig Cow Lick seasoning
- Kosher Salt, 1 tsp per pound
Instructions
- Salt the prime rib roast with Kosher salt (1 tsp per pound) 24 hours before cooking and place on a baking sheet with a wire rack. Place in the refrigerator uncovered.
- -hours before cooking take the roast out of the fridge and allow it to come to room temperature.
- Soften the 2 sticks of butter and combine with minced garlic, minced herbs, and seasoning.
- Apply the butter mixture to the roast all over.
- Preheat your Big Green Egg to 350°F setup for indirect cooking using your ConvEGGtor. I like to use Pecan Wood chips for some additional smoke flavoring.
- When the temp is stable and the smoke is running clean, place the roast inside the Big Green Egg bone side down. and let cook undisturbed for an hour before checking. After that check on the roast and internal temperature every 30 minutes until an internal temperature of 125°F is achieved.
- Pull the roast and let rest 30 minutes before slicing.
- Slice the bones off the roast first, then cut the roast in to equal steaks.
Nutrition information is automatically calculated, so should only be used as an approximation.


My name is Paul. I’m from Ontario Canada Hamilton wonderful to watch your video meat. Look great. Give me another way to cooking it easy look delicious. That is my next cook on the egg is my prime rib. Thank you for your help.
Hey Chris tried your recipe on a 10lb roast. Amazing, best cooked meat i ever did.
Question how long for a 23lb prime rib?
Cooking this weekend
Thanks for the kind words! For a roast that large plan between 5.5 – 7 hours.