
This post contains affiliate links. Please see our disclosure policy.
When it comes to the pillars of the BBQ world, pork ribs are the gold standard. While many backyard cooks reach for Baby Backs, the St. Louis-style rib is the preferred choice for those on the competitive circuit. These are essentially spare ribs with the sternum bone, cartilage, and rib tips removed to create a perfect, uniform rectangular rack. Because they come from the belly side of the hog, they boast a higher fat content and deeper marbling than their loin-back cousins, which translates to incredible flavor on the grill.
In this post, I am introducing a technique that departs from the traditional “low and slow” indirect method. We are cooking these St. Louis-style ribs over direct heat on the Big Green Egg. By raising the cooking grid, we allow the rendered pork fat to drip onto the hot charcoal, creating an amazing flavor profile you just cannot get with a plate setter in the way.
Now sit back, grab a nice cold PBR, and enjoy this guide to mastering direct heat St. Louis-style ribs.
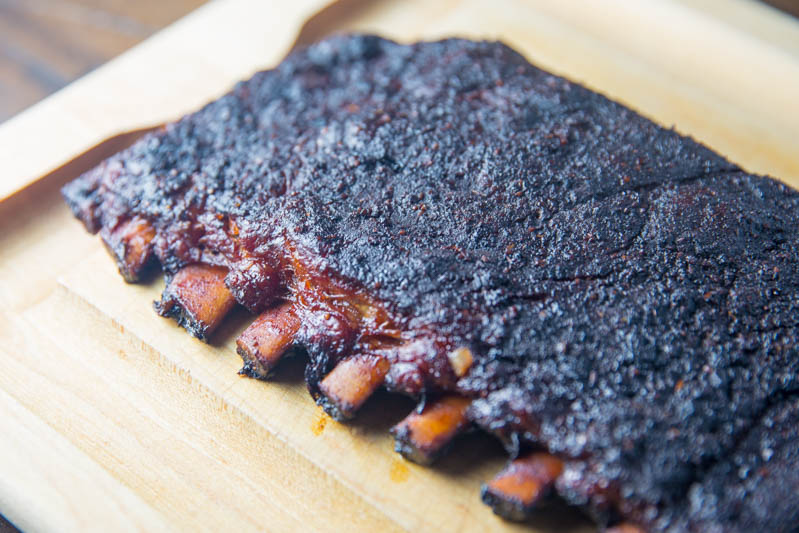
Table of Contents
- Direct Heat vs. Indirect: A New Rib Technique
- Step 1: Prep and Seasoning
- Step 2: Big Green Egg Setup and Wood Choice
- Step 3: The Direct Heat Cook and Bark Development
- Step 4: The Foil Wrap and Finish
- Step 5: The Rest, Slicing, and Serving
- Final Thoughts: The Power of Direct Heat
- Direct Heat St. Louis Ribs on the Big Green Egg Recipe
Get My NEW Book
The Ultimate Big Green Egg Cookbook

Direct Heat vs. Indirect: A New Rib Technique
I have tried many rib cooking methods over the years with varying success. The classic 3-2-1 or 2-2-1 methods certainly crank out decent ribs, but after watching my good friend and Pitmaster Chris Capell from Dizzy Pig BBQ, I picked up a new technique that I had to put to the test.
This method focuses on direct grilling instead of the traditional indirect setup. By using a lower heat over a longer period, we can render the fat directly over the coals without burning the meat. This approach brings a unique depth of flavor to the St. Louis cut that you just cannot achieve with a heat deflector in place.
Here is the process for my first cook using these “Dizzy Pig style” direct heat tips on the Big Green Egg.
Step 1: Prep and Seasoning
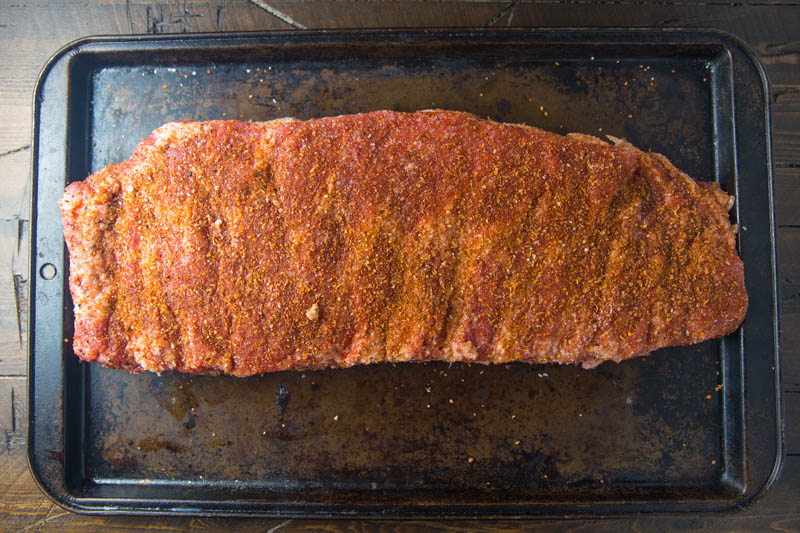
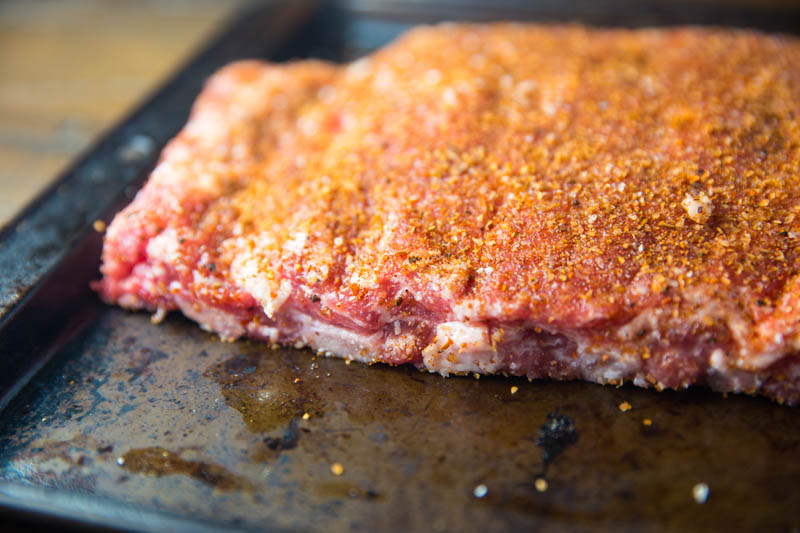
To get the best results with this direct heat method, preparation is key. I started by trimming the St. Louis-style racks to ensure a uniform shape, which helps them cook evenly over the charcoal. Once the ribs were cleaned and prepped, I applied a copious amount of Dizzy Dust dry rub to both sides.
I let the seasoned ribs sit in the fridge overnight. This “dry brine” period allows the rub to penetrate the meat and helps build a beautiful crust (or bark) once they hit the Big Green Egg.
Step 2: Big Green Egg Setup and Wood Choice
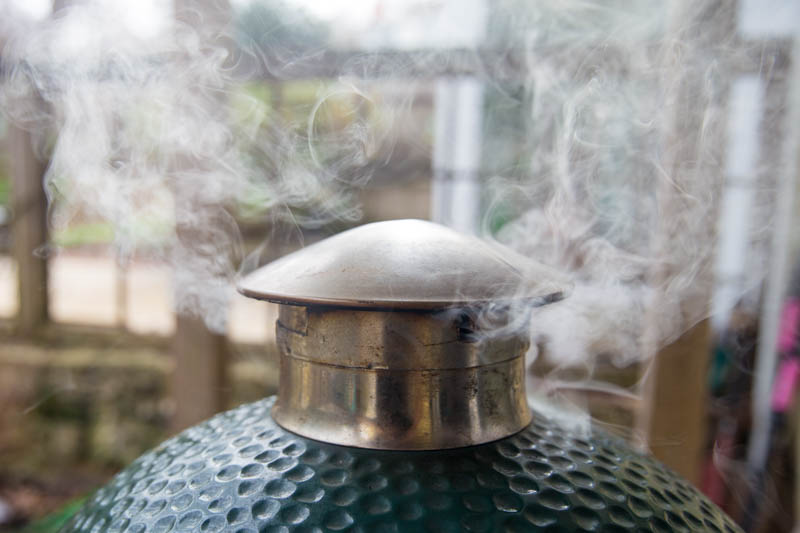
With the ribs well-seasoned from their overnight rest, it is time to prepare the Big Green Egg for a unique direct heat session. Unlike the typical indirect setup with a convEGGtor, we want the meat to have a clear path to the charcoal.
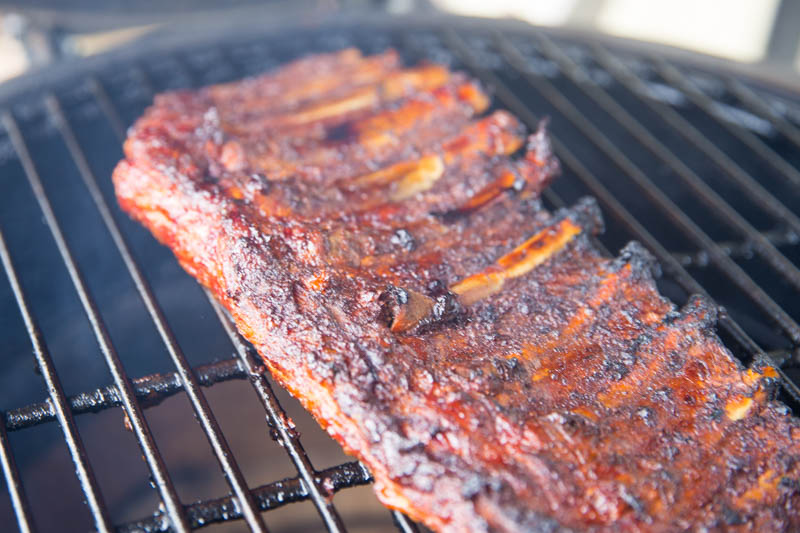
For this cook, I set the Big Green Egg for direct heat at 225°F using a raised grid. To add that classic BBQ depth, I included a few chunks of Hickory wood.
- The Raised Grid: Elevating the ribs away from the coals is essential for this technique. It allows you to cook at a lower temperature while still benefiting from the fat dripping directly onto the hot charcoal, which perfumes the meat with incredible flavor.
- Hickory Wood: Hickory provides a robust, traditional smoke profile that stands up well to the rich fat content of St. Louis-style ribs.
- Temperature Control: Keeping the Egg at a steady 225°F ensures that the exterior doesn’t char too quickly while the fat slowly renders and the meat becomes tender.
Step 3: The Direct Heat Cook and Bark Development
Once the temperature is regulated and the smoke is just right, the process is surprisingly straightforward. The key is patience and maintaining that steady 225°F environment to let the direct heat work its magic.
I cooked the ribs for two hours on each side, occasionally misting the outside with apple juice to help form the bark.
- The Flip: Cooking for two hours per side ensures that the heat penetrates the thick St. Louis cut evenly. Since there is no heat deflector, this rotation is vital to achieving a uniform cook.
- Misting for Flavor: Using a spray bottle with apple juice serves two purposes. It keeps the surface of the meat moist and the sugars in the juice react with the dry rub to create a deep, mahogany bark.
- The Sizzle: You will notice a distinct aroma during this phase. As the fat renders and hits the hickory coals, it creates a flavor profile that indirect cooking simply cannot replicate.
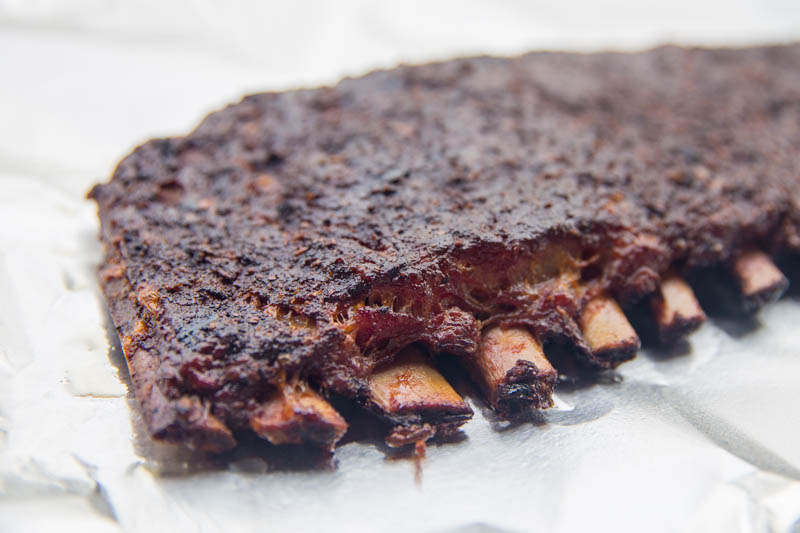
Step 4: The Foil Wrap and Finish
After four hours of direct cooking, the ribs have developed a beautiful bark and soaked up plenty of hickory smoke. Now, it is time to tenderize the meat to perfection.
I wrapped the ribs in foil and put them back in the Big Green Egg for another 2 hours. That is it! Easy.
- The Tenderizing Phase: Wrapping the ribs (the “crutch”) traps moisture and steam, which helps break down the connective tissue in the St. Louis cut. This is what gives you that “bite-through” tenderness that judges look for.
- Final Texture: By the end of these two hours, the meat should be pulling back slightly from the bone.
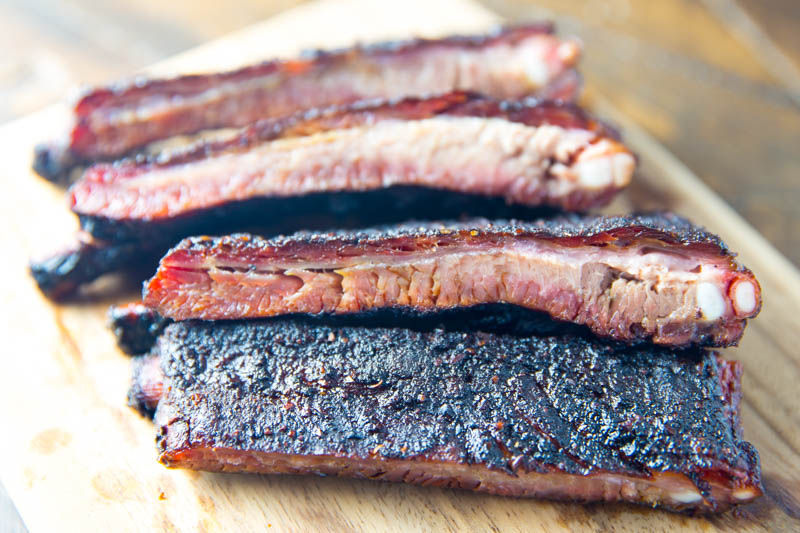
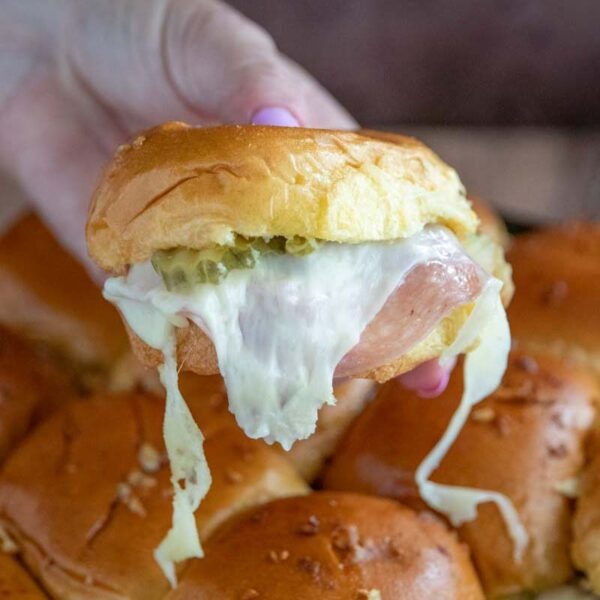
Step 5: The Rest, Slicing, and Serving
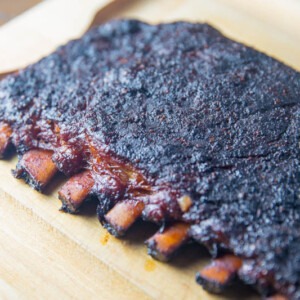
After the final two hours in the foil, the transformation is complete. The ribs should be incredibly tender while retaining that deep, smoky crust from the initial direct heat phase.
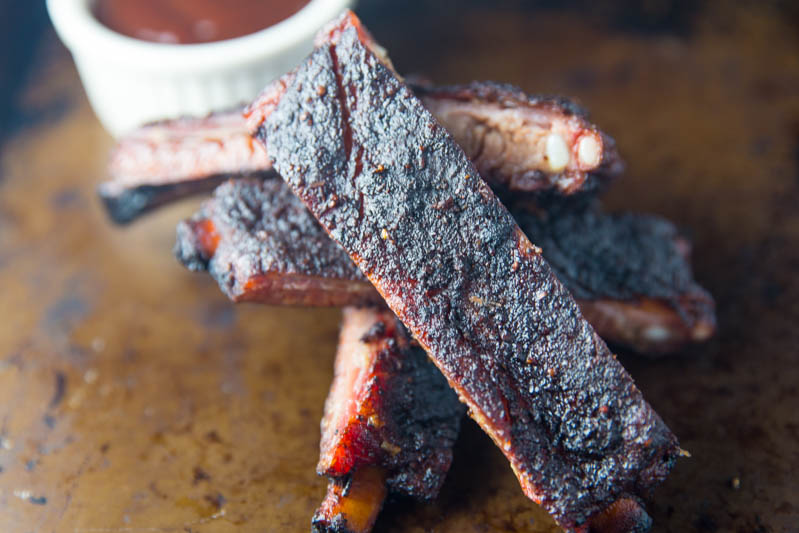
I took the ribs off the Big Green Egg, let them rest, then sliced them and served them for a delicious meal.
- The Texture: This “Dizzy Pig” method delivers a unique bite. Unlike mushy, over-steamed ribs, these have a firm yet tender texture with a flavor profile enhanced by the fat dripping directly onto the hickory coals.
- The Importance of the Rest: Just like a good brisket or steak, ribs benefit from a 15 to 20 minute rest. This allows the internal juices to stabilize and the meat to firm up slightly. If you slice them the second they come out of the foil, you risk losing that moisture and having the meat fall apart rather than holding a clean slice.
- The Slice: When slicing St. Louis ribs, look for the natural gaps between the bones. Since this cut is uniform and rectangular, you should get clean, even portions that show off a beautiful smoke ring.
Final Thoughts: The Power of Direct Heat
Shifting from the traditional indirect method to a raised direct cook is a game changer for St. Louis-style ribs. While the “low and slow” method with a plate setter is the standard for a reason, this technique offers a layer of flavor that is hard to beat. By letting the fat render directly over the hickory coals, you get a clean, authentic smoke profile and a bark that is incredibly savory.
This method requires a bit more attention than just setting it and forgetting it, but the results speak for themselves. You end up with a rack of ribs that has a perfect bite, a deep mahogany color, and a flavor that pays homage to the techniques used by the pros. Whether you are cooking for a crowd or just honing your skills on the Big Green Egg, these Dizzy Pig-style ribs are a must-try.
Give this direct heat method a shot on your next cook, and you might just find yourself ditching the heat deflector for good.
Direct Heat St. Louis Ribs on the Big Green Egg
Ingredients
- 1 rack St. Louis Cut Spare Ribs
- Yellow Mustard
- Dizzy Dust BBQ Rub
- Apple Juice, for spritz
Instructions
- The Prep: Trim the ribs and apply a copious amount of rub to both sides, then let them sit in the fridge overnight.
- The Setup: Preheat the Big Green Egg to 225°F for raised direct cooking and add a few chunks of hickory wood.
- The First Flip: Place the ribs on the raised grid and cook for 2 hours on the first side, misting occasionally with apple juice.
- The Second Flip: Turn the ribs over and cook for another 2 hours, continuing to mist with apple juice to build the bark.
- The Wrap: Remove the ribs, wrap them tightly in aluminum foil, and return them to the Egg for a final 2 hours of cooking.
- The Rest and Slice: Pull the ribs from the grill and let them rest in the foil for 15 to 20 minutes before slicing and serving.
Nutrition information is automatically calculated, so should only be used as an approximation.


Very nice, Chris! Personally, I only use St. Louis-style ribs. And, for the very reason you mentioned…they are meatier, and for me, offer more bang-for-the-buck. Your choice of Dizzy Dust for the rub was the same as I do…I prefer the course cut of Dizzy Dust…and it always serves me well.
Chris Capell is indeed a true Pit Master and one who’s techniques are well worth emulating. I noticed by the the bark, smoke ring and appearance of the ribs that they appear to be done to perfection.
As for your wings, they look delicious. However, I would have brined them first, dried them off, and gone with a dusting of Tsunami Spin, then followed with the Sriracha glaze/sauce. But that’s just me. 🙂
Can’t wait to get to see and hear your evaluation on “Crossroads”. I tried it on a steak over hickory in the BGE and I found it to be Kick-a**. 🙂
Looking forward to, hopefully, meeting up with you again…perhaps the 2016 Harpoon if Chris and the Team participate. This time I will show up on Thursday so we can spend some time together.
Health and best wishes to you and yours.
Thanks Jim!
No thanks needed, Chris. You are the one who did it. Thank you for post and great pictures. 🙂
Also, Chris….What i would have provided as sides to the ribs and wings was some summer and zucchini squash sliced about 3/8-inch thick, lengthwise, rubbed with olive oil and sprinkled with “Pineapple Head”. That along with some mac & cheese sprinkled with “Dizzy Dust” is a meal, I feel, would be well accepted at any gathering.
Keep your charcoal hot and your wood chips soaked.
Jim 🙂