
This post contains affiliate links. Please see our disclosure policy.
Mastering the Big Green Egg Tomahawk Ribeye
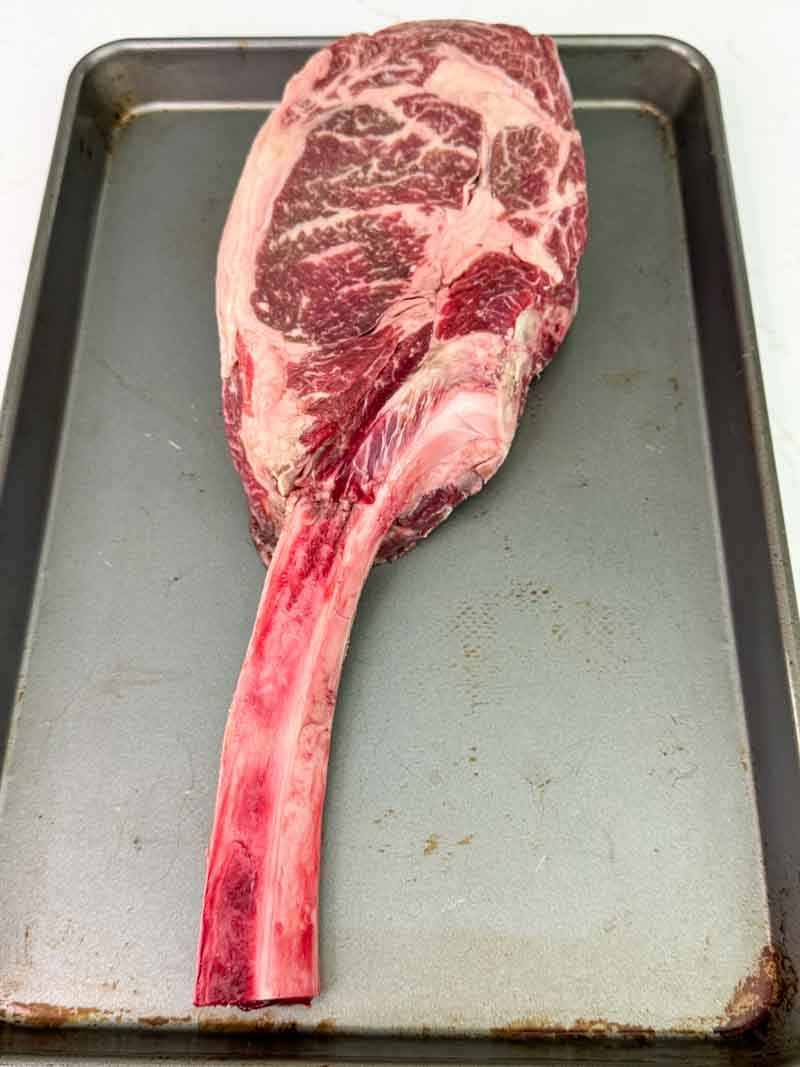
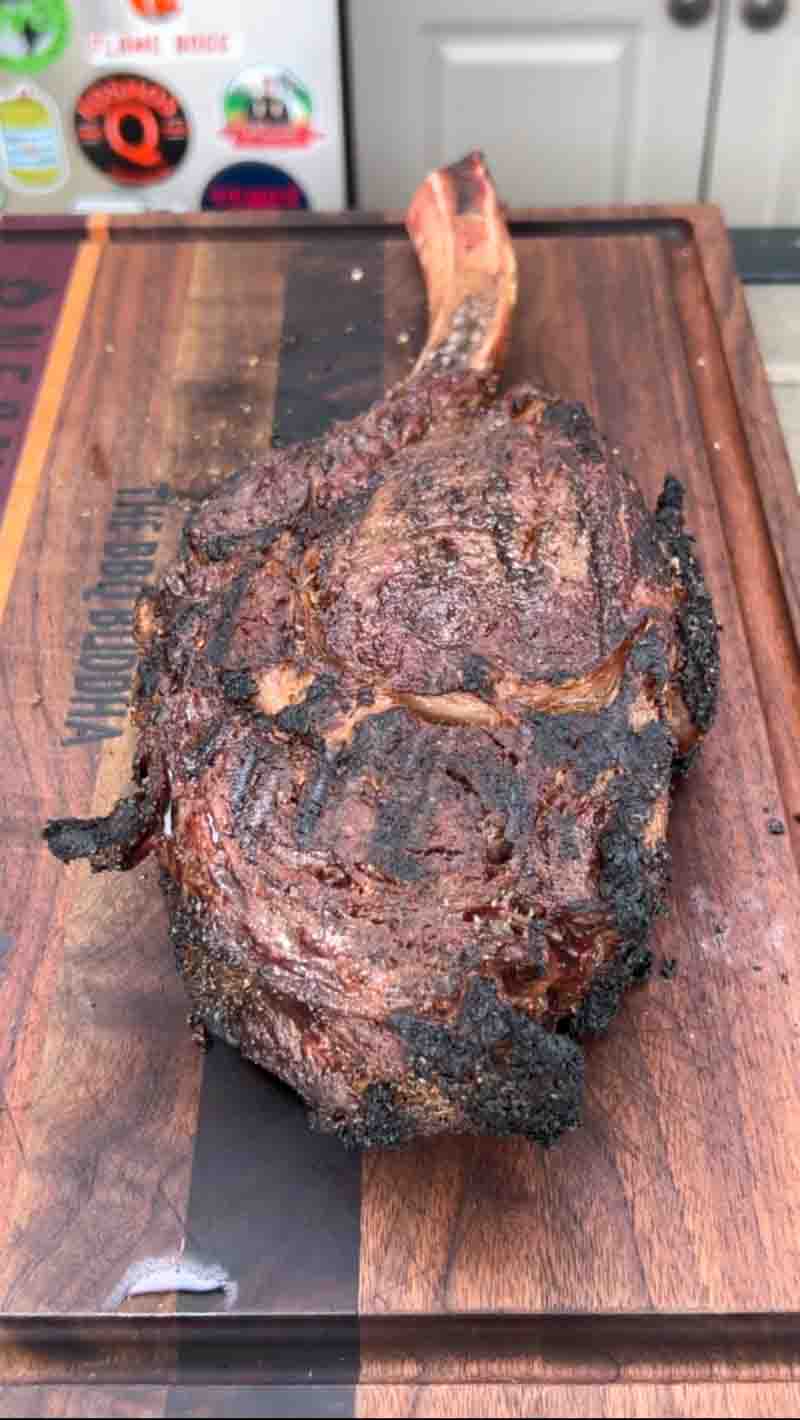
If you have just picked up a massive, bone-in tomahawk ribeye and are wondering how to do justice to such a premium cut of beef, you have come to the right place. The Big Green Egg Tomahawk Ribeye is the ultimate “showstopper” meal, combining a dramatic presentation with the unmatched flavor of a wood-fired sear. Whether you are celebrating a special occasion or just want to conquer the “king of steaks,” this recipe delivers a perfectly edge-to-edge pink center and a crust that is second to none.
Table of Contents
- Step 1: Temper the Tomahawk Ribeye
- Step 2: Seasoning the Tomahawk Ribeye
- Step 3: Setup and Preheat the Big Green Egg
- Step 4: Cooking the Tomahawk Ribeye
- Step 5: Timing the Roast
- Step 6: Rest the Tomahawk Ribeye and Fire up the Big Green Egg
- Step 7: Searing the Tomahawk Ribeye
- Step 8: Pull, Slice, and Serve
- Big Green Egg Tomahawk Ribeye Recipe
Get My NEW Book
The Ultimate Big Green Egg Cookbook

The Meat: Quality and Marbling
For this cook, I am using a Snake River Farms American Wagyu Tomahawk. Known for its incredible marbling and rich, buttery texture, this American Wagyu is a favorite in the BBQ community. However, the beauty of this technique is its versatility. Whether you have a Prime-grade steak from your local butcher or a high-end cut from a boutique purveyor, these steps will ensure you get professional-level results on your Big Green Egg.
The secret lies in managing the thickness of the meat and that long, iconic bone. When you are dealing with a steak this size, you have to treat it more like a roast than a standard strip steak. Now sit back, grab a glass of your favorite Merlot, and enjoy this guide to the perfect Big Green Egg Tomahawk Ribeye.
Step 1: Temper the Tomahawk Ribeye
The Importance of Tempering
Before you even think about lighting the charcoal, you need to let the meat rest. A Tomahawk is a massive cut, often measuring 2 to 3 inches thick. If you take a cold steak straight from the refrigerator to the grill, the exterior will char and burn long before the icy center reaches a safe temperature.
To ensure an even cook, remove the steak from its packaging, pat it dry, and let it temper at room temperature for at least 2 hours.
Why this matters:
- Even Heat Distribution: Tempering takes the “chill” off the muscle fibers, allowing the heat of the Big Green Egg to penetrate the center more efficiently.
- Better Sear: As the meat sits, the surface moisture continues to evaporate, which is essential for a world-class crust.
- Texture: A tempered steak relaxes, resulting in a more tender bite compared to one that was “shocked” by a hot grate while cold.
Step 2: Seasoning the Tomahawk Ribeye
The Binder and the Rub
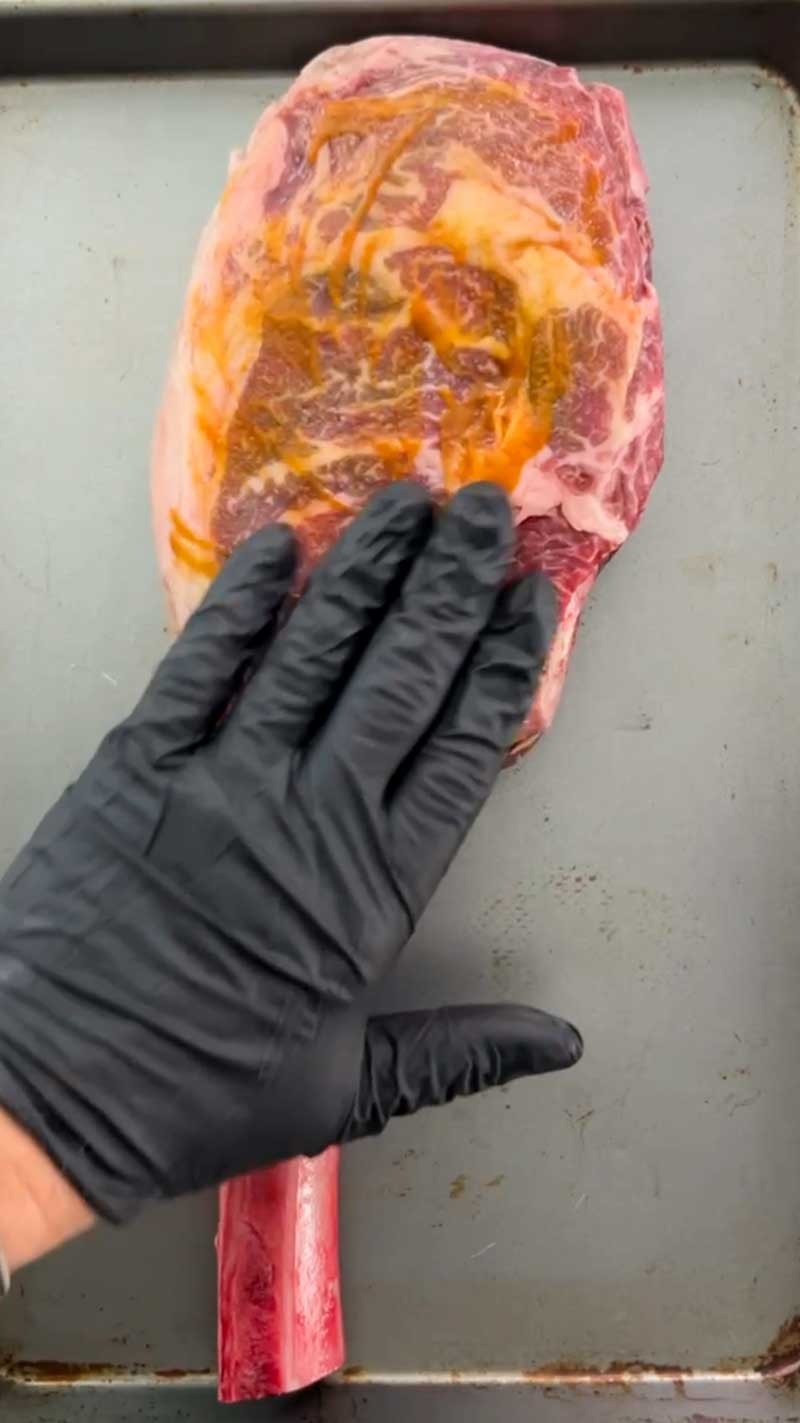
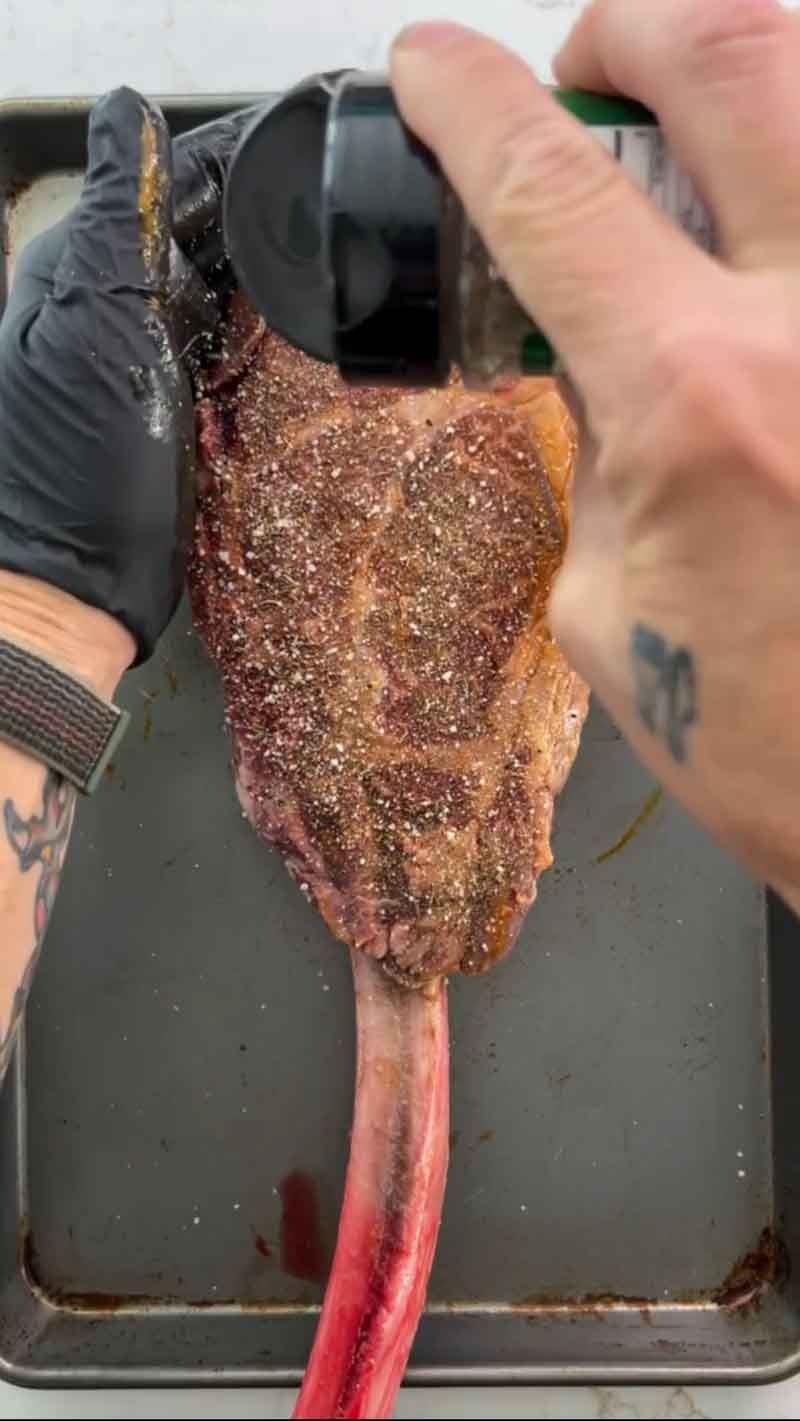
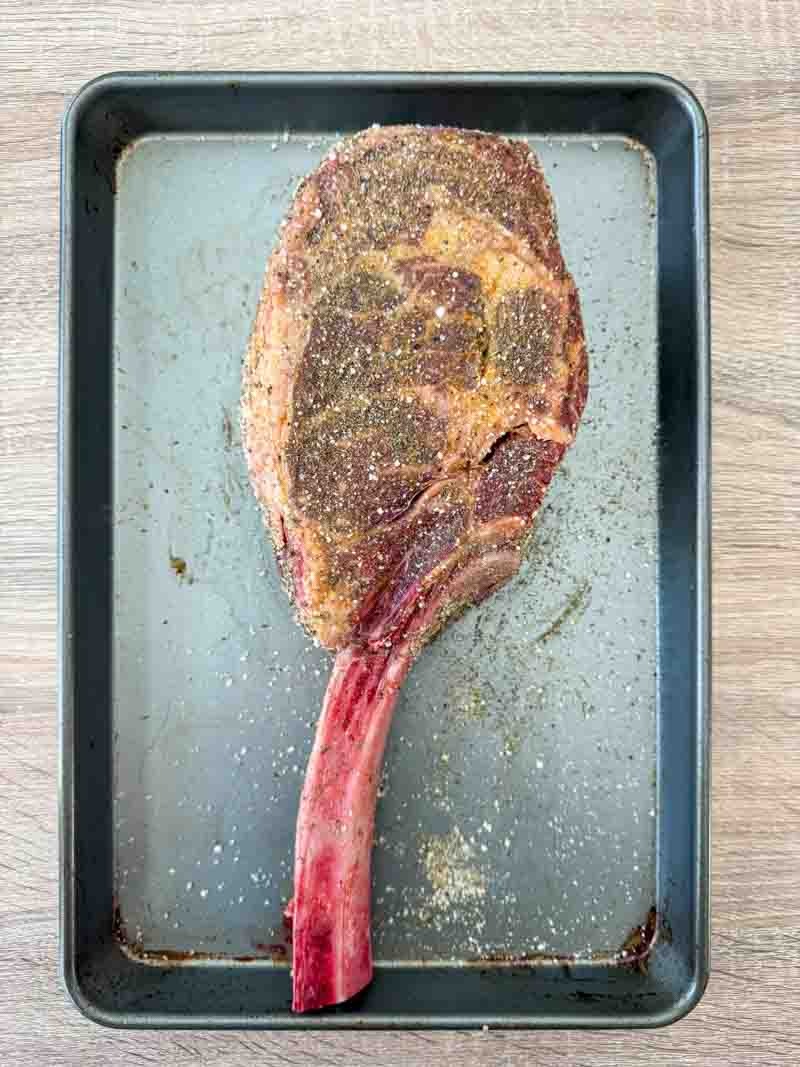
When you are dealing with a steak as substantial as a Tomahawk, you need to make sure your seasoning stays exactly where it belongs: on the meat. To achieve that perfect, flavorful crust, we use a two-step process: a binder followed by a generous layer of rub.
Why Use a Binder?
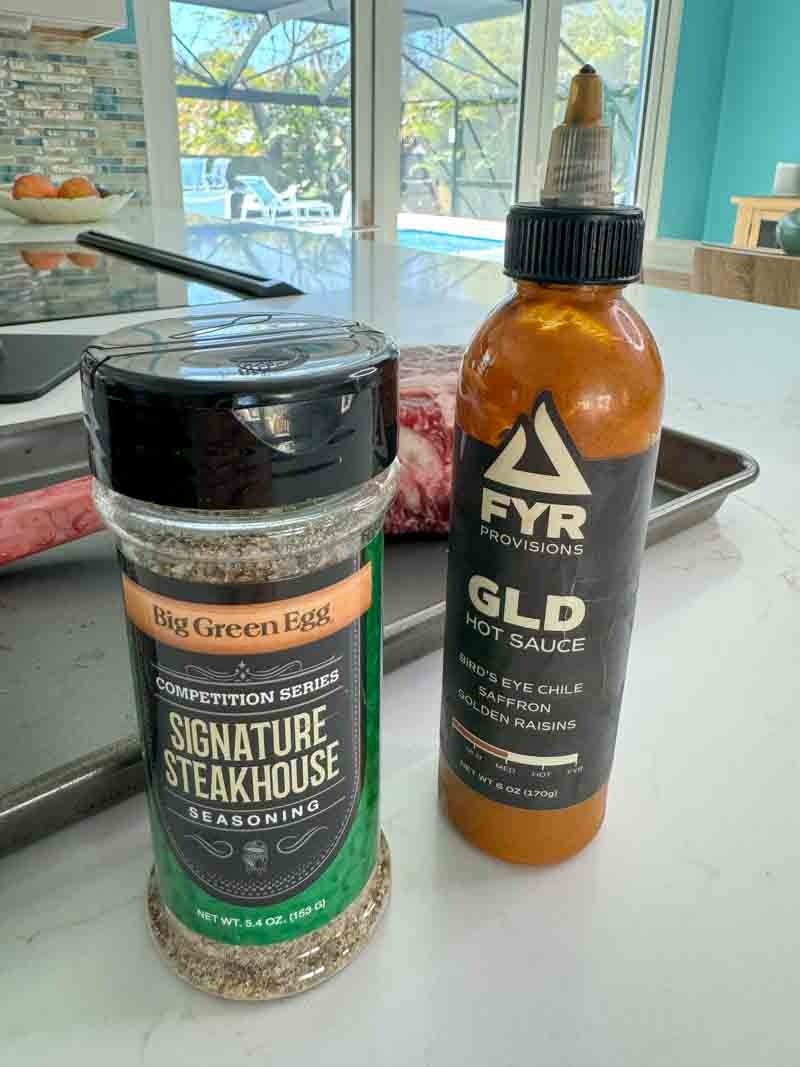
A binder is simply a thin coating applied to the meat to help the dry rub adhere. Without it, much of your seasoning can fall off during the flip or get lost in the grates. For this cook, I am using hot sauce (specifically FYR Gold). Don’t worry about the heat… the vinegar and spice mellow out significantly during the cook, leaving behind a subtle tang that cuts through the richness of the ribeye.
If you aren’t a fan of hot sauce, other great binder options include:
- Olive Oil: Best for a clean, classic flavor.
- Worcestershire Sauce: Adds an extra layer of umami.
- Dijon Mustard: Creates a fantastic “bark” or crust.
Choosing Your Seasoning
I am using the Signature Steakhouse Rub from Big Green Egg, which is specifically designed to stand up to high-heat searing. However, you have plenty of great options depending on your pantry:
- Store-Bought Favorites: Lane’s BBQ “Brisket” or Meat Church “Holy Cow” are excellent choices for big beef cuts.
- The DIY “Buddha Steakhouse Blend”: If you want to keep it simple and homemade, mix equal parts Kosher salt, coarse black pepper, and garlic powder, then add a pinch of smoked paprika for color.
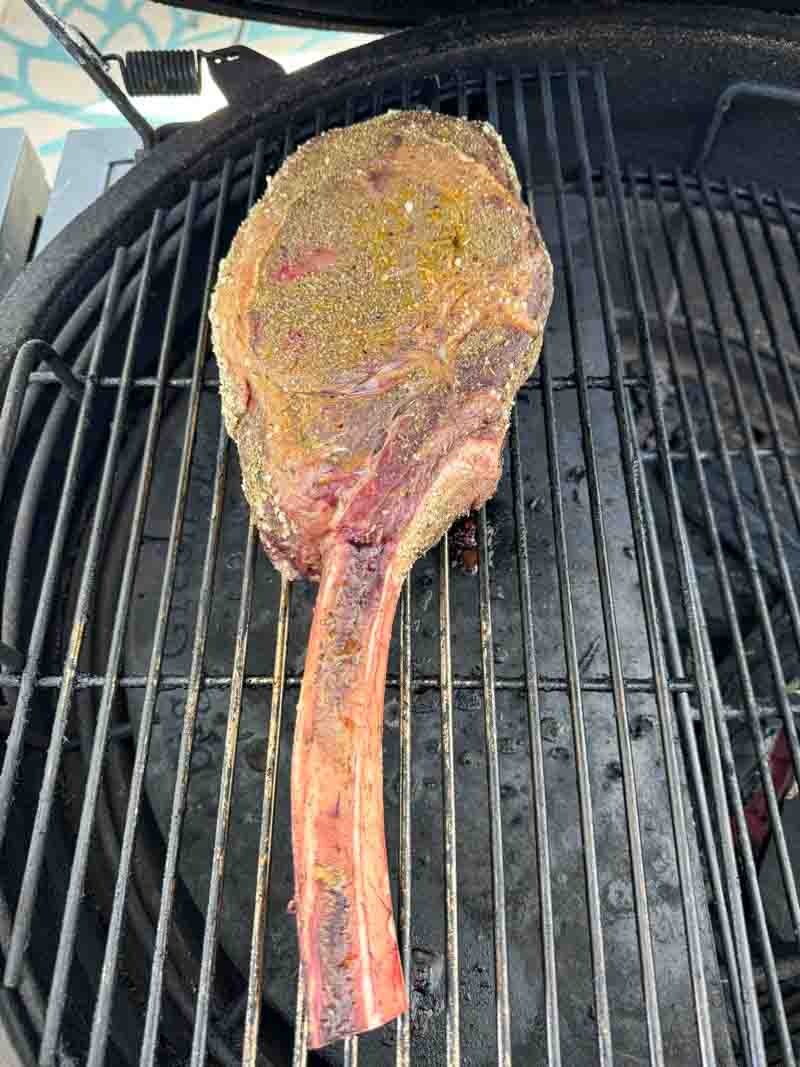
Apply your binder to all sides (don’t forget the edges!), then generously season. Because a Tomahawk is so thick, you need more rub than you think to ensure every bite is well-seasoned.
Step 3: Setup and Preheat the Big Green Egg
Big Green Egg Setup: The Two-Zone Advantage
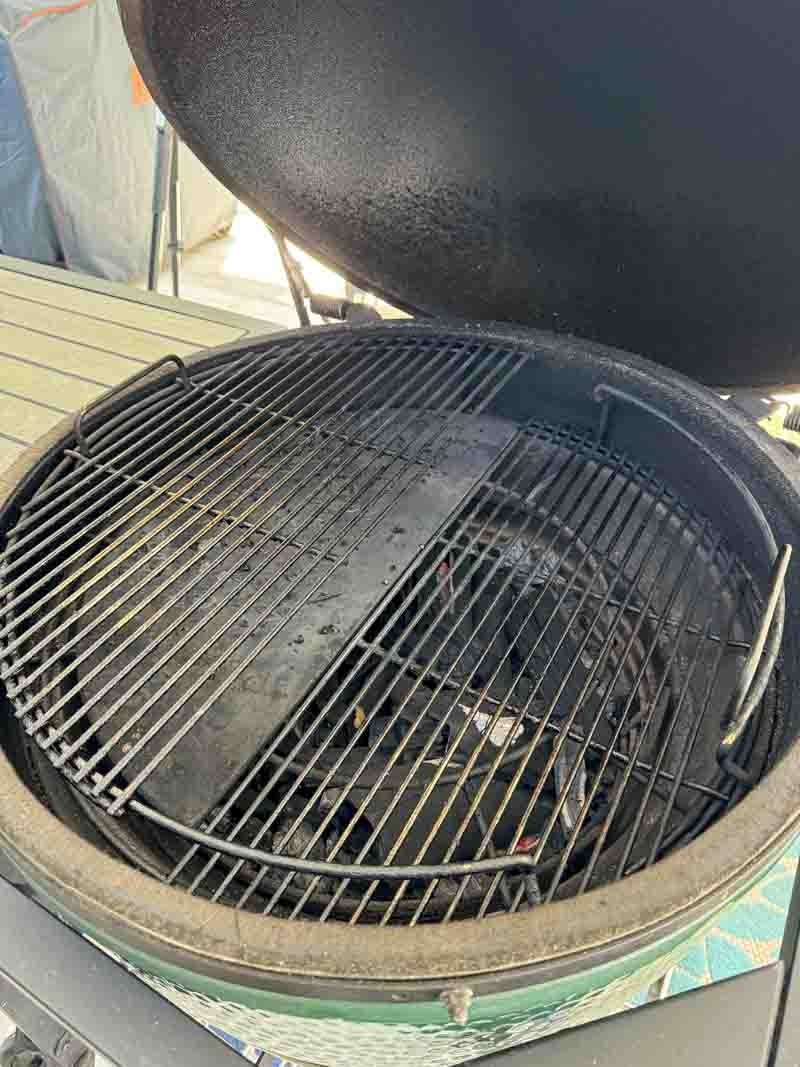
To master a steak this thick, you cannot simply throw it over high heat and hope for the best. We are using a Two-Zone Setup, which allows us to gently roast the meat before finishing with a high-heat sear. This is best achieved using the EGGspander System.
Configuring the EGGspander
Configure your Egg for a “low and slow” start with a high-heat finish built-in:
- Indirect Zone: Place a ceramic half-moon stone (convEGGtor insert) on one side of the EGGspander base. This creates a heat shield, allowing the steak to roast without burning.
- Direct Zone: On the opposite side, drop a half-moon grill grate into the lower section of the EGGspander base, closer to the coals. We won’t use this side yet, but it will be primed and ready for the final sear.
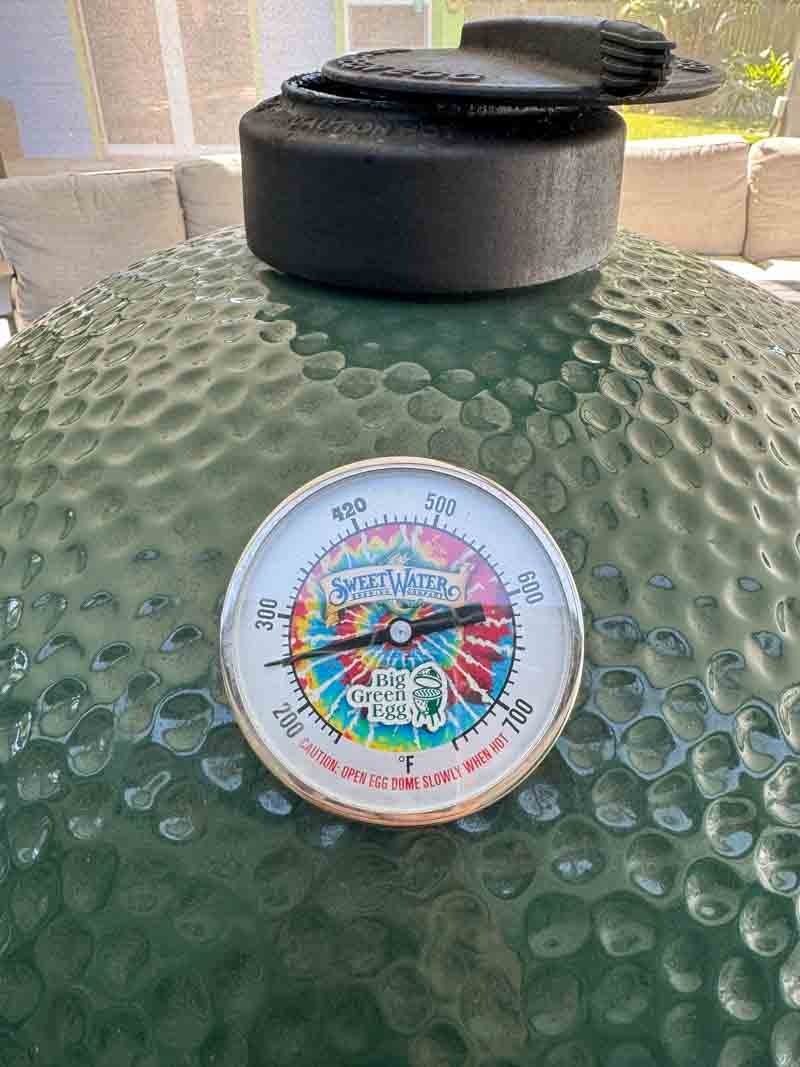
Dialing in the Temperature
Preheat your Big Green Egg to a steady 250°F. Lighting the charcoal in only one or two spots and keeping the vents narrowed will help you maintain this low temperature. This gentle heat ensures that the internal fat in the American Wagyu begins to render beautifully without overcooking the exterior muscle fibers.
Step 4: Cooking the Tomahawk Ribeye
The Reverse Sear: Precision Cooking
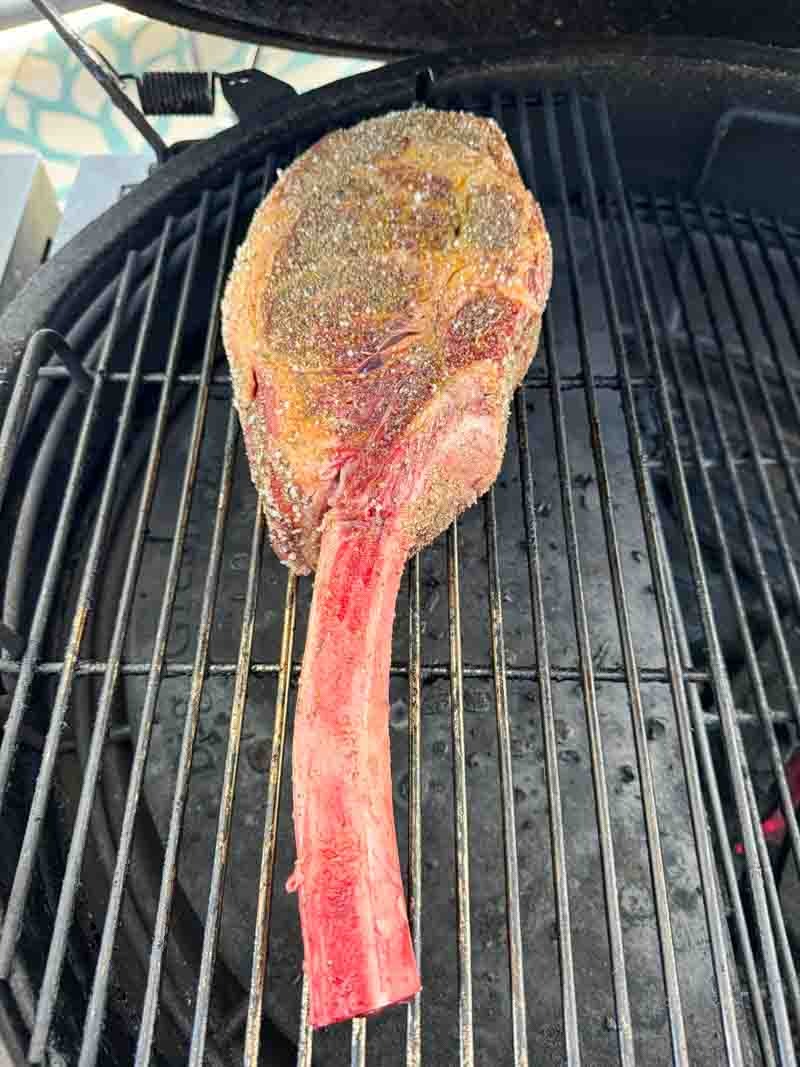
When the Big Green Egg is stabilized at 250°F, place the tomahawk ribeye on the indirect side (over the ceramic stone). This is the “roasting” phase of the reverse sear.
Why the Reverse Sear is Mandatory
For a steak this thick, the reverse sear is the gold standard. If you were to start with a high-heat sear, the outside would be charred to a crisp by the time the center reached medium-rare. By starting low and slow, we achieve two critical goals:
- Edge-to-Edge Perfection: The gentle heat allows the entire steak to warm up evenly, eliminating that unappealing gray “overcooked ring” just under the surface.
- Surface Prep: The dry environment of the Egg helps evaporate any remaining surface moisture, which primes the meat for a superior crust during the final step.
Monitoring the Temp
I use a Thermopop to monitor the internal temperature throughout the cook. You want to pull the steak off the Egg when it reaches 115°F.
Pitmaster Note: Don’t be alarmed if the steak looks a bit “pale” at this stage. It won’t have that dark, crusty appearance yet, that’s exactly what the final sear is for.
Step 5: Timing the Roast
For this specific cook, it took approximately one hour to reach an internal temperature of 115°F. You might wonder if 115°F is too low, but it is actually the perfect “pull temp” for the indirect phase. Remember, we still have to sear the steak over high heat, which will quickly bring the internal temperature up to a perfect medium-rare. Pulling at this stage gives you the “headroom” needed to develop a world-class crust without overcooking the center.
Estimated Cooking Times
While every fire burns a little differently, you can use the thickness of your steak to estimate how much time you’ll need for the indirect roasting phase. Use the table below as a general guide to help you time your sides and appetizers.
| Steak Thickness | Weight (Approx.) | Est. Time to reach 115°F |
| 1.5″ Standard Ribeye | 16–20 oz | 35–45 Minutes |
| 2″ Thick Cut | 24–30 oz | 50–60 Minutes |
| 2.5″+ Massive Tomahawk | 36–48 oz | 75–90 Minutes |
Pitmaster Tip: Always cook to temperature, not to time. Factors like wind, outside temperature, and the specific marbling of your beef (like the high fat content in American Wagyu) can cause these times to vary.
Step 6: Rest the Tomahawk Ribeye and Fire up the Big Green Egg
The Transition: Prepping for the Sear
Once the steak hits 115°F, remove it from the Egg and let it rest on a cutting board. At this point, the meat is perfectly tender, but it lacks that signature steakhouse crust. While the steak rests, it is time to transform your Big Green Egg from a roasting oven into a high-heat searing machine.
Opening the Airflow
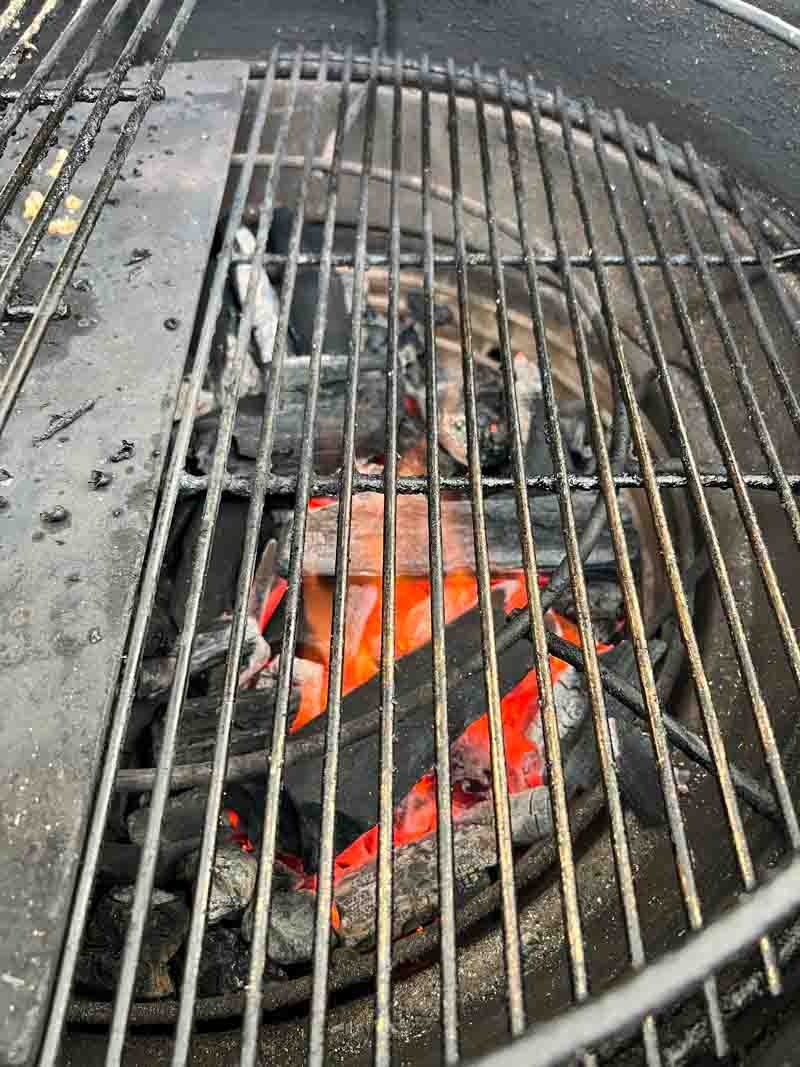
To get those roaring flames needed for a proper sear, you need to maximize oxygen. Open the bottom vent and the top daisy wheel (or Regulated Air Controller) completely. With the lid closed, the increased airflow will cause the charcoal to ignite rapidly.
Targeting the Heat
You are looking for the dome temperature to climb to at least 500°F to 600°F. Because you have the EGGspander set up with the lower grate, the direct side will be significantly hotter than the dome reading suggests, perfect for creating a flash-sear.
Why the rest is important here:
Leaving the steak on the cutting board for these 10–15 minutes while the Egg heats up serves two purposes. First, it allows the internal juices to stabilize. Second, it allows the surface of the meat to cool slightly, which ensures that when you return it to the grill for the sear, you are only browning the exterior rather than cooking the interior any further.
Step 7: Searing the Tomahawk Ribeye
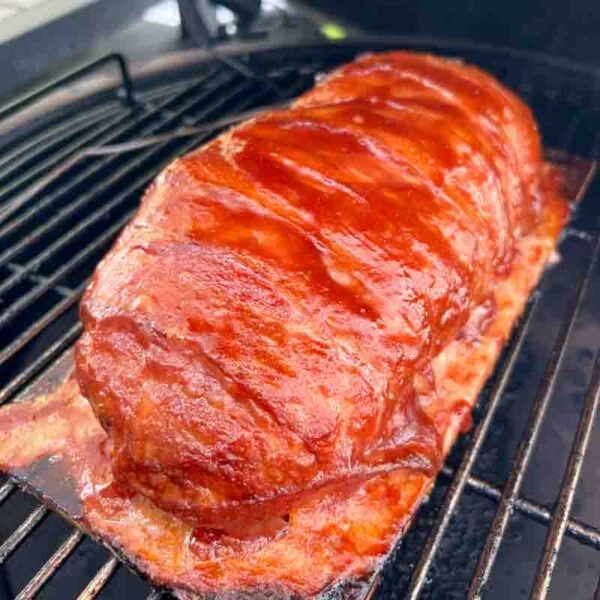
The Final Sear: Building the Crust
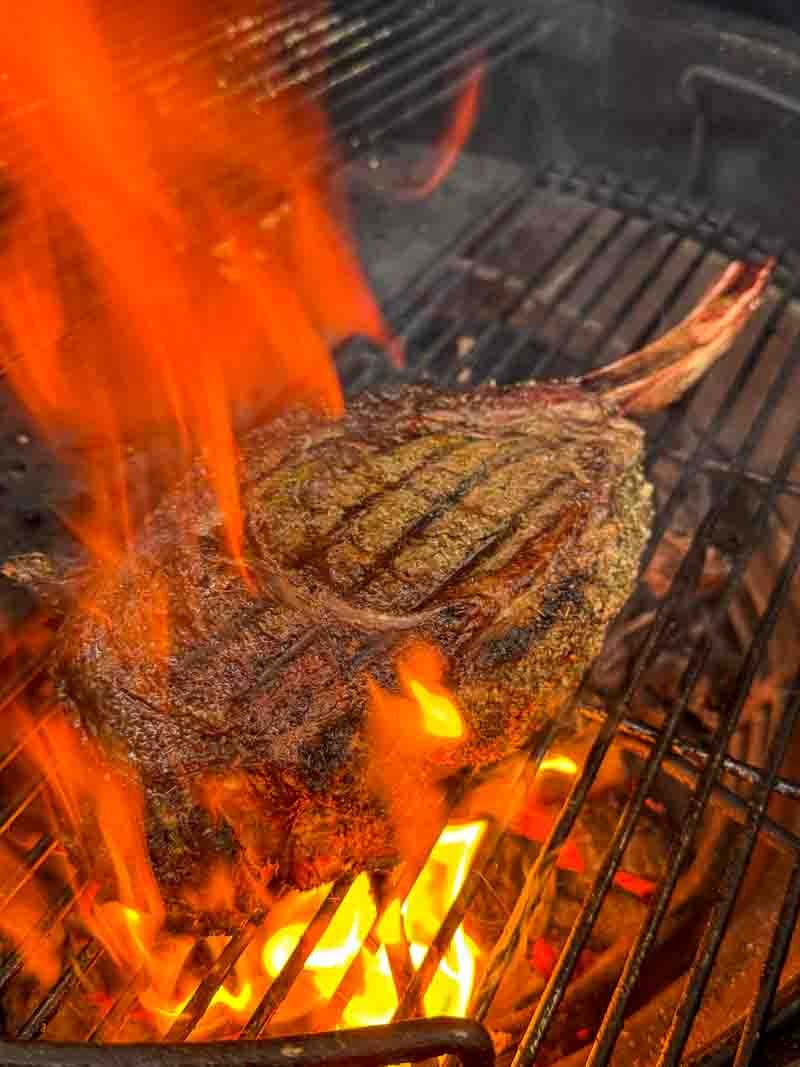
Once your Big Green Egg hits that 500°F mark, it is time for the most exciting part of the cook. Move the tomahawk ribeye from the cutting board and place it directly onto the lower grill grate, the side without the ceramic insert.
Since the meat is already mostly cooked through, this step is all about the Maillard reaction, the chemical process that creates that savory, caramelized brown crust we all crave.
Execution and Timing
- The Sizzle: You should hear an immediate, aggressive sear the moment the beef hits the cast iron or stainless steel.
- Duration: Sear for approximately 1 to 2 minutes per side. Because of the high fat content in a Wagyu cut like Snake River Farms, be prepared for some flare-ups. This is normal, but keep your tongs ready to move the steak if the flames get too intense.
- The Edges: Don’t forget the sides! Use your tongs to hold the steak upright and sear the thick fat cap along the edge of the ribeye for about 30 seconds. This renders out the remaining fat and adds incredible flavor.
The Final Target
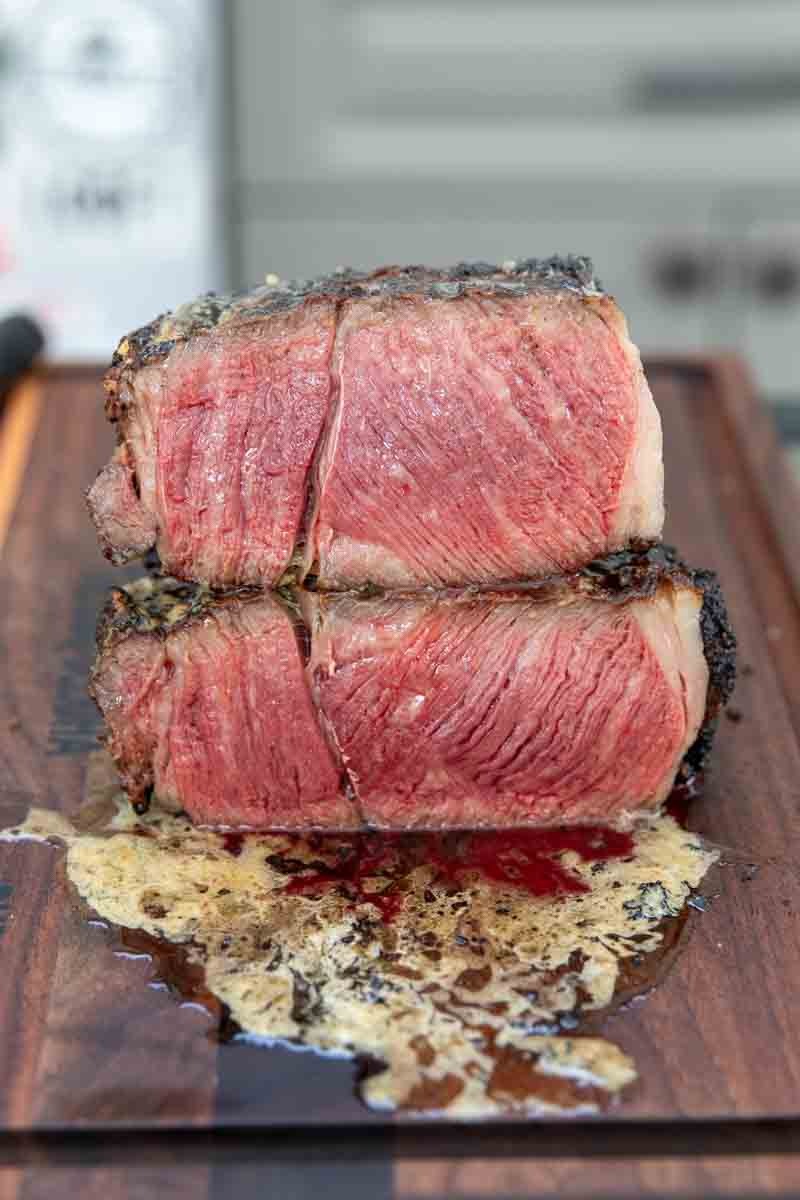
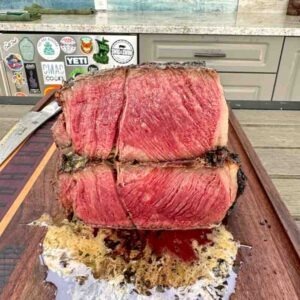
Your goal is to pull the steak off the Egg when the internal temperature reaches 130°F to 135°F. Just like other proteins, the temperature will continue to climb slightly while it rests, landing you at a perfect Medium-Rare (135°F – 140°F).
Targeting Your Perfect Doneness
While most pitmasters aim for medium-rare with a Tomahawk to let that fat marbling truly shine, everyone has a personal preference. Use the table below to determine when to pull your steak during the searing phase.
Remember: Always pull the meat 5°F before your target temperature. The residual heat trapped in that massive bone and the thick muscle will cause the temperature to rise during the rest.
| Desired Doneness | Pull Temp (From Grill) | Final Temp (After Rest) | Center Appearance |
| Rare | 120°F | 125°F | Cool, bright red center |
| Medium-Rare | 130°F | 135°F | Warm, rich pink center |
| Medium | 140°F | 145°F | Warm, light pink center |
| Medium-Well | 150°F | 155°F | Slightly gray with a touch of pink |
| Well Done | 160°F | 165°F | Solid gray-brown throughout |
Searing Time Estimates
At 500°F–600°F, the sear happens quickly. Use these times as a general rule of thumb for each side:
- For Rare/Medium-Rare: 60 to 90 seconds per side.
- For Medium/Medium-Well: 2 to 3 minutes per side.
Note: For a Tomahawk, anything beyond Medium-Well can make the meat around the bone quite tough. If you have guests who prefer “well done,” I recommend slicing those portions from the outer edges and giving them an extra minute on the grate after the main steak has been carved.

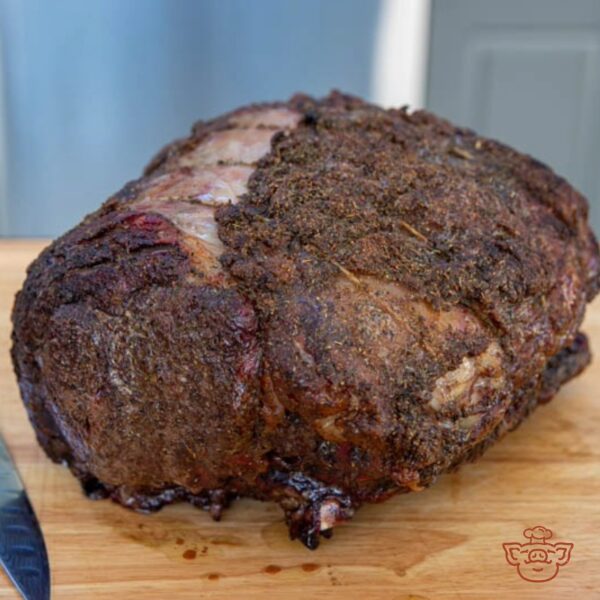
Step 8: Pull, Slice, and Serve
The Final Rest
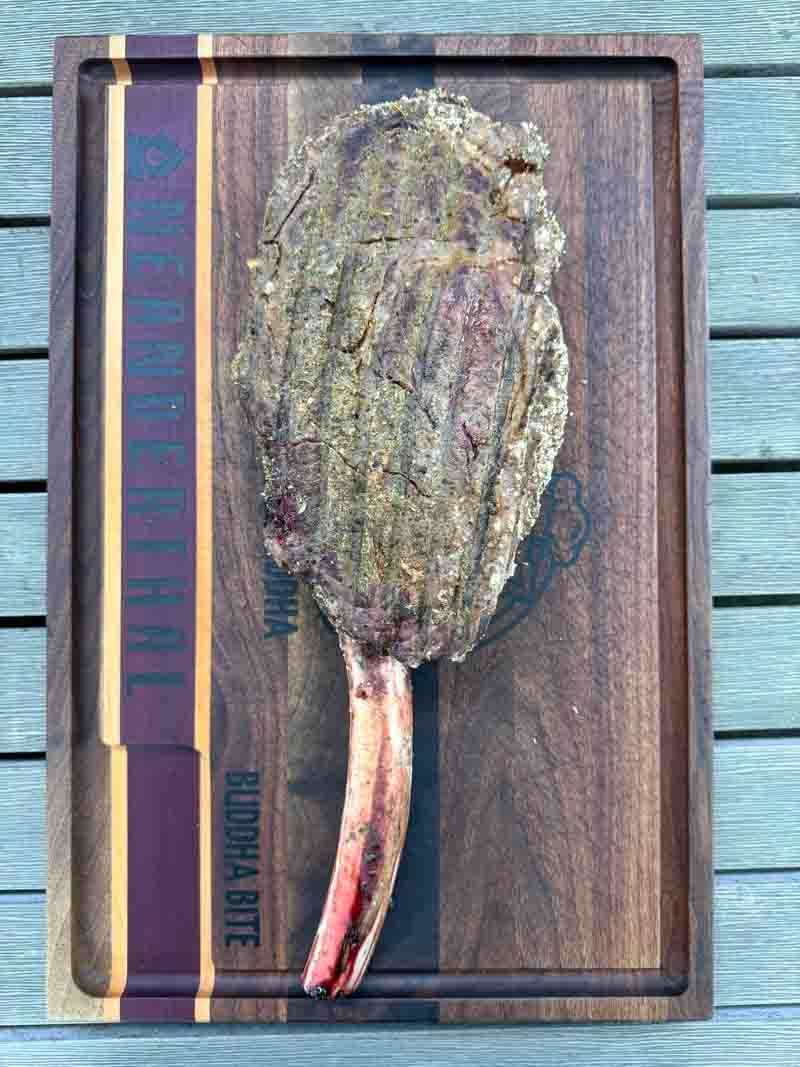
Once that crust is dark, caramelized, and has that perfect “crunchy” look, it is time to take the steak off the heat. Move the tomahawk ribeye to a clean cutting board for its final rest.
Do not skip this step. After searing at such high temperatures, the muscle fibers are tight and the juices are agitated. Resting the steak for 10 to 15 minutes allows the meat to relax and reabsorb those juices. If you slice it too soon, all that flavor will run out onto the board, leaving you with a drier steak.
The Grand Reveal
To serve, I like to slice the meat away from the long rib bone first, then carve the ribeye into thick strips. Arrange the slices back against the bone for that classic “Tomahawk” look that always wows guests. Every bite should be a perfect blend of smoky, wood-fired crust and a buttery, tender center.
Whether you’re using a Snake River Farms Wagyu or a choice cut from the local grocer, the reverse sear on the Big Green Egg is the foolproof way to achieve steakhouse quality at home.
The Finishing Touch: Compound Butter
While the steak is resting and still hot from the sear, it is the perfect time to add one final layer of decadence. A good compound butter melts into the crust, creating a rich glaze that enhances every bite.
For this cook, I used Churn Garlic and Shallot butter. It provides a concentrated punch of savory aromatics that perfectly complements the smokiness of the Big Green Egg. If you don’t have a premium brand on hand, you can easily whip up a DIY Buddha Butter Blend at home:
- 1 Stick Unsalted Butter (Softened)
- 2 Cloves Garlic (Minced)
- 1 Small Shallot (Finely minced)
- 1 tsp Fresh Parsley (Chopped)
- A pinch of Kosher salt
Simply mix the ingredients together and place a generous dollop on top of the hot steak. Let the Tomahawk rest for 15 to 20 minutes. This allows the steak to cool down slightly, the internal juices to redistribute for a tender bite, and the butter to melt deep into the charred exterior.


Wrapping Up Your Tomahawk Masterclass
Cooking a steak of this magnitude can be intimidating, but by using the reverse sear method, you turn a high-stakes cook into a controlled, successful masterpiece. The Big Green Egg provides the perfect environment to get that gentle roast and that ferocious sear all in one place.
Thank you for following along with this guide. There is nothing quite like the satisfaction of carving into a perfectly cooked, bone-in ribeye and sharing it with friends and family. I hope this helps you become the hero of your next backyard cookout!
Big Green Egg Tomahawk Ribeye
Equipment
- 1 EGGspander Base
- 1 Ceramic Half-Moon Insert
Ingredients
- 2.5 pounds Snake River Farms Wagyu Tomahawk Steak
- 1.5 tsp hot sauce, as a binder
- 3.5 tsp Big Green Egg Signature Steakhouse Rub, you can substitute SPG here
- 2 tbsp Churn Garlic & Shallot butter, to finish
Instructions
- Remove the steak from its packaging and let it come up to room temperature for at least 2 hours before you plan to cook it.
- Use the hot sauce as a binder and rub it all over the steak. Next use the rub and season all over the tomahawk ribeye, including the sides.
- Preheat your Big Green Egg to 250°F using the EGGspander Base with a ceramic half-moon insert on one side. Make sure the other side has the half-moon grill grate dropped down to the bottom section of the EGGspander base. This setup will give you a raised indirect cooking zone and a direct cooking zone (used later).
- Place the seasoned tomahawk ribeye in to the Big Green Egg on the raised indirect side. Let this cook until the internal temperature measures 115°F. This can take up to an hour.
- Once the tomahawk ribeye measures 115°F, remove the steak and place on a cutting board.
- Open the top and bottom vents of the Big Green Egg all the way and allow the temperature to come up to 500°F.
- When ready place the tomahawk ribeye on the direct side of the grill and cook for 90-seconds then flip and cook another 90-seconds.
- When the crust is dark and crunchy looking remove the steak and rest on a cutting board for 20-minutes. While the steak is resting, place the garlic shallot butter on top allowing it to melt while the steak rests.
- Slice and enjoy!
Nutrition information is automatically calculated, so should only be used as an approximation.


It tastes great, but I find it on the rare side of medium to rare. If there were a gauge between rare and medium from 1-5, this will be a 1. 130 degrees Fahrenheit might be more suitable and probably be a 3/5.
It was my first try, definitely going to give it another go.
Good feedback. Thank you 🙏