
This post contains affiliate links. Please see our disclosure policy.
There is a certain rite of passage in the culinary world: being the one responsible for the Thanksgiving turkey. It’s a high-stakes, high-reward mission that defines the holiday. Ask ten different pitmasters how to do it, and you’ll get ten different answers… from the deep-fryer and the kitchen oven to the spatchcocked bird. But at the end of the day, we’re all chasing the same holy grail: a turkey that is incredibly moist, packed with flavor, and possesses that “centerpiece-worthy” golden-brown skin.
This recipe is my definitive guide to roasting the perfect bird on the Big Green Egg. To be clear, we aren’t making a traditional “heavy-smoke” BBQ turkey here. Instead, we are utilizing the Egg’s incredible ceramic insulation to create the ultimate outdoor convection oven, adding just a clean hint of hickory smoke to elevate the natural flavors.
So, let’s take the stress out of the holiday. Pop a bottle of Beaujolais Nouveau, pour yourself a glass, and let’s walk through the steps to making a Big Green Egg Thanksgiving Turkey that your family will be talking about until next November.
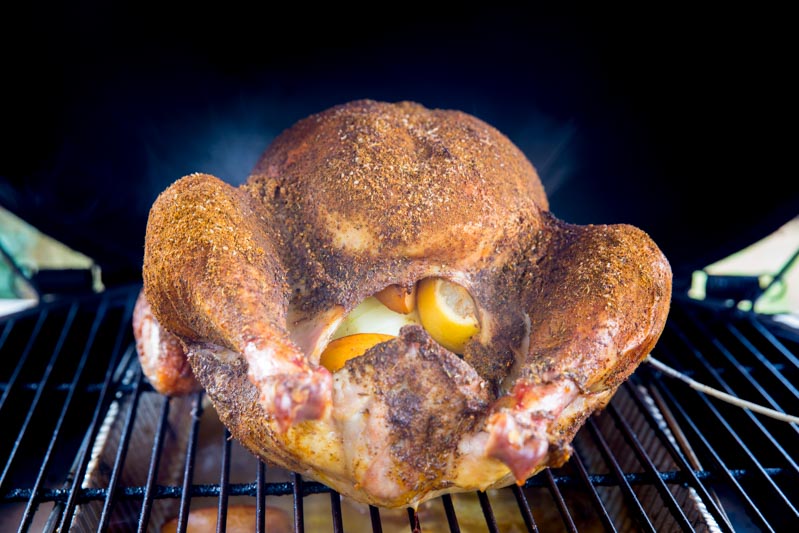
Table of Contents
Get My NEW Book
The Ultimate Big Green Egg Cookbook

Brining Your Thanksgiving Turkey
When it comes to Thanksgiving turkey on the Big Green Egg, the conversation always starts with one word: Brining. If you want a bird that is actually juicy not just “passable with enough gravy” you have to brine. Here is the breakdown of why it matters and why I chose Lane’s for this specific cook.
The Brining Breakdown: Wet vs. Dry
There are two main ways to tackle a turkey, and both have their loyalists:
- Wet Brining: This is the traditional method of submerging the bird in a saltwater bath infused with aromatics.
- Pros: It’s like an insurance policy for moisture. The salt breaks down the muscle fibers, allowing the turkey to literally soak up extra water. It’s much harder to “dry out” a wet-brined bird.
- Cons: It’s a logistical puzzle. You need a massive food-grade bucket or bag, plenty of fridge space, and it can be a bit messy to handle a slippery, wet turkey.
- Dry Brining: This involves rubbing the bird down with salt and spices and letting it sit uncovered in the fridge for 24–48 hours.
- Pros: It’s way cleaner and takes up less space. More importantly, it results in the absolute best, shatters-like-glass crispy skin because the air in the fridge dries out the exterior.
- Cons: It doesn’t actually add moisture to the bird; it just helps the turkey retain the juices it already has.
Why I Choose Lane’s BBQ Signature Brine
For this Thanksgiving cook, I went with Lane’s BBQ Signature Brine. While I love the science of a dry brine, I’m a “Wet Brine” guy for the holidays because I want that extra margin of error that comes with added moisture.
What sets Lane’s apart is the flavor profile. Most homemade brines are just salt and sugar, but Lane’s adds Apple Cider Vinegar powder, which provides a distinct tang that cuts through the rich, smoky flavors of the Egg. It also includes Herbes de Provence and Sage, giving the meat that classic “Thanksgiving” aroma from the inside out. It’s a “Signature” blend for a reason, it simplifies the process while delivering a level of flavor penetration you just can’t get from a standard salt-water soak.
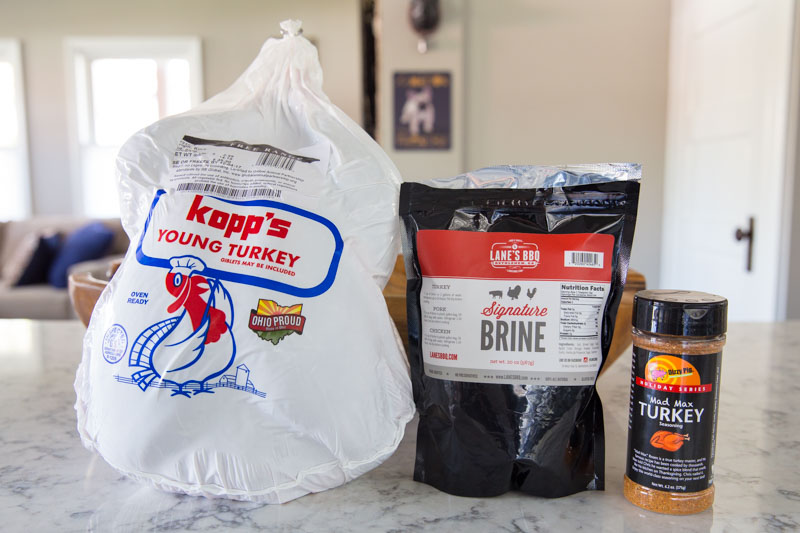
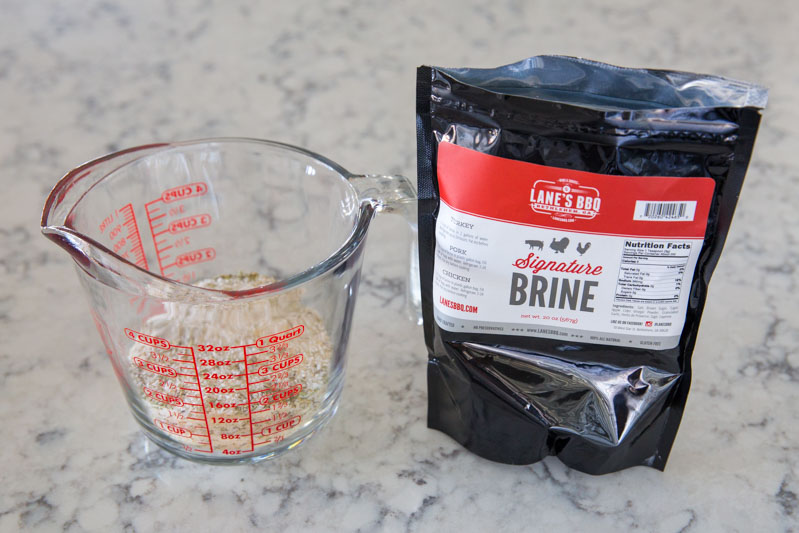
Making the brine couldn’t be easier than with Ryan Lane’s signature brine. Instead of hunting through your pantry for the right ratio of kosher salt and sugar, you just mix 3 cups of the brine with 2.5 gallons of water, and you are good to go.
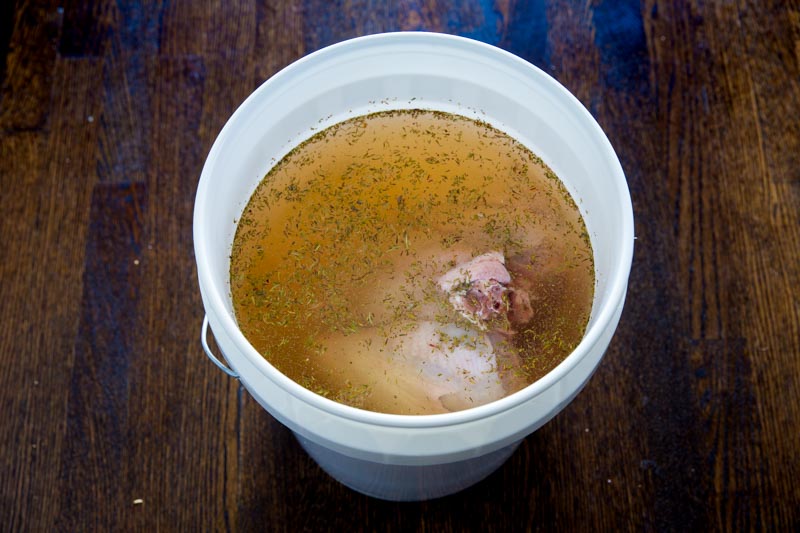
I like to use a large food-grade bucket for this. Once you’ve dissolved the mixture into the water, submerge the turkey completely, make sure there are no air pockets trapped in the cavity. If the bird tries to float, you can weight it down with a heavy plate. Giving the turkey a full 12 to 24-hour soak in this solution allows those aromatics like sage and apple cider vinegar to work their way deep into the breast meat, ensuring every single bite is seasoned and succulent. It takes the guesswork out of the most stressful part of the meal, leaving you more time to focus on your sides (and your bourbon).
Air Dry the Turkey
After the 24-hour soak is up, it’s time to get that bird ready for the heat. Remove the brined turkey from the bucket and rinse it thoroughly under cold water. You want to be diligent here… make sure you’re washing away all the excess surface salt, both on the skin and inside the cavity. If you skip this step, the drippings for your gravy might end up way too salty, and the skin won’t crisp up quite right.
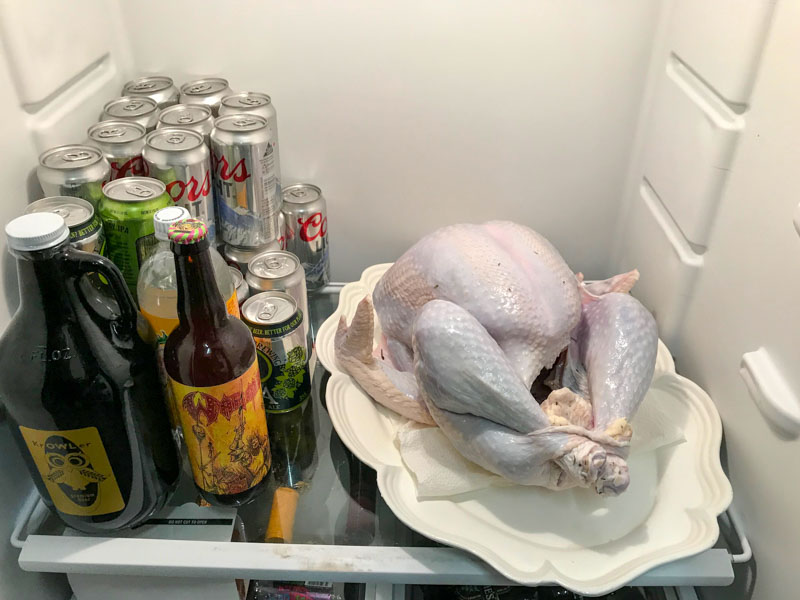
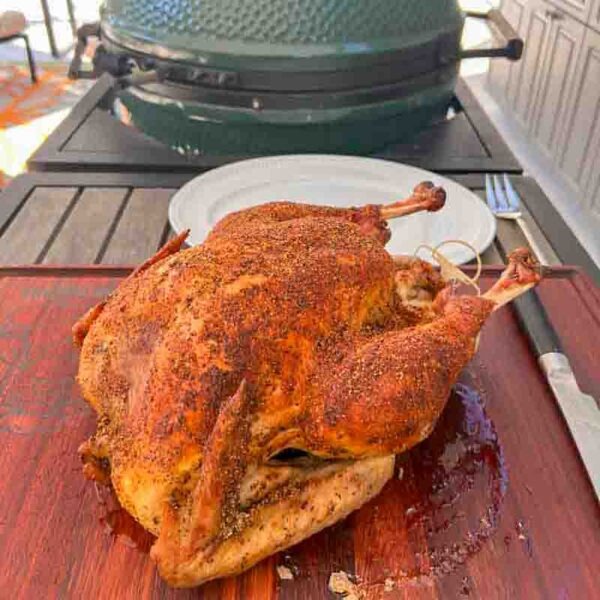
Once rinsed, pat the turkey completely dry with paper towels and place it on a roasting rack over a sheet pan. Now, here is the real pro tip: place it back in the fridge, uncovered, for at least 4 to 12 hours (or even overnight). This air-drying phase is the secret to getting that “bite-through” crispy skin on the Big Green Egg. While the wet brine worked its magic on the inside, the cold air in the fridge will dehydrate the skin on the outside. By the time you’re ready to light the charcoal, the skin will look slightly translucent and feel like parchment paper, that is exactly what you want for a perfect, golden-brown finish that isn’t rubbery.
Prep the Turkey for the Cook
After 24 hours of air-drying, remove the bird from the fridge while you get the Big Green Egg dialed in. To ensure the breasts cook at the same time as the thighs and legs, place a Ziploc bag full of ice directly on top of the turkey breasts for about 20 to 30 minutes before the bird hits the grill.
I know it sounds a little crazy, but trust me on this: the breast meat is much leaner and cooks significantly faster than the dark meat of the legs and thighs. By “pre-chilling” the breasts while the rest of the bird comes up toward room temperature, you’re giving the dark meat a head start. This little trick is the ultimate insurance policy as it allows the thighs to reach that safe 175°F without the breasts drying out, resulting in a perfectly even cook across the entire bird. While the ice is doing its job, use this time to give the rest of the turkey a light coat of oil or melted butter so your rub has something to stick to.

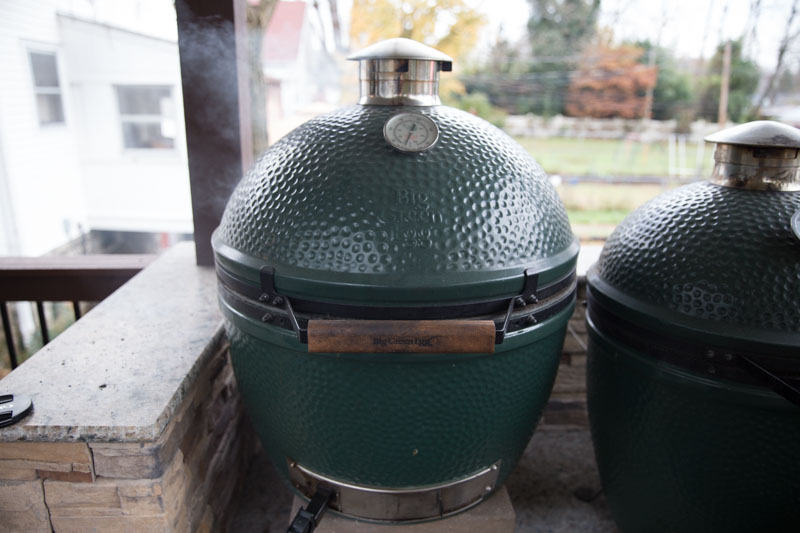
Setting Up the Big Green Egg
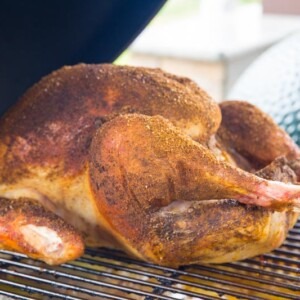
To get that perfect wood-fired flavor, you need to set up your Big Green Egg for indirect cooking. I use the ConvEGGtor (platesetter) with the legs facing up, which creates a heat shield that turns your Egg into a high-end outdoor convection oven. This is crucial because it protects the bird from direct flames, allowing it to roast evenly without burning the bottom.
When it comes to the fire, I like to mix 2-3 chunks of hickory wood in with the lump charcoal. For a turkey, you aren’t looking for a heavy, “Texas-brisket” level of smoke; you just want a clean, steady hint of it. Hickory provides that classic, savory BBQ aroma that pairs beautifully with the herbs in the brine.
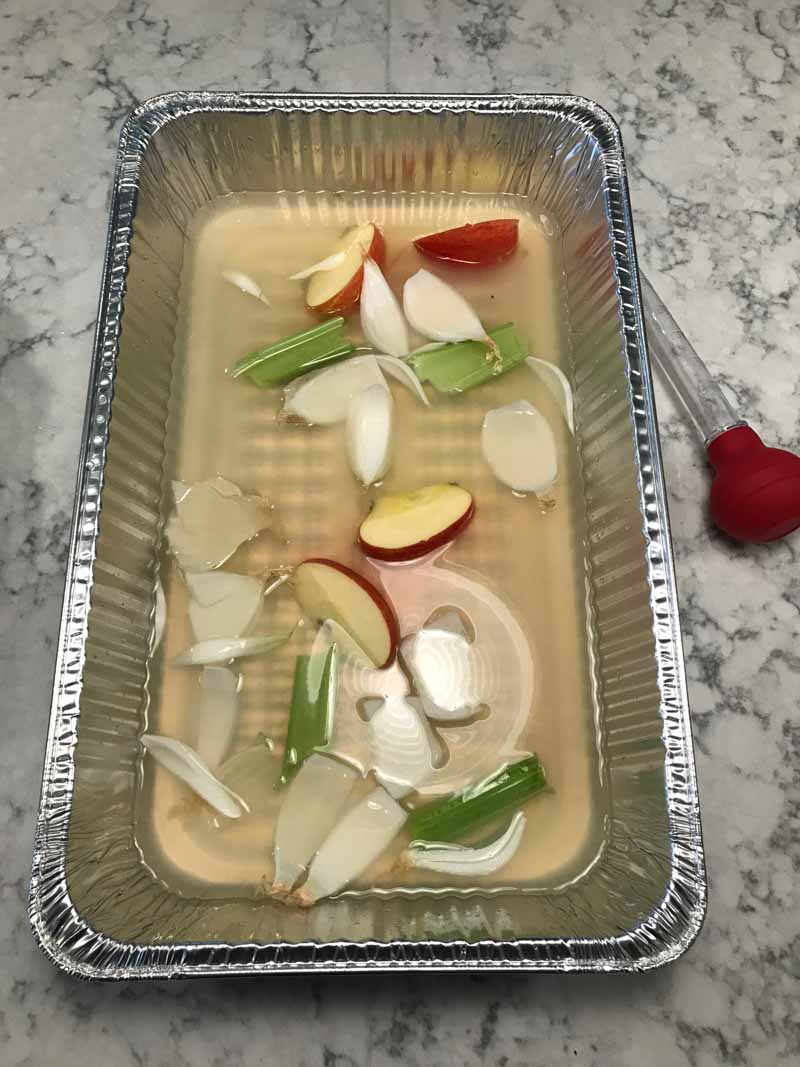
The Drip Pan Setup
Before you set the grate in place, nestle a sturdy drip pan directly onto the ConvEGGtor. Fill that pan about halfway with a flavorful mixture of chicken stock, a crisp white wine, and I’m using sliced apples, celery, and onion. The apples provide a subtle sweetness that pairs perfectly with the hickory smoke, while the celery and onion build that classic savory base. This setup catches every drop of “liquid gold” that renders off the turkey, ensuring your drippings are infused with these flavors for the ultimate gravy. This serves two purposes:
- It adds a bit of moisture to the cooking environment.
- It catches all those “liquid gold” turkey drippings while keeping them from burning against the hot ceramic. You’ll thank me later when it’s time to make the gravy.
Once the Egg is holding steady at 325°F and the smoke has turned from thick white to a thin, translucent blue, you’re ready to get that bird on the grate.
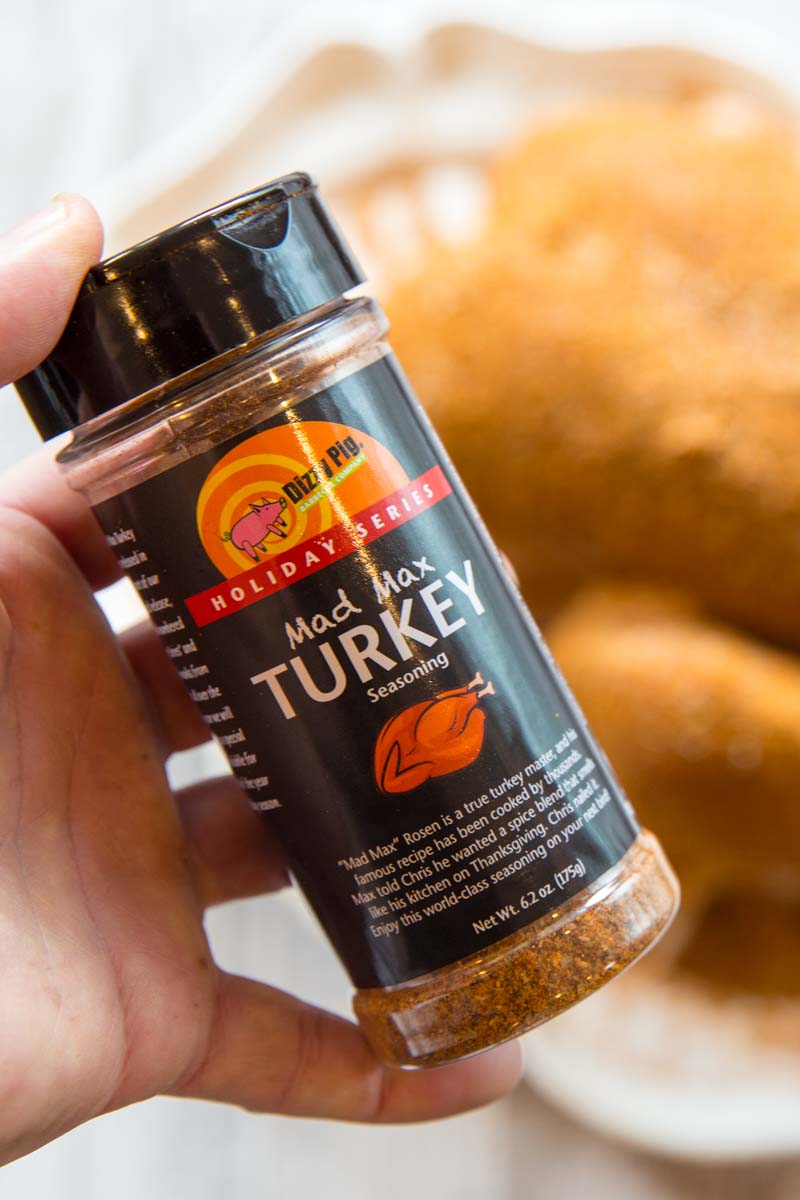
Seasoning the Thanksgiving Turkey
Once the bird has been air-dried and the breasts are chilled, it’s time to bring the flavor. While the brine has seasoned the meat from the inside out, the rub is what’s going to make that skin legendary. I recommend picking a BBQ rub specifically designed to complement poultry my absolute favorite for this is Mad Max from Dizzy Pig.
The flavor profile is practically built for the Thanksgiving table. It features a perfect balance of garlic, salt, and a touch of sugar, but it’s the lemon peel that really sets it apart. That citrus note cuts through the richness of the turkey and the smoke of the Big Green Egg, giving the skin a bright, savory finish that isn’t too heavy.
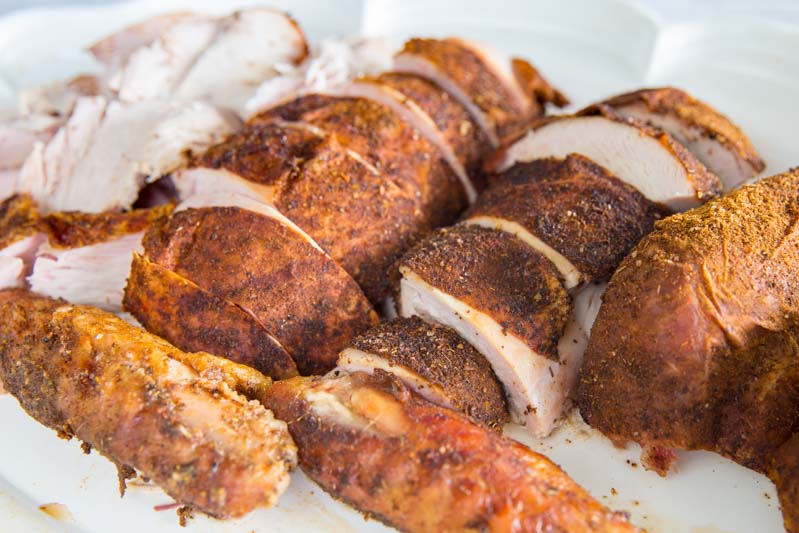
When applying the rub, be thorough but mindful. You want an even coat over the entire exterior, including the legs and wings. Since we took the time to air-dry the skin in the fridge, the rub should adhere beautifully to the tacky surface. If you really want to go the extra mile, you can even gently loosen the skin over the breasts and work a little bit of the rub (or even some compound butter) directly onto the meat for an extra layer of flavor.
To round out the flavor profile and ensure the turkey is seasoned from the inside out, we are going to pack the cavity with aromatics. This isn’t a traditional bread stuffing—this is an aromatic infusion that steams inside the bird while it cooks, keeping the breast meat moist and perfuming the entire turkey.
Stuffing the Cavity for Maximum Flavor
Just before the turkey goes onto the Big Green Egg, grab your sliced apple, lemon, and onion. Stuff them loosely into the main cavity of the bird.
- The Apple: Provides a hit of moisture and a subtle sweetness that balances the smoke.
- The Lemon: The acidity helps brighten the heavy, savory flavors of the turkey.
- The Onion: The ultimate savory aromatic that builds the foundation of the bird’s flavor.
Don’t pack it too tightly; you want some hot air to still be able to circulate in there so the turkey cooks safely and evenly. Once stuffed, you can tie the legs together with kitchen twine (trussing) to hold everything in place and give the bird a nice, uniform shape on the grate.

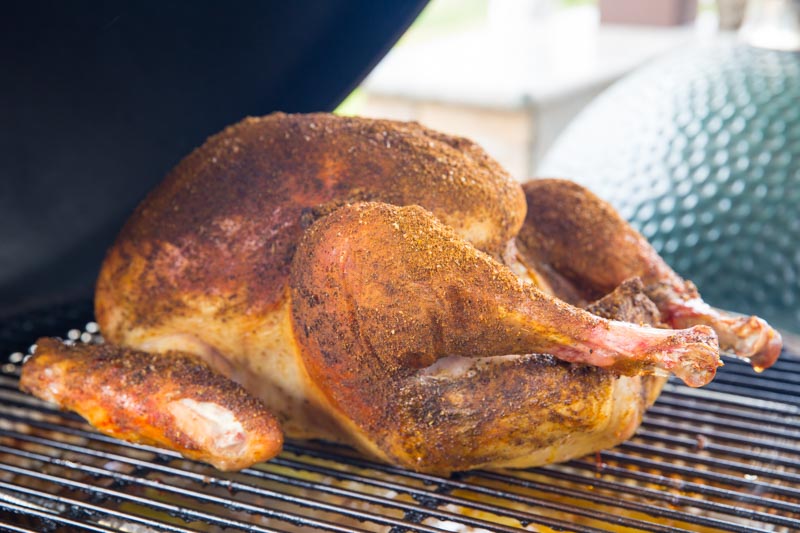
Cooking the Thanksgiving Turkey on the Big Green Egg
When the Big Green Egg is holding a rock-steady 325°F and the smoke has cleared to a beautiful thin blue, you’re officially ready for the main event. Open the dome and carefully center the turkey on the grilling grate, directly over your aromatic-filled drip pan.
Roasting at 325°F is the “sweet spot” for turkey on the Egg. It’s hot enough to render the fat and crisp up that skin we spent so much time air-drying, but gentle enough that the hickory smoke has time to really penetrate the meat. By positioning the bird directly above the drip pan, you’re creating a perfect convection environment where the heat circulates around the turkey while the liquid below keeps the atmosphere inside the dome perfectly humid.
Once the bird is settled, close the lid and resist the urge to peek. Every time you open the dome, you lose that carefully managed heat and moisture, which can lead to rubbery skin and longer cook times. Let the Big Green Egg do its job. I usually don’t even think about checking the internal temperature until about the 2-hour mark, depending on the size of the bird. You’re looking for a beautiful, mahogany-gold color and an internal temperature of 160°F in the thickest part of the breast (it’ll carry over to 165°F while resting).
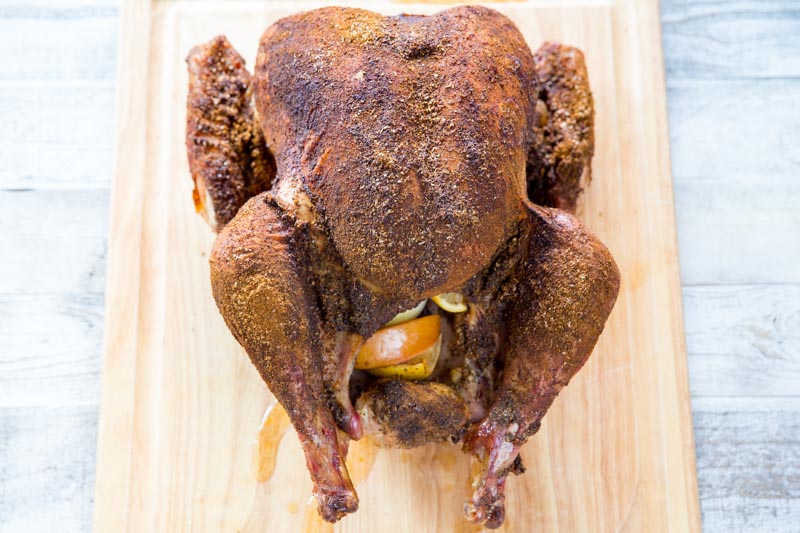
The Finish and How to Carve the Turkey
Once that thermometer hits 160°F in the breast and 175°F in the thigh, it’s time to get that bird off the Egg. But here is the most important rule of the day: Let the turkey rest for at least 30 to 45 minutes before you even think about touching a knife. I know the 10-minute suggestion is tempting when the house smells that good, but for a bird this size, you need more time. Resting allows the internal juices, which have been pushed to the surface by the heat, to redistribute back into the meat. If you slice it too soon, all that moisture we worked so hard to build with the Lane’s brine will end up on your cutting board instead of on the plate. Don’t worry about it getting cold; a turkey that has rested properly will stay hot for over an hour, and the skin will actually stay crispier than if you tented it tightly with foil.
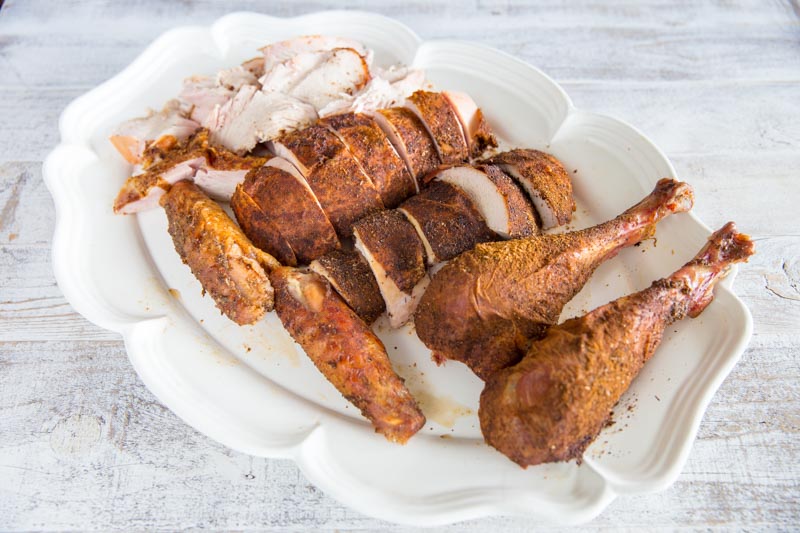
The Master Carver Overview
When it’s time to eat, don’t just hack away at the bird while it’s sitting in the roasting pan. Move it to a large, sturdy cutting board and follow this flow:
- Remove the Legs and Thighs: Slice through the skin connecting the leg to the breast and pull the leg back until the joint pops. Cut through the joint and set the dark meat aside.
- Take the Breasts Off Whole: Instead of slicing downward into the bird, find the breastbone (the keel bone) and slice down right alongside it. Follow the curve of the ribcage to remove the entire breast in one large piece.
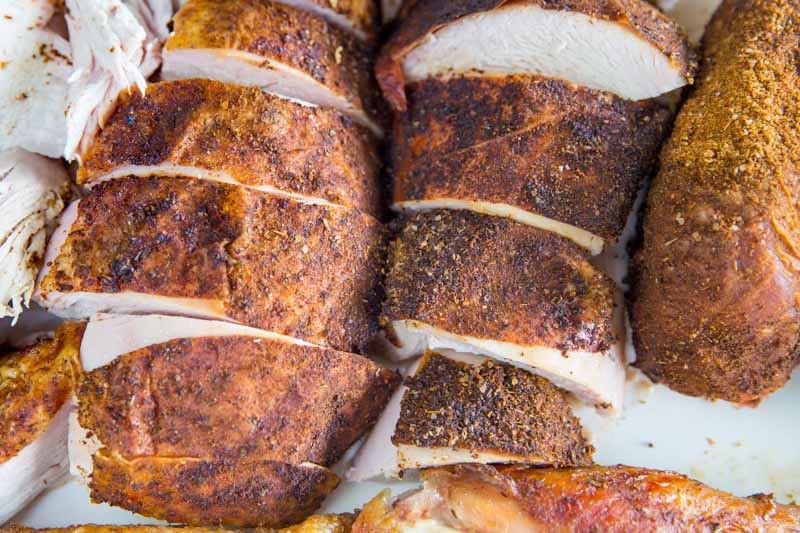
- The Cross-Cut: Now, lay that breast meat flat on your board and slice it across the grain into thick, beautiful medallions. This ensures every slice has a piece of that perfectly seasoned Mad Max skin and stays incredibly tender.
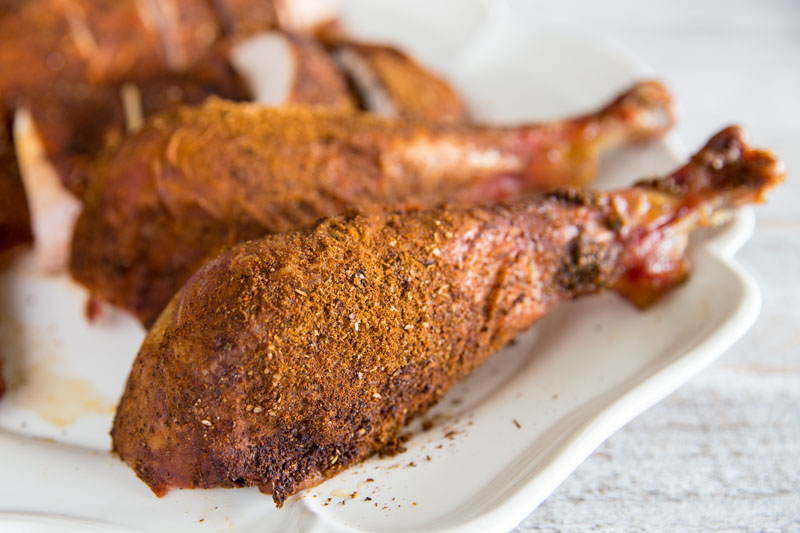
- Separate the Dark Meat: Disconnect the drumstick from the thigh. You can serve the drums whole (the “caveman” style) and slice the thigh meat away from the bone.
Arrange everything on a warm platter, grab that “liquid gold” gravy you made from the drip pan, and get ready for the best Thanksgiving compliments you’ve ever received.
Making the Gravy
While the turkey is resting, it’s time to transform that drip pan into the best gravy your guests have ever tasted. Thanks to the chicken stock, white wine, and aromatics we started with (plus all those smoky, herb-infused turkey drippings) you have a flavor base that simply can’t be bought in a store.
1. Strain the Goodness Carefully remove the drip pan from the Big Green Egg (watch out, it’s hot!). Pour the liquid through a fine-mesh strainer into a large measuring cup or bowl. Discard the spent herbs and garlic. Let the liquid sit for a minute so the fat rises to the top, then skim off most of the oil, leaving just a bit for flavor.
2. The Roux is the Foundation In a saucepan over medium heat, melt 4 tablespoons of butter. Whisk in 1/4 cup of all-purpose flour and cook it for 2–3 minutes until it turns a light golden brown and smells slightly nutty. This removes the “raw” flour taste and ensures a silky-smooth texture.
3. Build the Flavor Slowly whisk in your strained liquid from the drip pan. If you find you don’t have enough liquid, top it off with a little extra chicken stock until you have about 3 to 4 cups total. Keep whisking over medium heat until the gravy simmers and thickens to your liking.
4. The Final Touch Give it a taste. Because we used Lane’s Brine and the Mad Max rub, you probably won’t need much salt, but a fresh crack of black pepper or a teaspoon of chopped fresh sage can really make it sing. If the flavor is too intense, a splash of heavy cream can mellow it out and add a luxurious richness. Pour it into a warmed boat, and get ready… this gravy is usually the first thing to disappear from the table.
Big Green Egg Thanksgiving Turkey
Ingredients
Turkey Ingredients:
- 12-14 pound turkey
- 3 cups Lane's Signature Brine
- 3/4 cup Your Favorite BBQ Rub
- 1 stick of softened Butter or 1/2 cupOlive Oil, for the slather (to bind the rub)
- 1 Lemon, sliced
- 1 Apple, quartered
- 1 Onion, halved
Drip Pan Ingredients:
- 2 cups Chicken Stock
- 2 cups white wine
- 1 apple (Honeycrisp or Fuji work well), sliced in to wedges
- 2 stalks celery , cut in to 3" pieces
- 1 yellow onion, peeled, cut in to wedges
Gravy Ingrediens:
- 4 tbsp butter
- 1/4 cup all purpose flour
- 3-4 cups strained drippings from the pan, add extra chicken stock as needed
- 1 tsp fresh cracked pepper
Instructions
Turkey Instructions:
- Clean the turkey and keep trimmings, neck, etc. to the side for gravy
- Mix 3 c of Lane’s Signature Brine with 2.5 Gallons of water
- Place the turkey in the brine and let sit for 24 hours in a refrigerator
- After 24 hours pull the turkey from the brine and rinse well
- Pat dry and place the turkey (uncovered) back in the fridge for another 24 hours to let the skin dry
- After 24 hours take the turkey out of the refrigerator and place a Ziploc bag full of ice on the turkey breasts (this will help the breasts cook at the same time as the thighs/legs)
- Prep your Big Green Egg for indirect cooking and set to 325°
- I used a few chunks of hickory wood to add smoke flavor to the turkey
- Place a drip pan half full of chicken stock, white wine, and the aromatics (apple, onion, celery) to catch the drippings
- Remove the ice from the turkey and rub all over with olive oil or softened butter
- Liberally add the BBQ rub to your turkey
- Stuff the turkey's cavity with the apple, lemon, and onion
- Once the BGE is up to temp place the turkey in on the grilling grate over the drip pan
- Check progress every hour waiting for the turkey to come up to 165° measured in the breast and thigh
- When you check on the bird you can use a turkey baster to draw juices from the drip pan and baste the bird inside and out
- I had a 14-pound bird for this cook and it took me 2.5 hours until it was ready
- Pull the turkey when the temp measures 165° and allow it to rest 10 minutes before slicing and serving
Gravy Instructions:
- Carefully remove the drip pan from the Big Green Egg and pour the liquid through a fine-mesh strainer into a large bowl.
- Allow the strained liquid to sit for 1–2 minutes, then skim off the excess fat from the surface.
- In a saucepan over medium heat, melt the 4 tablespoons of butter until bubbling.
- Whisk in the 1/4 cup of flour to create a roux; continue whisking for 2–3 minutes until the mixture turns golden brown and smells nutty.
- Slowly pour in the strained turkey liquid while whisking constantly to prevent lumps from forming.
- Bring the gravy to a gentle simmer and continue to whisk until it reaches your desired thickness.
- Taste the gravy and add the fresh black pepper and sage (the brine and rub usually provide enough salt, so taste before adding more).
- For a creamier finish, whisk in a splash of heavy cream just before serving.
- Transfer to a warmed gravy boat and serve immediately alongside your rested turkey.
Nutrition information is automatically calculated, so should only be used as an approximation.


Do you eat the skin on a cooked bird or is it too tough and salty due to the brining?
Skin is amazing and must eat!
Lanes brine link is am error for me. Is there a recipe I can follow for the brine? This looks amazing and I really want to try it this year.
Hey Chris, avid follower of your recipes! You help make our parties the talk of the neighborhood! Going to smoke a Turkey this weekend for a “Friendsgiving” party. I have the standing turkey roaster from Big Green Egg. Any concerns about using that for this recipe? If recommended, should I fill it with anything (chicken stock, apple cider vinegar, beer, etc…)?
Thanks in advance!
Thanks Jared! The standing toaster will work fine. Definitely fill it with something like wine or stock with some aromatics in there too. Just keep basting the bird from the top to keep it moist as it cooks.
Question.. how long would you guess it might take for a 28# turkey?
5.5 hours estimated
Chris. Can you give me some direction on how to make the gravy? How do I bring together pan drippings with the giblets that are set aside? I assume I put them all together in a pot for a period of time. Can you walk me through it?
The giblets and turkey neck could be used if you are not using the pan drippings. In other words, you can roast neck and giblets then simmer in stock and aromatics to get base for your gravy. If you are using the pan drippings as outlined in this post you don’t need neck or giblets as you are getting the roasted turkey flavor from the actual turkey. Hope that makes sense. As for actually making the gravy… strain the drippings, separate the fat, use the fat with flour to make roux, slowly add in the drippings to the roux to make gravy.
Can you brine and inject?
Yes
Thank you for sharing your recipes and helpful advice.
Thanks for the kind words!
You mention apple cider vinegar when you discuss the brine, but no further mention of this in the directions. Do you add vinegar to the brine or not? I have lanes brine but there’s no mention of vinegar.
Lane’s signature brine has apple cider vinegar powder in it. So, the reference to ACV in the post was to the flavor not to the need to add more. So, all you need is a bag off the brine and water. Hope that makes sense.
Chris – great. I see ACV on the ingredient list. Thanks for your reply.
Look again. Chicken stock and white wine are listed on the ingredient list. ACV should not be listed there.
Chris,
We are a stuffing family. Love the stuff (pardon the pun). What are your thoughts on stuffing the turkey and then using your recipie.
Separate question: I noticed you said that injection of the turkey was OK to pair with your recipie. I was also thinking of a cajun-seasoning based brine. Your thoughts on these ideas are welcome.
Stuffing the bird with this recipe would be fine. The flavors should do well marrying right the stuffing inside the cavity. As for Cajun brine, I love the idea. Share the recipe if you try it!