This post contains affiliate links. Please see our disclosure policy.
Mastering the duck breast is a rite of passage for any serious outdoor cook. While many people feel intimidated by the thick layer of fat, the Big Green Egg provides the perfect controlled environment to transform that fat into a crispy, golden crust. Think of duck breast as the “steak of the bird world.” It is a rich, red meat that thrives on the high-heat, wood-fired environment of a ceramic grill.
The secret to a world-class seared duck breast lies in the rendering process. By using a preheated cast iron skillet, you create an immediate surface sear that helps the fat begin to liquefy and escape. In this guide, I will walk you through the “Grilling by Feel” techniques needed to achieve a perfect medium-rare center and a mahogany-colored exterior. Whether you are cooking for a special date night or a weeknight treat, this method is the gold standard.
So, sit back, grab a nice glass of Merlot, and enjoy this post How to Sear Duck Breast on the Big Green Egg: The Ultimate Guide.

Table of Contents
- Step 1: Prepping the Duck for the Perfect Render
- Step 2: Big Green Egg Setup and Cast Iron Prep
- Step 3: The Sauce Mise en Place
- Step 4: The Art of the Render
- Step 5: The Flip and the Finish
- Step 6: Finishing the Port and Cherry Reduction
- Final Thoughts: Plating a Masterpiece
- Big Green Egg Seared Duck Breast with Cherry Port Sauce Recipe
Get My NEW Book
The Ultimate Big Green Egg Cookbook

Step 1: Prepping the Duck for the Perfect Render
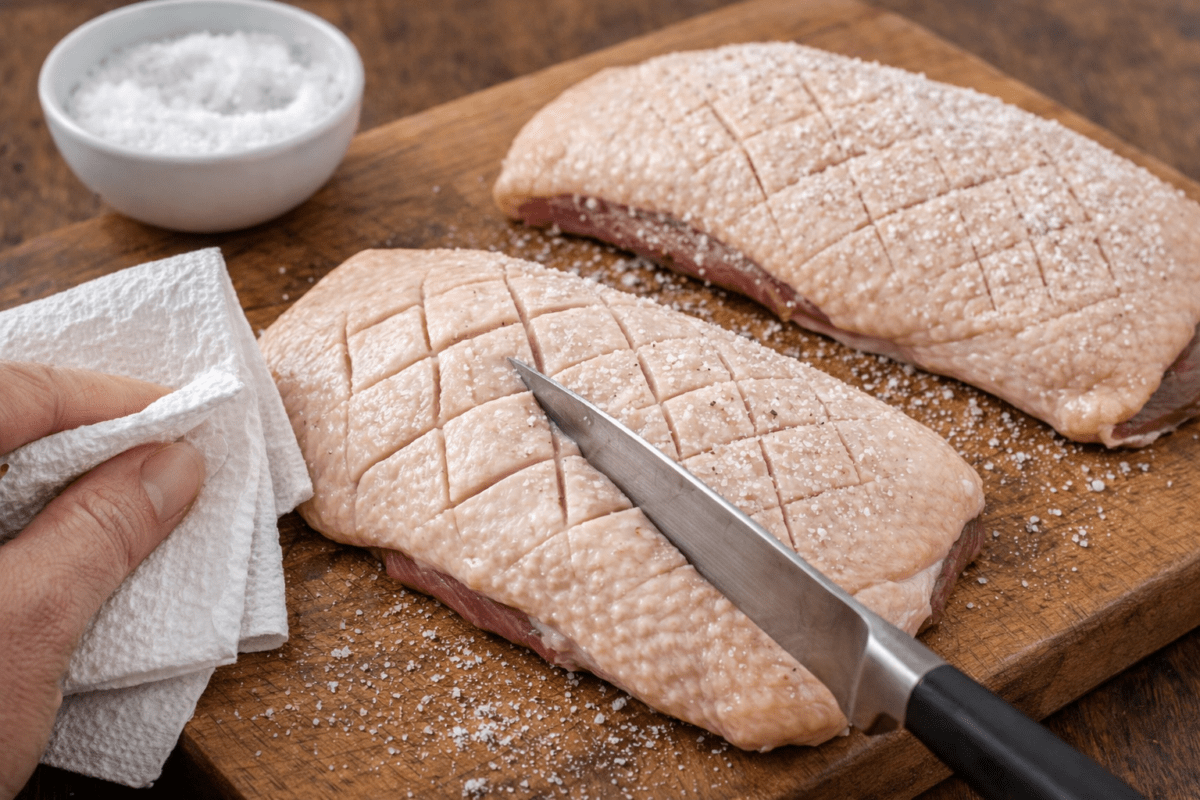
Preparation is the most critical phase when you are learning how to sear duck breast on the Big Green Egg. Unlike a steak, where you want the fat to stay intact, duck requires you to “score” the skin to allow the fat to escape during the cooking process. If you skip this step, the fat will get trapped, leaving you with a rubbery texture instead of that coveted “shatter-crisp” skin.
Start by using a very sharp knife to score a crosshatch pattern into the fat. You must be careful to cut through the white fat layer without piercing the dark meat underneath. Once you have scored the skin, pat the entire breast bone-dry with paper towels. Moisture is the enemy of a good sear, so a dry surface is mandatory. Finally, apply a generous dusting of kosher salt to both sides. The salt helps draw out surface moisture and seasons the fat as it renders down in the pan.
Step 2: Big Green Egg Setup and Cast Iron Prep
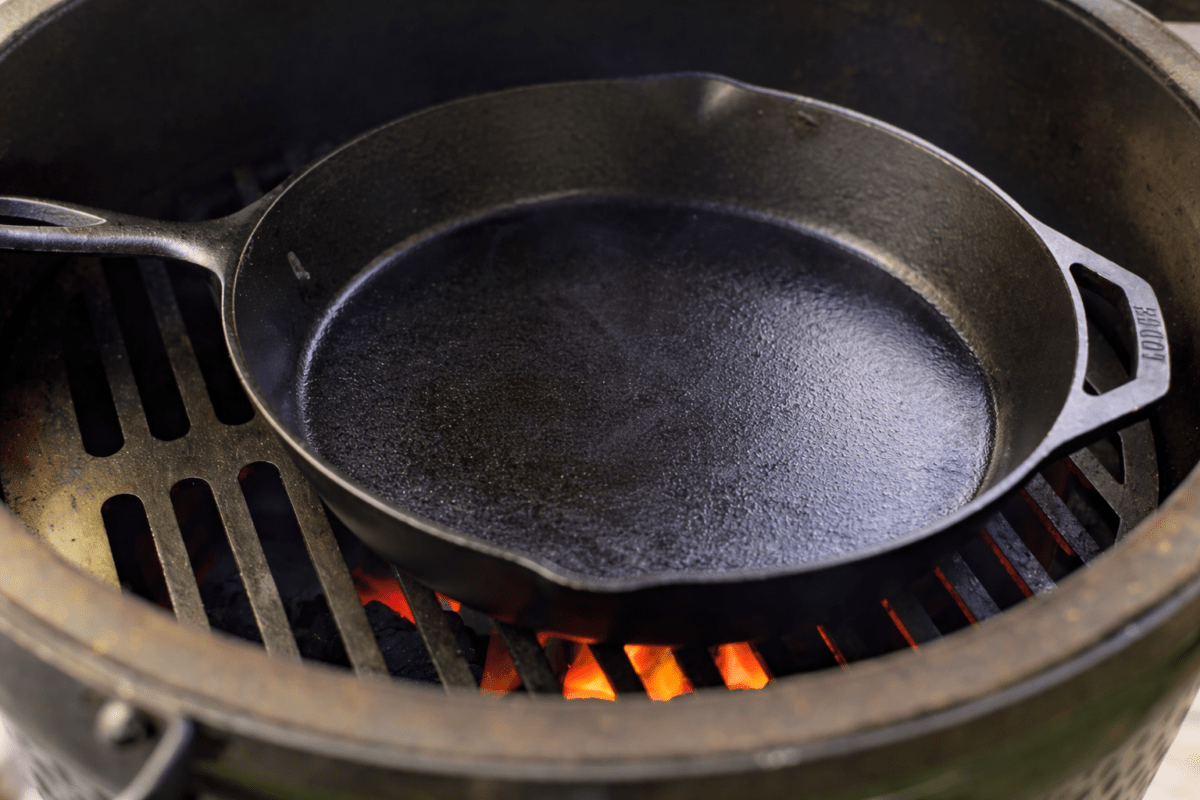
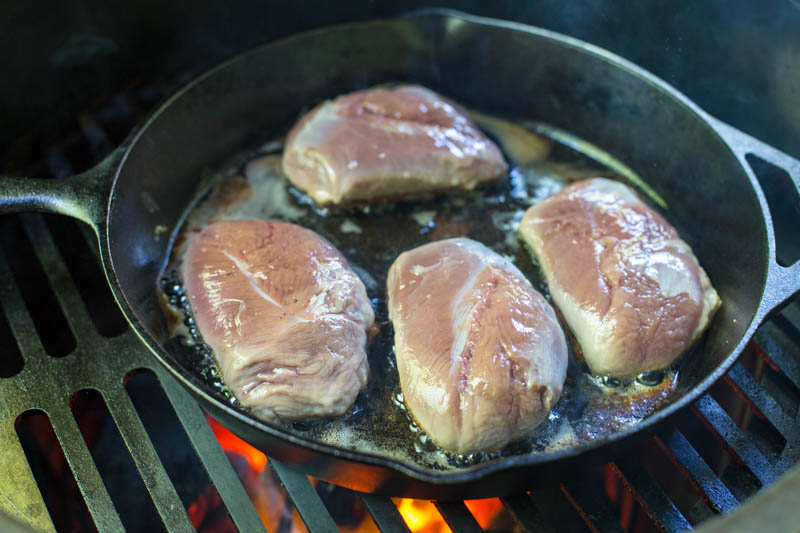
When you are cooking duck for the first time, the Big Green Egg is your best friend because of its incredible temperature stability. For this cook, I chose to use a Lodge cast iron pan placed directly on the cooking grate. Cast iron is the superior choice here because it provides even heat distribution, which is essential for rendering the thick layer of duck fat without scorching the skin.
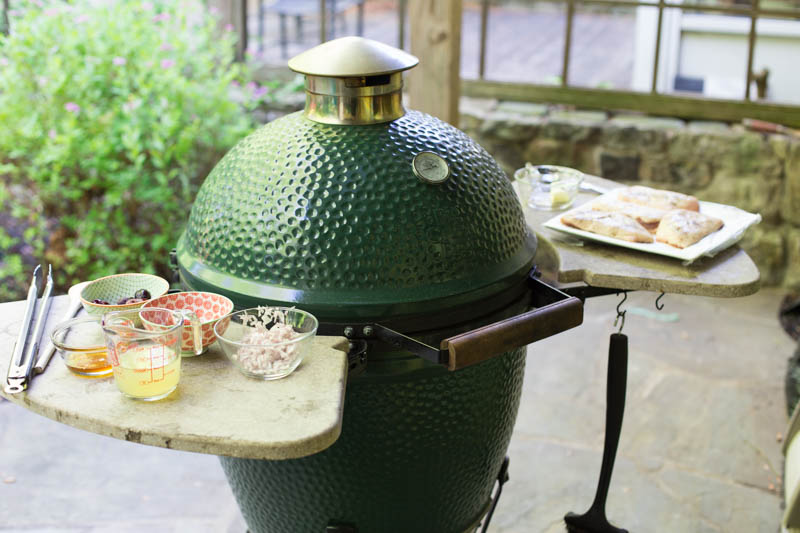
Stabilize your Egg at 400°F and allow the cast iron pan to preheat for at least ten minutes. You want the surface hot enough to initiate the render, but not so hot that the fat smokes immediately. While the grill is coming to temperature, ensure you have your mise en place ready for the pan sauce. Because duck cooks so quickly once you flip it, you need your cherries, chicken stock, shallots, port, and honey standing by for immediate use.
Step 3: The Sauce Mise en Place
A world-class duck breast deserves a sauce that can stand up to its bold, gamey flavor. For this version, I am using a combination of Tawny 20-year Port and fresh cherries to create a sophisticated reduction. The sweetness of the port and the tartness of the cherries provide a necessary contrast to the savory, salted duck skin. While you will build this sauce right in the pan once the meat is resting, you must have all your ingredients measured and ready before the duck ever hits the heat.
The key to a professional pan sauce is speed. Because the cast iron skillet retains intense heat from the Big Green Egg, you cannot afford to be chopping shallots or pitting cherries while the pan is empty and smoking. Gather your pitted cherries, chicken stock, minced shallots, Tawny Port, and honey near the grill. Having this mise en place ready allows you to transition seamlessly from searing the meat to simmering the glaze without losing a second of cooking momentum.
Step 4: The Art of the Render
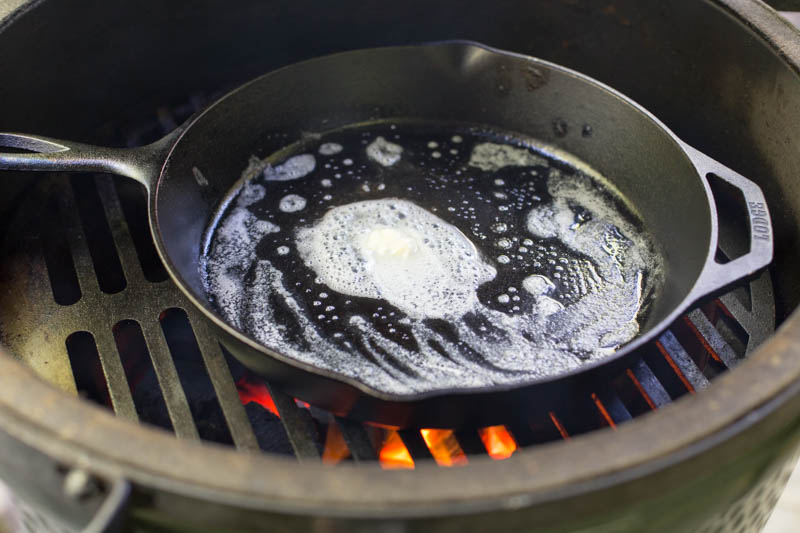
The secret to a successful duck breast is patience. Once the butter melts in your preheated cast iron pan, place the duck breasts skin-side down to begin the rendering process. You are not just searing the meat here; you are systematically melting the thick layer of subcutaneous fat to achieve a paper-thin, crispy skin. If you rush this stage, you will end up with a chewy, unrendered layer of fat that ruins the eating experience.
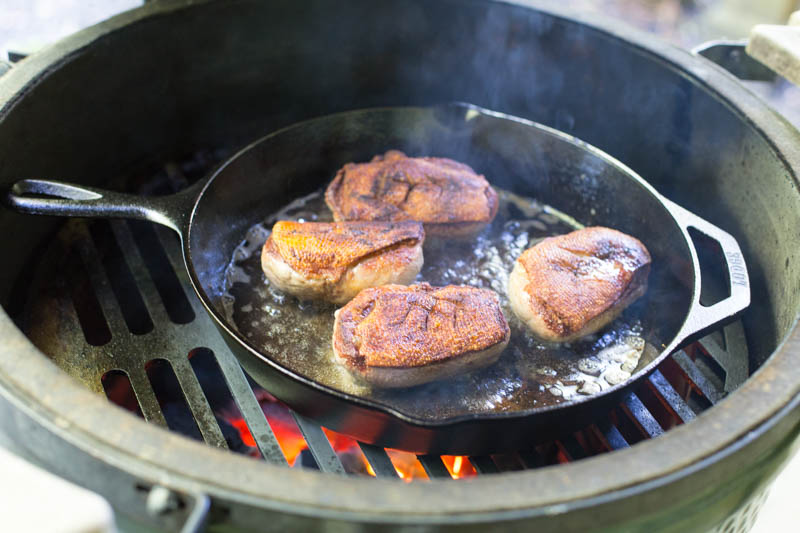
Keep the skin side down for approximately 10 minutes. During this time, the fat will liquefy and fill the pan, essentially confit-ing the skin in its own juices. You should hear a steady sizzle, but the heat should not be so aggressive that the skin burns before the fat has time to escape. This is “Grilling by Feel” at its most technical level. Once the skin is deep mahogany and remarkably crisp, you are ready to flip.
Step 5: The Flip and the Finish
Once the skin reaches a deep mahogany color and feels firm to the touch, it is time to flip. Turn the duck breasts over to sear the meat side for approximately 5 minutes. This final stage is much faster than the rendering process because you are simply looking to bring the internal temperature to a perfect medium-rare. The residual heat from the cast iron pan and the Big Green Egg will work quickly now that the heavy lifting of the fat rendering is complete.
You must use an instant-read thermometer to ensure precision during these final minutes. Duck is best served at 135°F after resting, so I recommend pulling it off the heat when it hits 130°F. Because duck is a very lean red meat, overcooking it will lead to a dry, metallic taste that masks the rich flavor you worked so hard to develop. Trust the process and the temperature, and you will be rewarded with a restaurant-quality result.
Step 6: Finishing the Port and Cherry Reduction
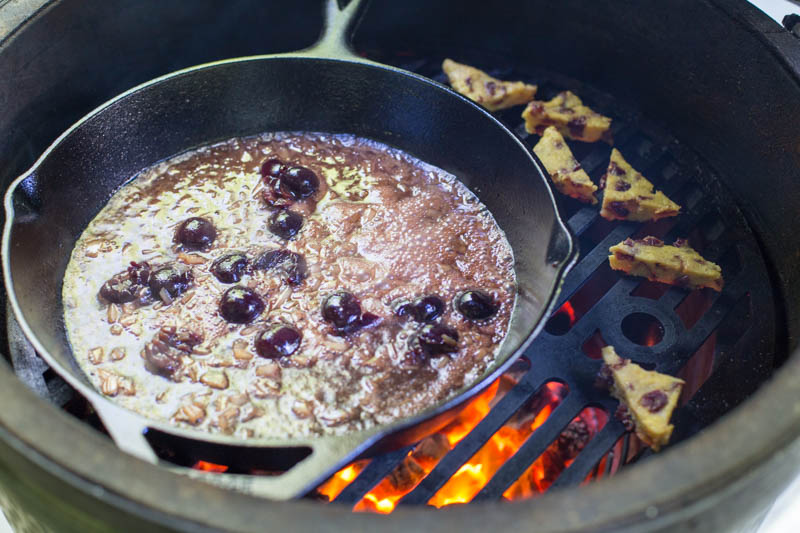
After you remove the duck from the heat, you have the perfect base for a world-class pan sauce. Pour off the excess duck fat into a jar for later use, but leave about two tablespoons in the cast iron skillet. The rendered fat and the browned bits of duck skin provide an incredible foundation for the remaining ingredients.
Add the shallots to the hot pan and sauté them until they are translucent and fragrant. Next, pour in the port wine, chicken stock, cherries, and honey. Bring the mixture to a boil over the direct heat of the Big Green Egg and let it reduce for approximately ten minutes. Once the sauce thickens enough to coat the back of a spoon, pull it off the grill. This rich, tart glaze perfectly balances the savory richness of the seared duck.
Final Thoughts: Plating a Masterpiece
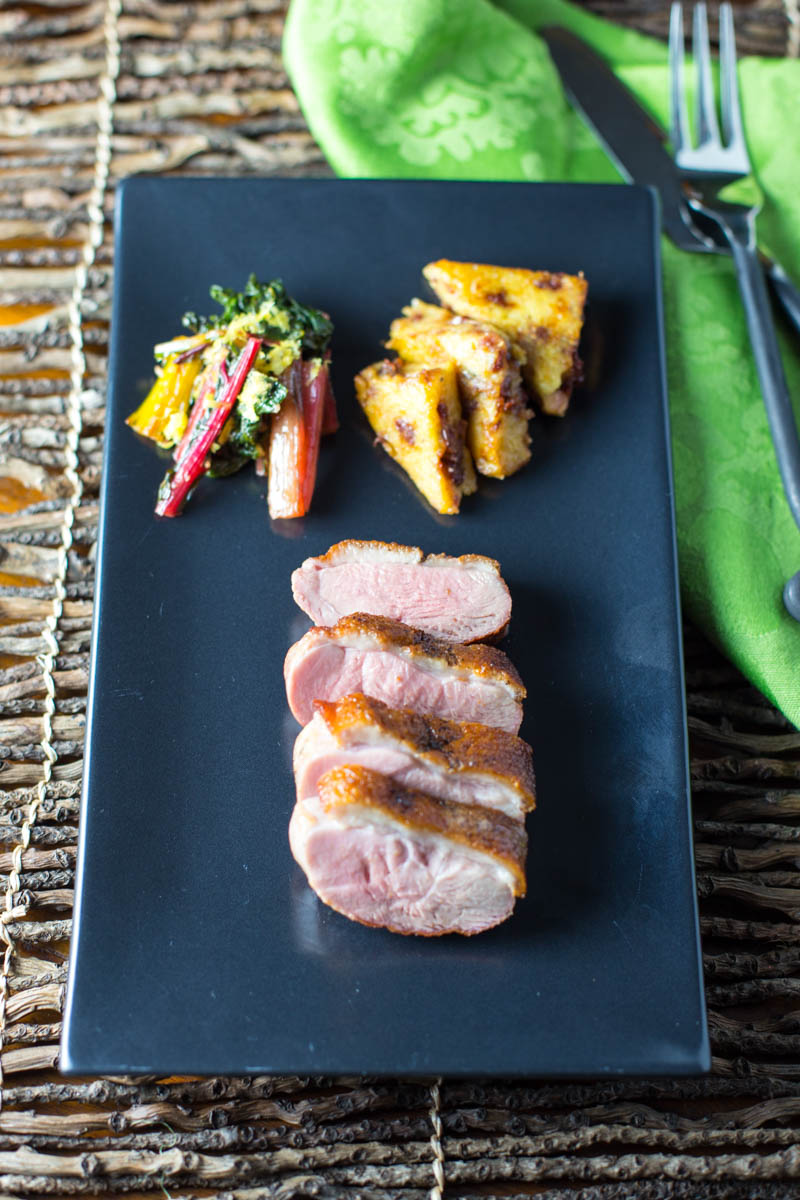
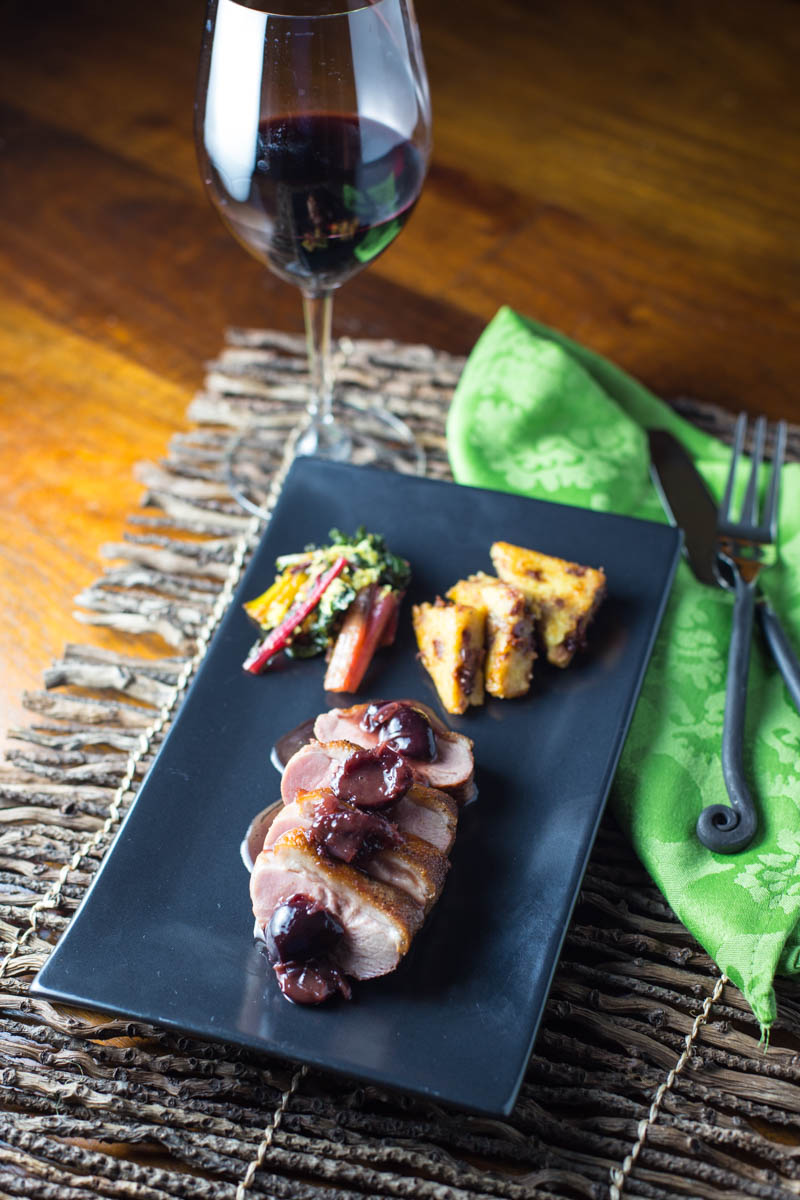
The beauty of a perfectly seared duck breast lies in the contrast between the paper-thin, crispy skin and the tender, ruby-red center. When you slice into the breast, you should see a uniform medium-rare temperature that highlights the quality of the meat. As you can see in the photos, the rendering process we used on the Big Green Egg creates a professional finish that rivals any high-end bistro.
Pairing this dish correctly is the final step in the experience. For this meal, I chose a Seghesio Zinfandel, which has the structure and fruit notes to stand up to the rich duck fat and the tartness of the cherry reduction. A bold Merlot or a complex Pinot Noir would also work beautifully here. Whether you are hosting a dinner party or just treating yourself, this dish proves that the Big Green Egg is the ultimate tool for gourmet seafood and game.
The Final Service
- The Pairing: Pour a glass of Zinfandel or Merlot to complement the rich, wood-fired flavors of the duck.
- The Slice: Carve the rested duck breast into 1/2-inch thick medallions using a very sharp carving knife.
- The Fan: Arrange the slices in a fan shape on a warm plate to showcase the internal temperature.
- The Sauce: Drizzle the warm cherry and port reduction generously over the center of the meat.
People Also Ask
Do you have to score the skin on a duck breast? Yes. Scoring is mandatory because it provides a path for the fat to escape. Without these cuts, the fat remains trapped under the skin, resulting in a rubbery and greasy texture rather than a crispy one.
What is the best internal temperature for duck breast? Duck breast is a red meat and is best enjoyed at medium-rare. You should pull the meat off the Big Green Egg at 130°F to allow carryover cooking to bring it to a final resting temperature of 135°F.
Should you cook duck breast in a cold pan? Starting with a relatively cool cast iron pan is a professional secret. This allows the fat to begin rendering slowly as the pan heats up on the Egg, which ensures the skin becomes crispy before the meat overcooks.
Big Green Egg Seared Duck Breast with Cherry Port Sauce
Equipment
- 1 Cast Iron Pan
Ingredients
The Duck Ingredients:
- 4 Large duck breasts, approx. 6–8 oz each
- 2 tbsp Kosher salt
- 1 tsp Fresh cracked pepper
- 1 tbsp Butter
The Cherry Port Sauce Ingredients:
- 1 cup Fresh or frozen dark cherries, pitted
- 1/2 cup Tawny 20-year Port
- 1/4 cup Chicken stock
- 2 tbsp Shallots, finely minced
- 1 tbsp Honey
Instructions
- Prep: Use a sharp knife to score a crosshatch pattern into the duck fat without piercing the meat.
- Season: Pat the duck breasts bone-dry with paper towels and apply a generous layer of salt and pepper.
- BGE Setup: Stabilize your Big Green Egg at 400°F for direct cooking and preheat a large cast iron skillet.
- The Drop: Melt the butter in the hot pan and lay the four duck breasts skin-side down immediately.
- The Render: Maintain steady heat for 10 minutes with the skin-side down to melt the fat and create a crisp crust.
- The Flip: Turn the breasts over once the skin is mahogany-brown and sear the meat side for 5 minutes.
- The Pull: Remove the duck from the pan at 130°F and let it rest on a warm plate for 10 minutes.
- The Fond: Pour off all but two tablespoons of the rendered fat and sauté the shallots until translucent.
- The Deglaze: Add the cherries, port, chicken stock, and honey to the hot pan while scraping the bottom.
- The Reduction: Bring the sauce to a boil and simmer for 10 minutes until it becomes a thick, glossy glaze.
- The Service: Slice the duck into thin medallions, fan them on a plate, and drizzle with the warm cherry sauce.
Nutrition information is automatically calculated, so should only be used as an approximation.