This post contains affiliate links. Please see our disclosure policy.
If you want to get the most out of your kamado grill, learning how to grill on the Big Green Egg with these 4 proven setup methods will completely change the way you cook over live fire. While the Big Green Egg is famous for low-and-slow barbecue, it is also an incredibly versatile grill capable of everything from burgers and chicken thighs to reverse-seared steaks and blazing hot cowboy-style cooking.
The key is understanding that there is no single “right” way to grill on the Big Green Egg. Depending on what you are cooking, you may want direct heat, raised direct cooking for more control, a 2-zone setup for flexibility, or an aggressive high-heat cowboy grilling setup right over the coals.
In this guide, I will walk you through the four grilling setups I use most, how to light the Big Green Egg for grilling success, and how to manage temperature so you get better results every time.
Table of Contents
- Quick Answer: What Is the Best Grilling Setup on the Big Green Egg?
- Direct vs Indirect Grilling on the Big Green Egg
- Out of the Box Direct Grilling
- Raised Direct Grilling
- 2-Zone Grilling
- Cowboy Grilling
- How to Light the Big Green Egg for Grilling
- Big Green Egg Grilling Temperature Guide
- Common Big Green Egg Grilling Mistakes
- Frequently Asked Questions About Grilling on the Big Green Egg
- Final Thoughts
- More Big Green Egg Guides
Get My NEW Book
The Ultimate Big Green Egg Cookbook

Quick Answer: What Is the Best Grilling Setup on the Big Green Egg?
There is no single best way to grill on the Big Green Egg. The right setup depends on what you are cooking and the results you want to achieve. For everyday grilling, I prefer a raised direct setup because it gives me more control over the fire while still delivering excellent searing and grill marks. For thicker cuts of meat, a 2-zone setup provides the flexibility to cook over direct heat and then finish over indirect heat. If maximum heat is the goal, nothing beats cowboy grilling, where the cooking grate sits just above the lump charcoal.
The beauty of the Big Green Egg is that it allows you to configure the grill to match the cook. Once you understand the strengths of each setup, choosing the right one becomes second nature.
Direct vs Indirect Grilling on the Big Green Egg
Before we dive into the four grilling setups, it helps to understand the two basic cooking methods used on the Big Green Egg: direct grilling and indirect grilling.
Direct grilling means the food is exposed to heat coming directly from the burning lump charcoal below. This is the setup most people think of when grilling burgers, steaks, chicken breasts, or vegetables. Direct heat cooks quickly and creates the grill marks, caramelization, and crust we all love.
Indirect grilling uses a ceramic heat deflector, such as the convEGGtor, to shield food from the direct heat of the charcoal. Instead of cooking directly over the fire, food cooks using the hot air circulating inside the dome. This setup is ideal for larger cuts of meat, roasting, baking, and reverse searing.
Many of the best Big Green Egg cooks combine both methods. A thick steak may start over indirect heat to slowly reach temperature before being finished over direct heat for a perfect crust. This approach, known as reverse searing, is one of the biggest advantages of cooking on a kamado grill.
Understanding the difference between direct and indirect cooking is the foundation for choosing the right grilling setup for every cook.

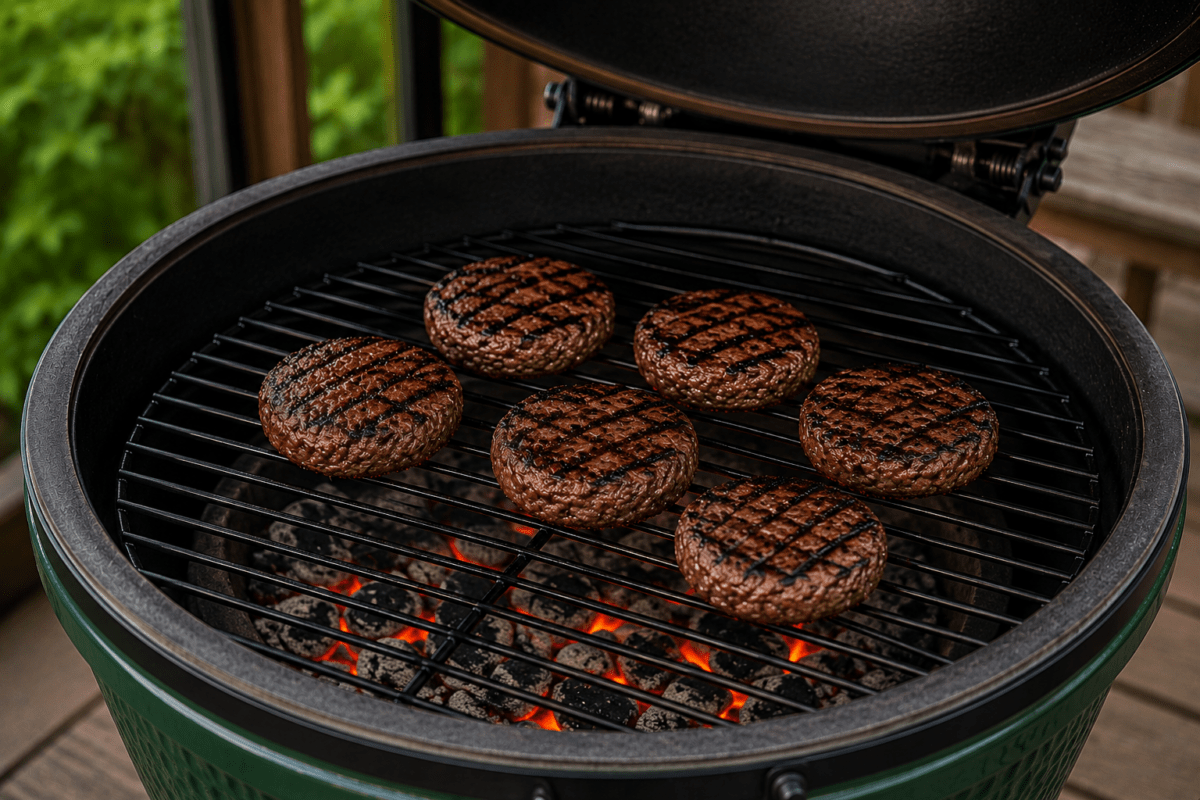
Out of the Box Direct Grilling
The standard grilling setup that comes with every Big Green Egg is what I call the out of the box setup. In this configuration, the cooking grate sits several inches above the burning lump charcoal with no convEGGtor or heat deflector installed. This creates a direct grilling environment that is ideal for everyday cooks.
I use this setup when grilling foods that benefit from moderate to high direct heat such as burgers, hot dogs, chicken breasts, pork chops, sausages, and vegetables. The distance between the grate and the charcoal gives you enough heat to create good grill marks and caramelization while still providing a reasonable amount of control.
For most cooks, this is the setup you will use most often. It requires no special accessories, heats up quickly, and works well in the 350°F to 500°F range. If you are new to the Big Green Egg, mastering this setup first will give you a solid foundation before moving on to more advanced grilling methods.
One thing to keep in mind is that food is relatively close to the fire. Fat dripping onto the charcoal can create flare-ups, especially when cooking burgers, chicken thighs, or heavily marbled steaks. Keep an eye on the cook and be prepared to move food around the grate if needed.
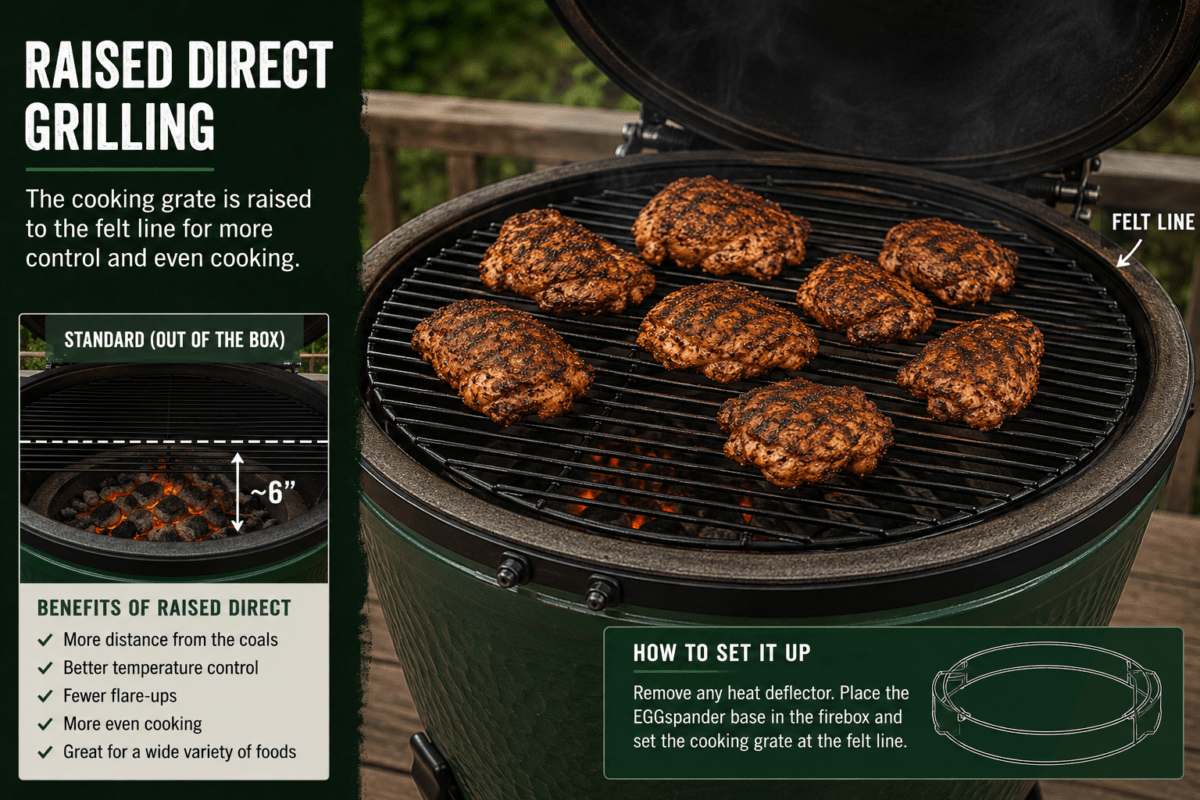
Raised Direct Grilling
If I could only use one grilling setup on the Big Green Egg, this would be it.
Raised direct grilling moves the cooking grate up to the felt line, creating more distance between your food and the burning lump charcoal below. I typically achieve this using the EGGspander system, though longtime Eggheads may know a similar setup from the Ceramic Grill Store’s Woo Ring.
That extra distance gives you significantly more control over the cook. You still get the benefits of direct heat, but the food is less likely to burn before the inside is properly cooked. The result is more even cooking, fewer flare-ups, and a much larger margin for error.
I use raised direct grilling for everything from burgers and chicken thighs to pork chops, seafood, and reverse-seared steaks. It is especially useful when cooking foods that benefit from a little more time over the fire without being subjected to intense radiant heat from the charcoal.
For most everyday grilling, I find raised direct cooking to be the sweet spot between control and performance. You still get excellent grill marks, great caramelization, and plenty of live-fire flavor while gaining a level of precision that is difficult to achieve with the standard setup.
If you own an EGGspander, I highly recommend experimenting with raised direct cooking. Once you get comfortable with it, you may find yourself using it more than any other setup on your Big Green Egg.
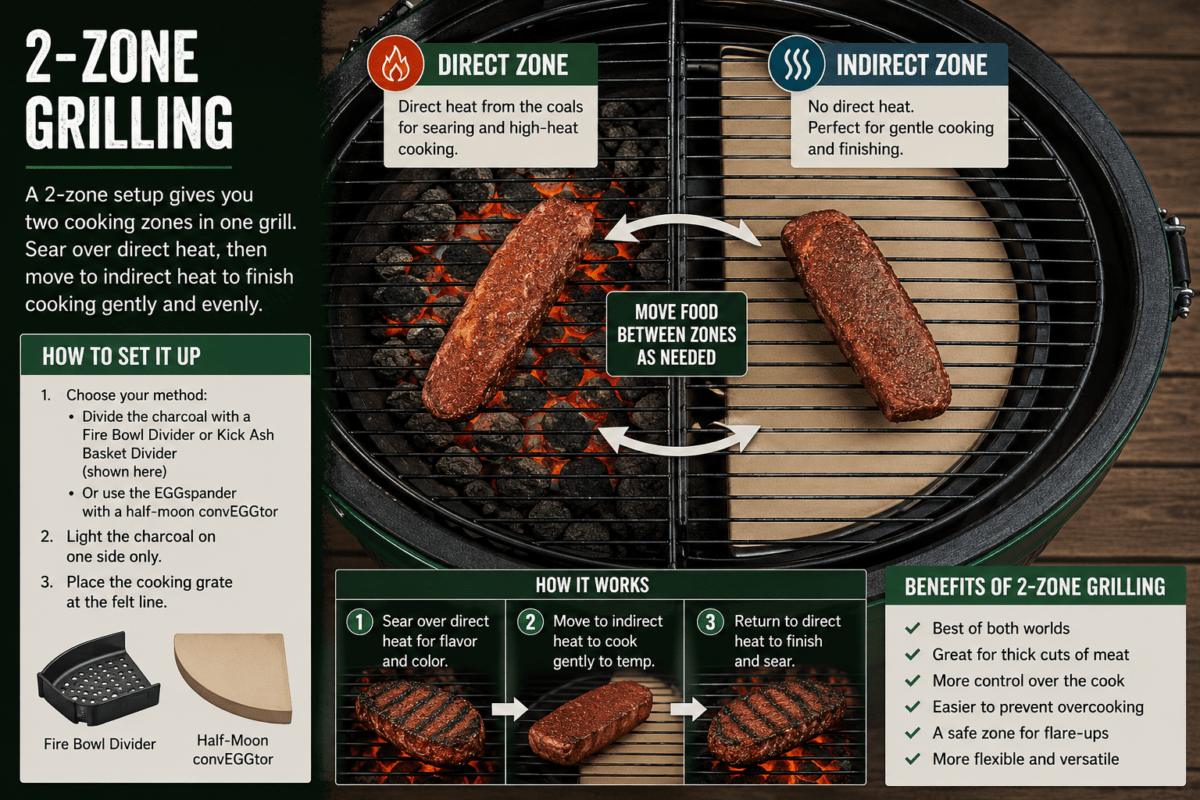
2-Zone Grilling
If raised direct grilling is my favorite everyday setup, then 2-zone grilling is the most versatile setup you can have on your Big Green Egg.
A 2-zone setup creates two distinct cooking areas inside the grill. One side is configured for direct heat, where food is exposed to the burning lump charcoal below. The other side is configured for indirect heat, allowing food to cook more gently away from the fire.
This setup gives you complete control over the cook. If food starts cooking too quickly, simply move it to the indirect side. If it needs more color or a finishing sear, move it back over the direct heat. Having both zones available at the same time makes it much easier to cook thicker cuts of meat without burning the outside before the inside is finished.
I use 2-zone grilling most often for reverse-seared steaks, thick pork chops, bone-in chicken, and anything else that benefits from both direct and indirect cooking during the same cook.
There are two common ways to create a 2-zone setup on the Big Green Egg. The first is to divide the lump charcoal using a Fire Bowl Divider or Kick Ash Basket Divider, concentrating the fire on one side of the cooker. The second is to use the EGGspander system with a half-moon convEGGtor, creating direct heat on one side and indirect heat on the other.
For many Big Green Egg owners, learning to use a 2-zone setup is the single biggest improvement they can make to their grilling game. It provides flexibility, prevents overcooking, and gives you a safe place to move food when flare-ups occur.
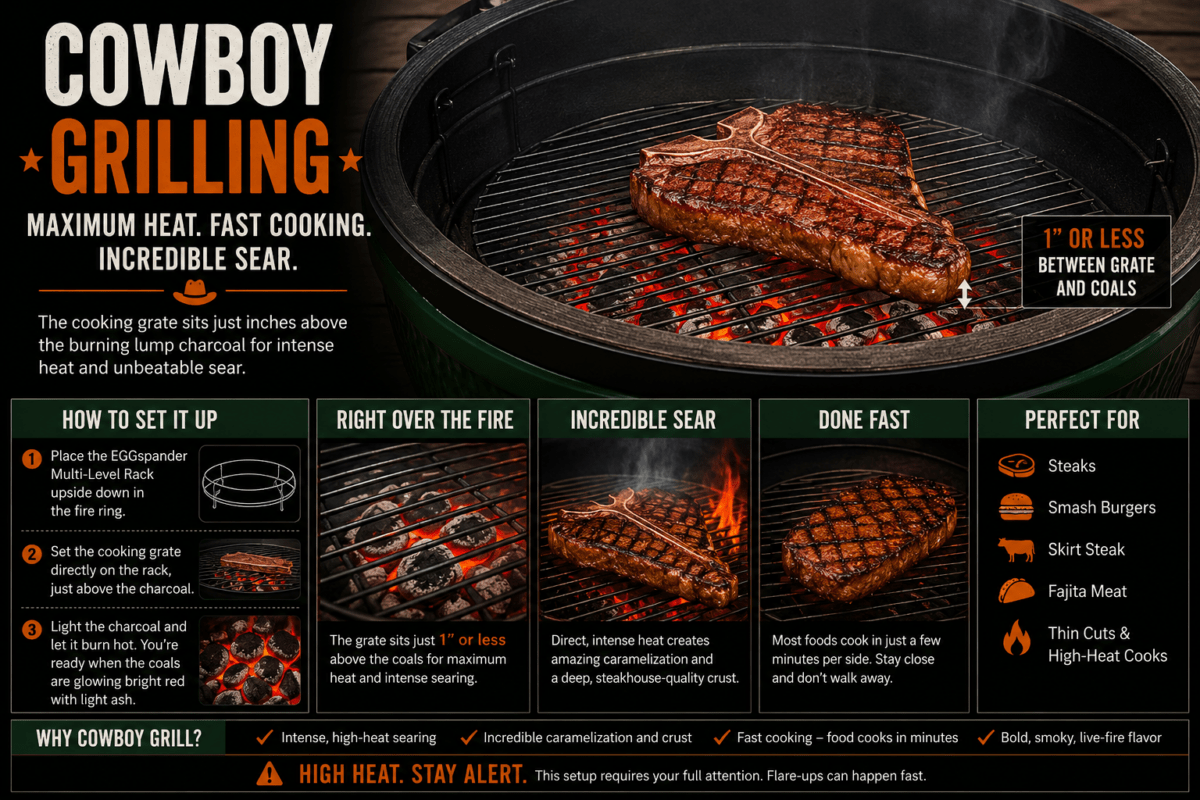
Cowboy Grilling
If raised direct grilling gives you more control and 2-zone grilling gives you more flexibility, cowboy grilling is all about maximum heat.
In this setup, the cooking grate sits just inches above the burning lump charcoal, putting your food closer to the fire than any other grilling method on the Big Green Egg. The result is intense heat, rapid cooking, and incredible caramelization.
I use cowboy grilling when I want to develop a hard sear on steaks, smash burgers, skirt steak, fajita meat, or thin cuts that benefit from high heat and fast cooking. When set up properly, temperatures can easily exceed 600°F and climb well beyond that if desired.
Because the food is so close to the fire, cowboy grilling requires your full attention. This is not the time to walk away and grab another beer. Most foods cook in just a few minutes per side, and flare-ups can happen quickly when fat drips onto the lump charcoal below.
To create this setup, place the EGGspander Multi-Level Rack upside down in the Fire Ring, allowing the cooking grate to sit directly above the charcoal bed. Once the fire is fully established, you’ll have a grilling setup capable of producing steakhouse-quality sears in your own backyard.
Cowboy grilling may not be the setup you use every day, but when maximum heat is the goal, nothing else on the Big Green Egg comes close.
How to Light the Big Green Egg for Grilling
No matter which grilling setup you choose, success starts with building a clean-burning fire. One of the biggest mistakes new Big Green Egg owners make is rushing this process and cooking before the charcoal is fully lit.
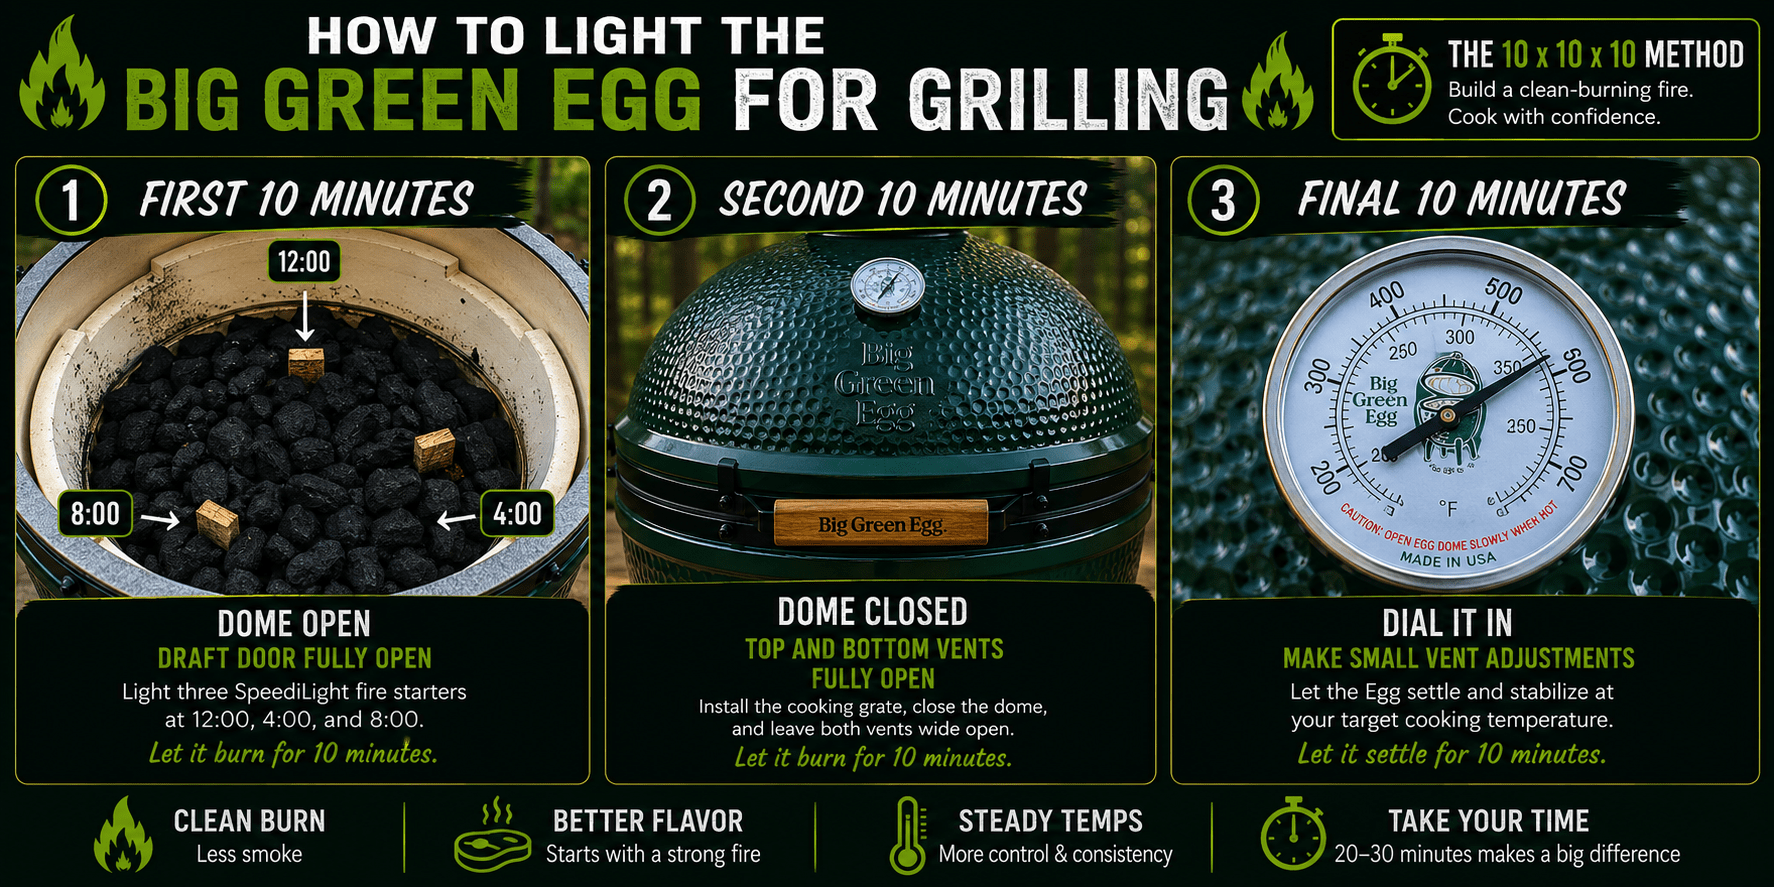
I use a simple method I call the 10 x 10 x 10 Method to build a strong fire and establish clean smoke before food ever touches the grill.
Start by filling the Fire Bowl about halfway with quality lump charcoal. Next, place three SpeediLight fire starters in a triangular pattern throughout the charcoal bed. Think of the charcoal as a clock face and position the fire starters at roughly 12:00, 4:00, and 8:00.
With the Draft Door fully open and the dome raised, light all three starters and allow the fire to burn undisturbed for 10 minutes. During this stage, the charcoal begins establishing multiple ignition points and building the foundation for an even fire.
After 10 minutes, install your cooking grate and close the dome. Leave both the top and bottom vents fully open and allow the fire to continue building for another 10 minutes.
At this point, the charcoal should be well lit, producing clean heat with very little dirty white smoke. Depending on your setup and weather conditions, your Big Green Egg will typically be approaching grilling temperatures.
The final 10 minutes are used to stabilize the cooker at your target temperature. Begin making small vent adjustments and allow the Egg to settle into the desired cooking range before adding food.
Taking an extra 20 to 30 minutes at the beginning of the cook may feel unnecessary, but it is one of the easiest ways to improve flavor, consistency, and temperature control on the Big Green Egg.
Big Green Egg Grilling Temperature Guide
One of the biggest advantages of cooking on a Big Green Egg is how easily it can handle a wide range of grilling temperatures.
Whether you’re searing steaks, grilling burgers, cooking chicken, or roasting vegetables, the Egg gives you precise temperature control and consistent results. The key is matching the dome temperature to the food you’re cooking.
Use this guide as a starting point.
| Food | Dome Temperature |
|---|---|
| Burgers | 400–450°F |
| Hot Dogs & Sausages | 375–425°F |
| Chicken Breasts | 375–400°F |
| Chicken Thighs | 400–450°F |
| Wings | 400–450°F |
| Pork Chops | 400–450°F |
| Steaks | 500–650°F |
| Seafood | 350–450°F |
| Vegetables | 350–450°F |
| Pizza (direct setup) | 500–600°F |
For most weeknight grilling, I find myself cooking somewhere between 400°F and 450°F. That range gives you great color, good airflow, and enough heat to develop flavor without burning the outside before the inside is done.
If you’re cooking thicker cuts like ribeyes or bone-in pork chops, consider using a raised direct or 2-zone setup. Those methods give you more control and make it easier to avoid flare-ups.
Remember that cooking temperatures are guidelines, not rules. The best tool for perfect results is always a good instant-read thermometer.
Common Big Green Egg Grilling Mistakes
The Big Green Egg makes grilling easy, but there are a few mistakes that can make the learning curve steeper than it needs to be.
Starting to Cook Before the Fire Is Stable
One of the most common mistakes is rushing the process.
If you throw food on the grate as soon as the charcoal lights, temperatures will continue climbing and your cook can quickly get out of control. Give the Egg time to stabilize before you start cooking.
Using Too Much Charcoal
Many new Egg owners fill the firebox for every cook.
For a quick weeknight grilling session, you often need far less lump charcoal than you think. Save the large loads of charcoal for long low-and-slow cooks.
Chasing the Temperature
The Egg responds slowly to vent adjustments.
Make small changes and give the cooker several minutes to react. Constantly opening and closing the vents usually creates bigger temperature swings, not better control.
Opening the Dome Too Often
Every time you open the lid, you change the cooking environment.
Trust the process. Let the Egg do its job and resist the urge to check on food every few minutes.
Cooking Everything Over Direct Heat
Direct grilling is great, but it is not always the best choice.
Thicker cuts of meat often benefit from raised direct grilling or a 2-zone setup. These methods give you more control and help prevent burnt exteriors and undercooked centers.
Ignoring Internal Temperature
A dome thermometer tells you the cooker temperature.
It does not tell you when your food is done.
Use a quality instant-read thermometer and cook to internal temperature rather than relying solely on time.
Frequently Asked Questions About Grilling on the Big Green Egg
What is the best temperature for grilling on a Big Green Egg?
For most everyday grilling, 400°F to 450°F is the sweet spot. This temperature range works well for burgers, chicken, sausages, pork chops, and vegetables while providing great color and flavor without excessive flare-ups.
Should I grill with the lid open or closed on a Big Green Egg?
For most cooks, grill with the dome closed. Closing the lid allows the Egg to function as a true ceramic cooker, creating even heat and better temperature control. The only exception is cowboy grilling, where food is cooked directly over the charcoal with the dome open.
What is the difference between direct and indirect grilling?
Direct grilling places food directly over the fire and is best for steaks, burgers, seafood, and vegetables. Indirect grilling uses a heat deflector to block direct heat and is better suited for larger cuts like brisket, pork butt, turkey, and whole chickens.
What is raised direct grilling?
Raised direct grilling moves the cooking grate higher into the dome while keeping food over direct heat. This creates a more forgiving cooking environment and is one of the best setups for chicken, pork chops, and thicker cuts of meat.
How do I prevent flare-ups on a Big Green Egg?
Keep the cooking grate clean, trim excess fat when appropriate, and avoid cooking directly over a roaring fire. Raised direct and 2-zone setups also help manage flare-ups while giving you more control over the cook.
Can you grill steaks directly over charcoal on a Big Green Egg?
Yes. This method is commonly called cowboy grilling. Food is cooked directly over the lump charcoal using an elevated rack positioned close to the coals. It produces an intense sear and incredible flavor but requires close attention because food cooks very quickly.
How long does it take a Big Green Egg to reach grilling temperature?
Using my 10 x 10 x 10 Method, most Big Green Eggs are ready to grill in about 20 to 30 minutes. The exact time depends on charcoal load, weather conditions, and your target cooking temperature.
Final Thoughts
There is no single “best” way to grill on a Big Green Egg.
The right setup depends on what you’re cooking, how much control you want, and the results you’re after.
For burgers, steaks, and quick weeknight cooks, the standard direct grilling setup works great. When cooking chicken, pork chops, or thicker cuts, I often prefer a raised direct setup. If I want maximum flexibility, I’ll use a 2-zone fire. And when it’s time to impress friends with a perfectly seared steak, cowboy grilling is hard to beat.
The good news is that every one of these methods is easy to set up and worth learning.
Start with the basic direct grilling setup, then experiment with the others as your confidence grows. Before long, you’ll know exactly which setup to use every time you fire up your Egg.
And that’s when the Big Green Egg becomes more than a grill. It becomes the most versatile cooker in your backyard.
More Big Green Egg Guides
Want to get even more out of your Big Green Egg? These guides will help you master temperature control, fire management, and cooking techniques.
- Big Green Egg Temperature Control Guide – Learn how to control airflow, stabilize temperatures, and avoid common mistakes that lead to temperature swings.
- How to Set Your Big Green Egg for Low and Slow – A step-by-step guide to setting up your Egg for brisket, pork butt, ribs, and other long cooks.
The more you understand how to manage heat and airflow, the more versatile your Big Green Egg becomes.