
This post contains affiliate links. Please see our disclosure policy.
The Thanksgiving Turkey. It’s the most anticipated meal of the year, yet it’s often the most stressful. You’ve likely spent years asking yourself: “Should I stick with the classic whole bird, or is this finally the year I try the spatchcock method?” If you’re feeling a mix of holiday tradition and “spatchcock-curiosity,” you aren’t alone and you’ve come to exactly the right place.
Let’s settle the debate right now. If your top priority is the Norman Rockwell “center-of-the-table” presentation, roasting the bird whole is a fine choice. It allows you to stuff the cavity with aromatics that lead to a legendary gravy (and you can find my guide for that here).
However, if you want a turkey that is objectively easier to cook, finishes in half the time, and ensures the breast meat is dripping with juice while the thighs are perfectly tender, then spatchcocking is your new best friend. By removing the backbone and flattening the bird, you create a uniform cooking surface where every part of the turkey crosses the finish line at the exact same moment. It might look a little different to your guests at first, but one bite of that perfectly rendered skin and succulent meat will make them forget all about tradition.
If you’re ready to take the stress out of your holiday and put the best bird of your life on the table, let’s dive into the details.
Now, sit back, pour yourself a glass of your favorite Beaujolais Nouveau, and let’s master the Big Green Egg Spatchcock Turkey.
Table of Contents
Get My NEW Book
The Ultimate Big Green Egg Cookbook

Why Spatchcock This Year?
Speed: A 12-14 lb turkey can often finish in under two hours at 350°F.
Total Temperature Control: No more waiting for the legs to finish while the breast meat dries out.
Maximum Surface Area: Every inch of the skin is exposed to the heat for a 360-degree crunch.
Brine the Spatchcock Turkey
The Brining Debate: Why Wet Brine Wins for Turkey
When it comes to the centerpiece of the Thanksgiving table, moisture is everything. While I love a dry brine for chicken, I have found that a wet brine is the gold standard for a spatchcock turkey on the Big Green Egg. Because a turkey is a significantly larger muscle, submerging it in a salt-and-aromatic bath ensures that moisture is driven deep into the breast meat, providing a safety net against the higher heat of the grill.
For this recipe, I used Dizzy Pig BBQ’s Mad Max Brine. It is a fantastic blend specifically designed for poultry that adds subtle herbal notes without overpowering the natural flavor of the bird.
However, you don’t have to be limited to just one brand. There are several high-quality brines on the market that will produce incredible results:
- Lane’s BBQ “Signature Plus” Brine: A heavy hitter in the BBQ world that provides a classic, savory profile.
- The Homemade Route: If you want to keep it simple, a classic mix of water, kosher salt, brown sugar, peppercorns, and fresh herbs like rosemary and thyme will do the trick beautifully.
- The “Bird Bath”: Whatever brine you choose, ensure you allow the turkey to submerge for at least 12 to 24 hours.
Brining Pro-Tips
Rinse and Dry: After the brine is complete, remove the bird and rinse it thoroughly under cold water to remove excess surface salt. Pat it bone-dry with paper towels, this is the first step toward getting that skin to crisp up later!
Keep it Cold: Always ensure your brine is ice-cold before adding the turkey. You can even replace some of the water in your recipe with ice cubes to speed up the cooling process.
The Container: A large food-grade bucket or a heavy-duty brining bag works best. Just make sure the turkey is fully submerged; if it floats, weigh it down with a heavy plate.
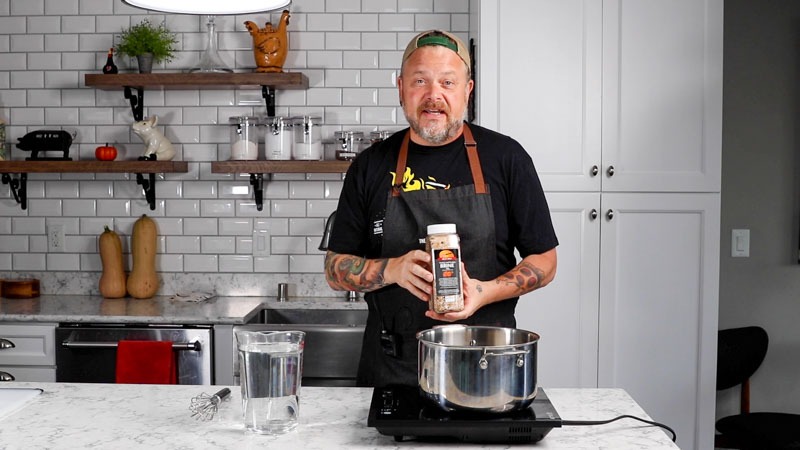
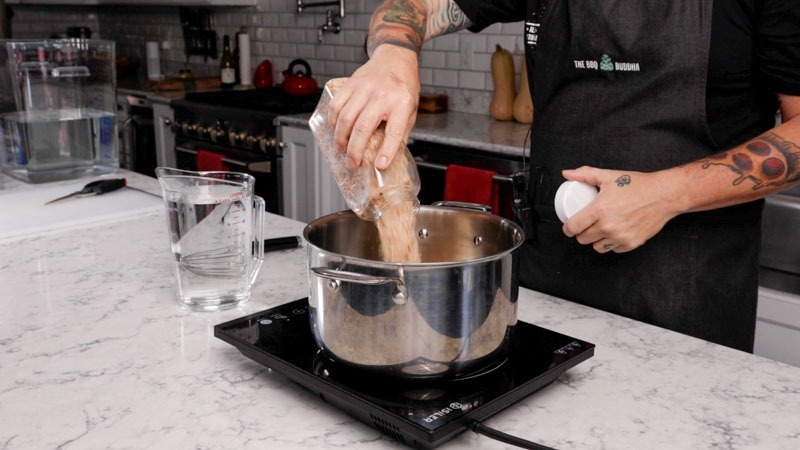
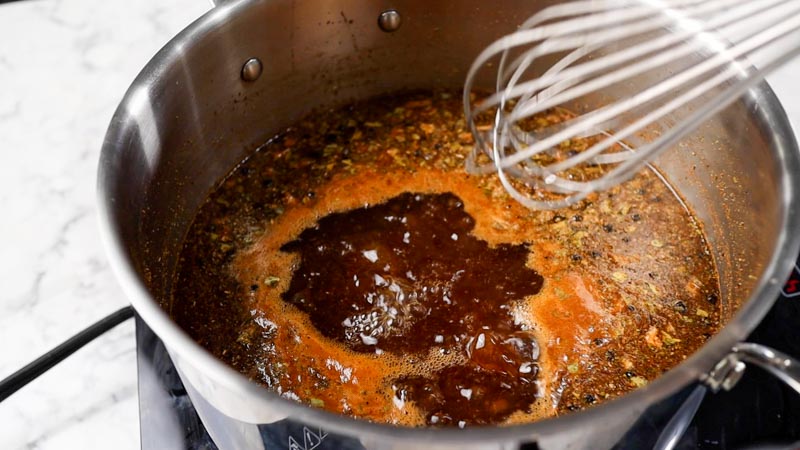
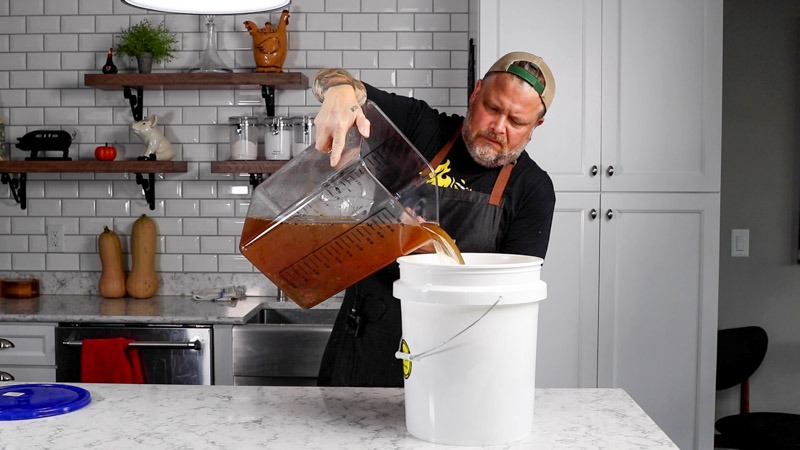
Start by pouring the brine into a pot, adding water, and bringing it to a low boil.

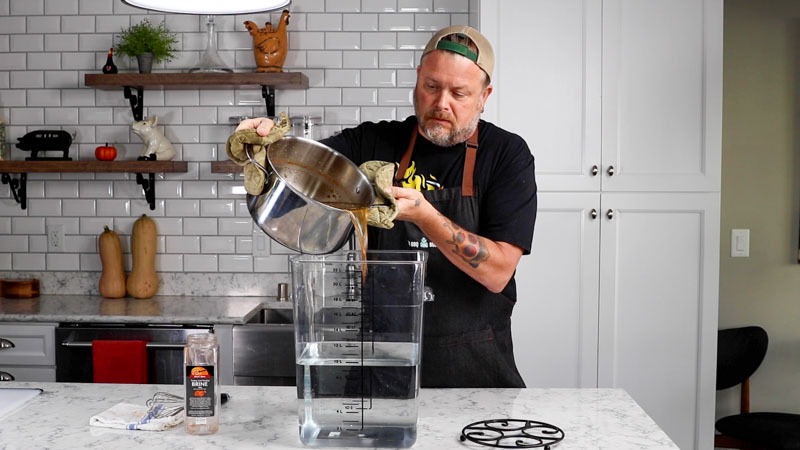
Once your brine is prepared, safety and temperature are your top priorities. Never add a raw turkey to warm brine. Pour your hot brine mixture into a container of cold water (or a mix of water and ice) and get it into the refrigerator immediately.
While that mixture is chilling down to a safe temperature, you have the perfect window of time to handle the “heavy lifting”: spatchcocking the turkey.
Preparation Sequence
- The Cooling Phase: Aim for the brine to be below 40°F before the bird goes in. Using an ice bath speeds this up significantly, ensuring you aren’t leaving your turkey on the counter for too long.
- The Spatchcock: While the brine cools, grab your heavy-duty poultry shears. Removing the backbone of a 12-14 lb turkey takes a bit more “oomph” than a chicken, so take your time and watch your fingers.
- The Submerge: Once the bird is flattened and the brine is ice-cold, submerge the turkey completely. If you’ve spatchcocked it first, you’ll find it actually fits into a brining bag or container much more easily than a whole bird!
Timing the Soak
For a turkey of this size, you want to let it soak for 12 to 24 hours. Any longer and the texture of the meat can start to become a bit too soft; any shorter and the brine won’t have time to penetrate the deep muscle of the breast.
How To Spatchcock the Turkey
Spatchcocking a turkey can feel a little intimidating the first time you do it, but I promise it is the most rewarding skill you’ll learn for the holidays. Before you even reach for your shears, however, you have to do a quick bit of detective work.
Step 1: The Label Check
Start with a high-quality whole turkey that has not been pre-brined. Most “supermarket” turkeys (think Butterball or similar brands) are often injected with or packaged in a saline solution to preserve them. Read the ingredients list carefully; if you see words like “solution,” “salt,” or “broth,” do not wet brine this bird. Doubling up on the salt will make the turkey nearly inedible. Look for a “natural” or fresh turkey for the best results.
Step 2: The Tools of the Trade
You are going to need a sturdy pair of heavy-duty poultry shears (e.g. OXO Poultry Shears). A standard pair of kitchen scissors won’t cut it here; turkey bones are much thicker and denser than chicken bones. You’ll also want a large, stable cutting board and a couple of paper towels to keep your grip firm.
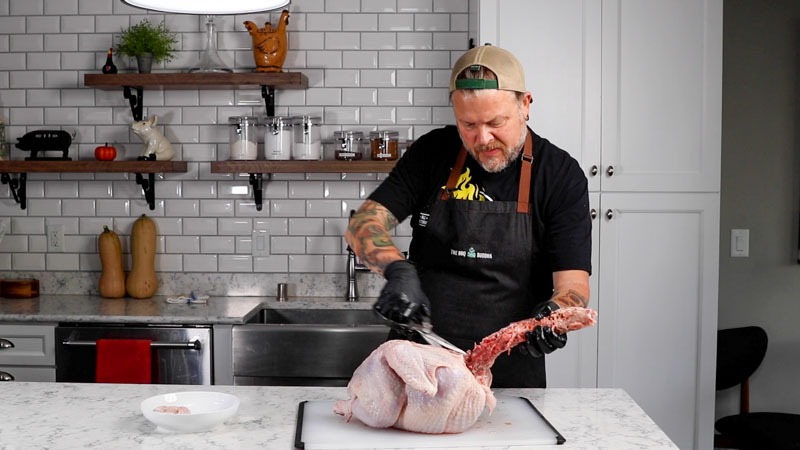
Step 3: Removing the Backbone
- Positioning: Place the turkey on the cutting board breast-side down, with the tail facing you.
- The First Cut: Starting at the tail, cut along one side of the backbone. You’ll need to use some muscle as you pass through the ribcage. Stay as close to the spine as possible to avoid losing too much meat.
- The Second Cut: Repeat the process on the other side of the backbone. Once finished, lift the backbone out completely. (Pro Tip: Save this bone along with the neck and giblets for the best turkey stock you’ve ever tasted!)
- The Flip and Crack: Flip the turkey over so it is breast-side up. Place the heels of both hands in the center of the breastbone and press down firmly until you hear a loud CRACK.
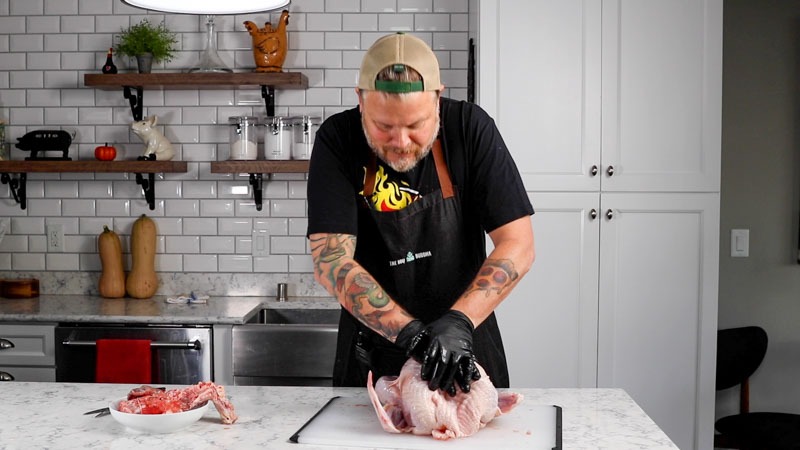
The Result
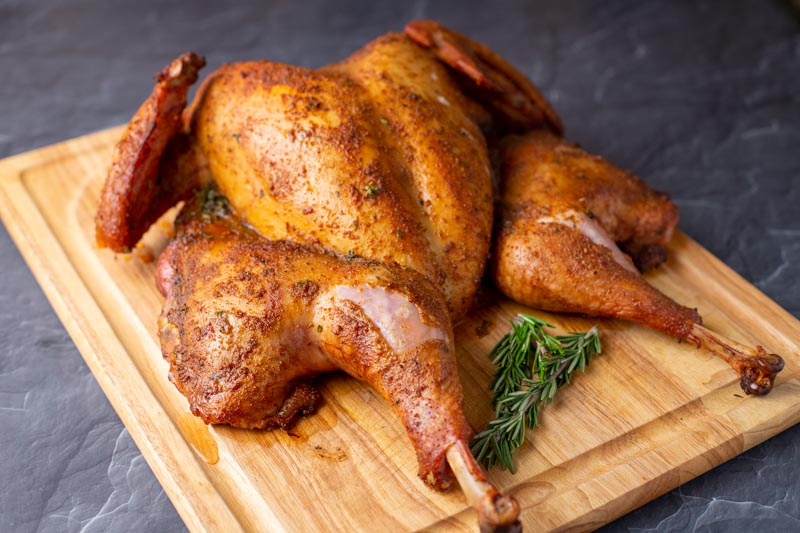
Your turkey should now lie completely flat on the board. The wings should be tucked back, and the legs should be flared out. By flattening the bird, you’ve just ensured that the heat of the Big Green Egg can reach the dark meat and white meat simultaneously, cutting your cook time in half and doubling your flavor.


Place the Spatchcock Turkey in the Brine
Once the bird is flattened and the brine has completely cooled, it is time for the soak. This is where the magic happens.
Carefully place the spatchcocked turkey into your brining bucket or a heavy-duty brining bag. One of the hidden perks of spatchcocking before you brine is that the bird is much more compact; you’ll find it fits into the bucket far more easily than a round, bulky whole turkey.
Pour the cold brining solution over the bird until it is completely submerged. If the turkey tries to float, you can weigh it down with a heavy ceramic plate to ensure every inch of the meat is in contact with the liquid. Seal the container and place it into the refrigerator overnight (12 to 24 hours).
During this time, the salt and aromatics will work their way into the muscle fibers, seasoning the turkey from the inside out and ensuring it stays juicy even under the heat of the Big Green Egg.

Seasoning the Spatchcock Turkey
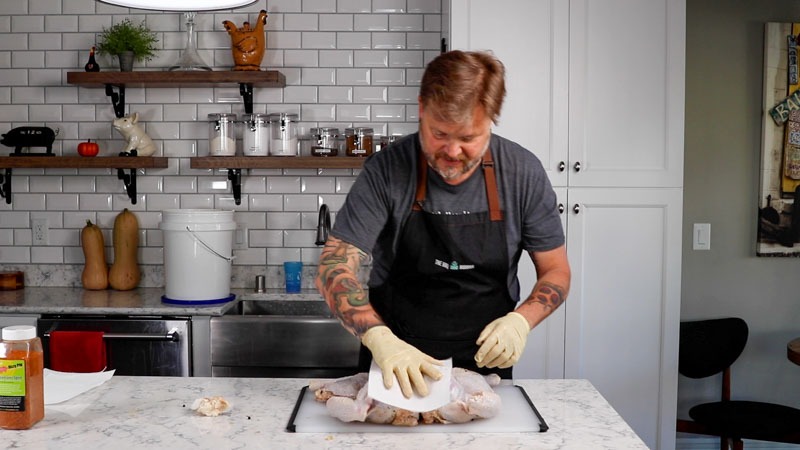
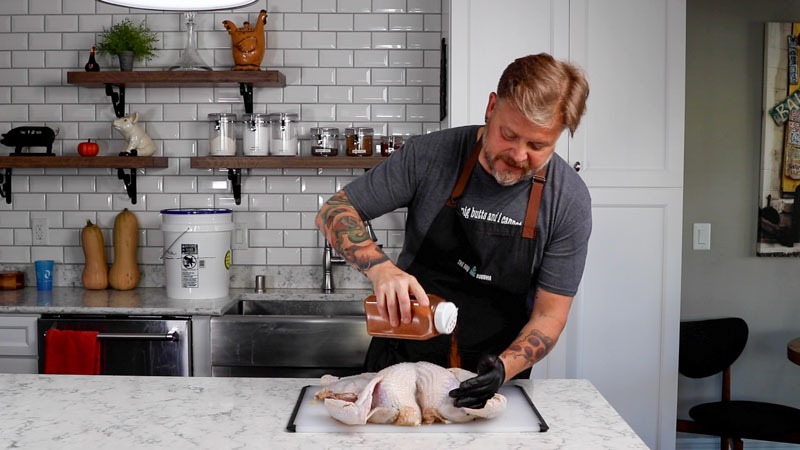
The next day, it’s time to get that bird ready for the smoke. Carefully remove the turkey from the brining bucket and give it a thorough rinse under cold water. This step is crucial as it washes away any excess surface salt that could make the skin overly salty. Once rinsed, grab your paper towels and pat the bird completely dry. The drier the skin is before it hits the heat, the crispier it will be when it comes off.
Now comes the fun part: layering on the aromatics. For this cook, I used Dizzy Pig’s Tsunami Spin, which has a unique profile that pairs beautifully with poultry. However, Thanksgiving is the perfect time to experiment with your favorite flavors:
- Lane’s BBQ “Spellbound” or “Signature”: Lane’s offers some fantastic rubs that provide a beautiful mahogany color and a savory-sweet balance that screams holiday feast.
- The Homemade Classic: If you want to keep it traditional, mix together a blend of kosher salt, coarse black pepper, dried thyme, rubbed sage, and plenty of smoked paprika.
- The Binder (Optional): If the skin feels too slick, you can apply a very thin coat of olive oil or melted butter to help the rub adhere and to promote even more browning.
Seasoning Best Practices
Under the Skin: For a pro move, gently loosen the skin over the breast with your fingers and work a little bit of the rub directly onto the meat. This guarantees the flavor gets deep into the bird.
Don’t Forget the Underside: Flip the bird over and season the bone side first. It’s often overlooked, but adding flavor here ensures the meat is seasoned from every angle.
Go Heavy on the Legs: The dark meat can handle a lot of seasoning, so don’t be afraid to be generous around the thighs and drumsticks.
Setting up the Big Green Egg
While the bird is resting in its rub, it’s time to get the Big Green Egg dialed in. For a turkey, we want a slightly lower starting temperature than we used for chicken to allow that larger bird to cook through evenly without the skin getting too dark too fast.
The Indirect Setup
Prepare your Egg for indirect cooking by installing the ConvEGGtor (legs up) and placing the stainless steel grate on top. This creates the protective heat shield that transforms your grill into a convection oven.
The “Kiss” of Smoke
For turkey, you want a light, delicate smoke profile that won’t overpower the natural flavor of the meat or the herbs in your rub. For this cook, I used two handfuls of Pecan wood chips.
- Why Pecan? It’s the “sweet middle ground” of smoking woods. It provides a rich, nutty aroma that is much milder than hickory but more distinct than apple or cherry.
- Clean Smoke is Key: Wait for the “white” smoke to dissipate. You are looking for those faint, wispy blue trails. This ensures your Thanksgiving bird tastes like a holiday feast, not a campfire.
Temperature and Placement
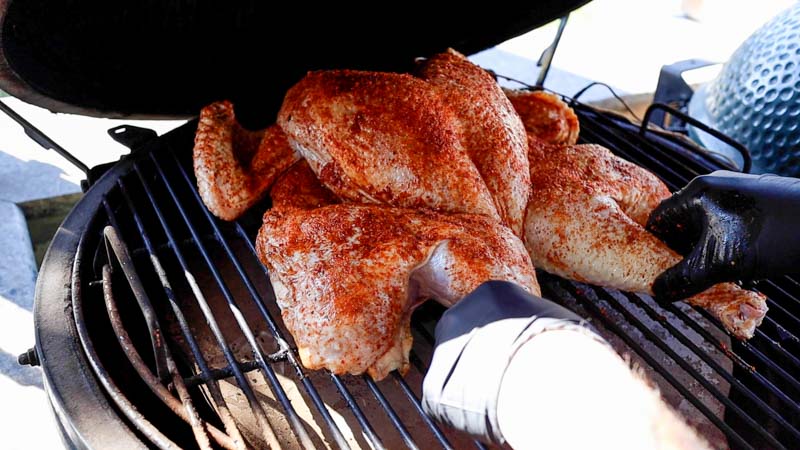
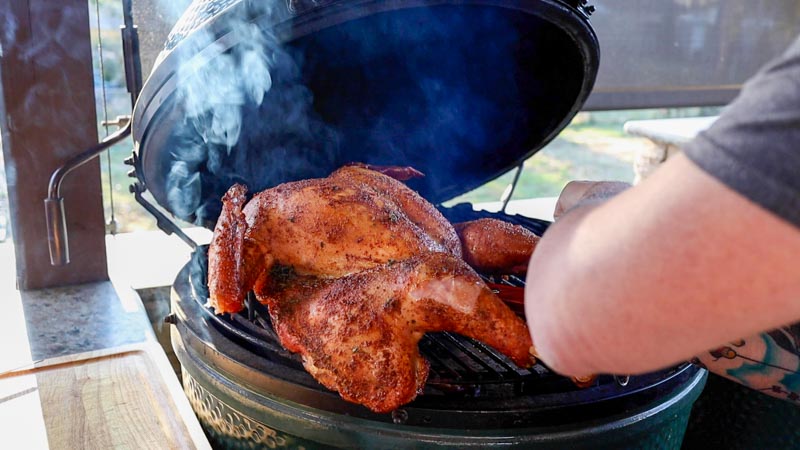
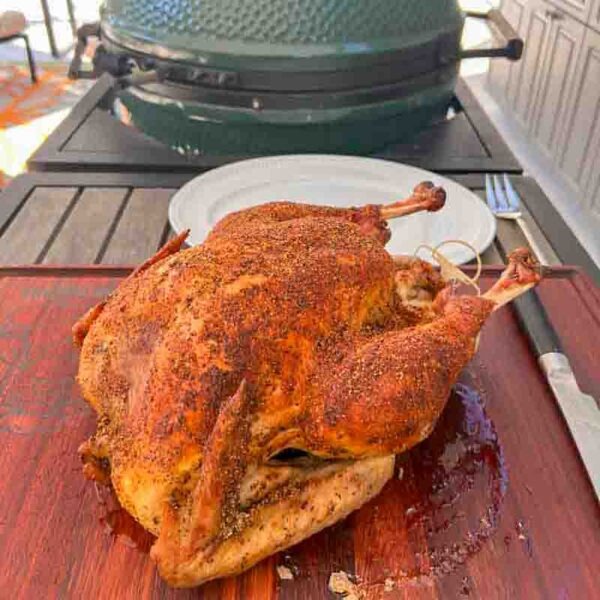
Stabilize your Egg at 275°F. Once the temperature is locked in and the smoke is running clean, place the turkey onto the center of the grate, breast-side up. Make sure the bird is laying as flat as possible to maximize the surface area exposed to the heat.
Now comes the hardest part of the day: Close the lid and leave it alone. For the first hour, let the turkey roast undisturbed. Every time you open the lid, you lose heat and moisture, and you interrupt the rendering process of the skin. Trust the Egg to do its job.
Thanksgiving Setup Checklist
The Flat Test: If a wing or leg is propped up, tuck it down. The flatter the bird, the more even the cook.
Full Firebox: Ensure you start with a full load of lump charcoal; you don’t want to run out of fuel halfway through the big meal.
Drip Pan (Optional): You can place a disposable foil pan on top of the ConvEGGtor (under the grate) to catch the drippings. This prevents the fat from burning on the ceramic and keeps the smoke smelling sweet.
Cooking the Spatchcock Turkey
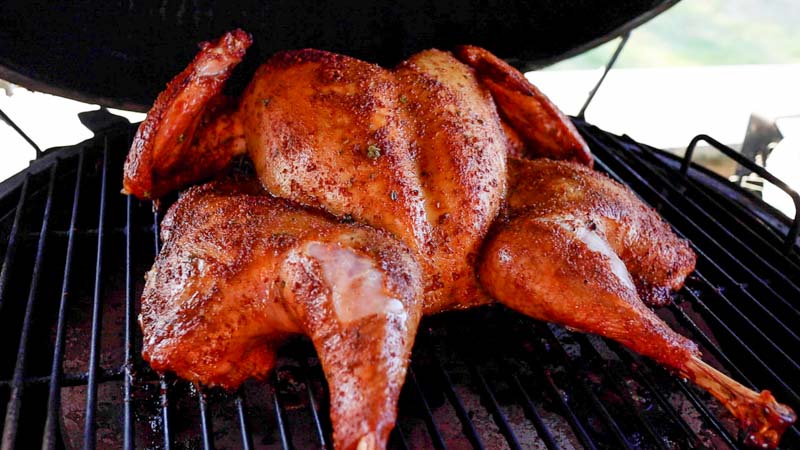
After the turkey has bathed in that gentle 275°F smoke for an hour, it’s time to shift gears. The meat has absorbed its “kiss” of pecan flavor, and now we need to focus on the texture and color of the skin.
The Temperature Bump
Open your vents and increase the Big Green Egg temperature to 350°F. This jump in heat is essential for rendering the turkey fat and transforming the skin from soft to crispy. Think of the first hour as the “flavor phase” and the rest of the cook as the “crunch phase.”
The Herb-Butter Glaze
While the Egg is climbing to 350°F, prepare your secret weapon: the glaze. Melt one stick of unsalted butter and stir in one teaspoon of finely chopped fresh thyme.
Using a basting brush, generously apply this herb butter over the entire surface of the bird.
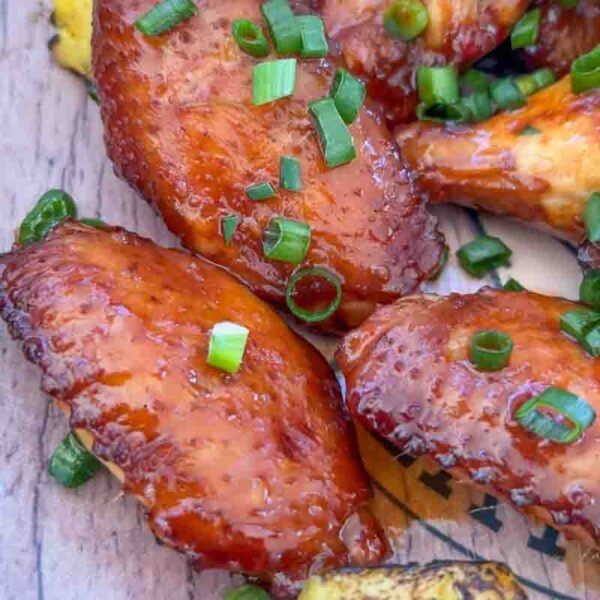
- The Science of Browning: The milk solids in the butter combined with the higher heat trigger the Maillard reaction, giving your turkey that “magazine-cover” mahogany glow.
- The Flavor Boost: The fresh thyme infused into the butter adds a final layer of herbaceous aroma that traditional Thanksgiving guests crave.
Pro-Tip: The “Quick Brush”
When you open the dome to apply the glaze, work quickly. You want to minimize the time the lid is open so the Egg can quickly recover to that 350°F target. Once the bird is glistening with butter, close the lid and let the heat do the rest of the work.
What to Watch For
As the bird roasts at this higher temperature, keep an eye on the wing tips and the ends of the drumsticks. If they start to get too dark before the breast is done, you can loosely tent those specific areas with a small piece of aluminum foil to protect them.

When is the Spatchcock Turkey Done
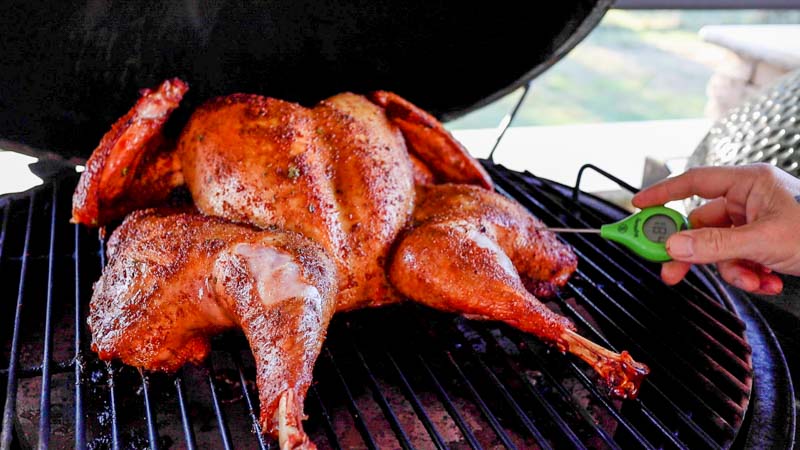
While the smell coming off the Big Green Egg will be incredible, we never pull a Thanksgiving turkey based on scent or “looks” alone. To guarantee a bird that is safe to eat but still dripping with juice, you need to rely on temperature.
The “Done” Indicators
For a standard 12–14 lb spatchcocked turkey, your total cook time will usually fall between 2:15 and 2:30 hours. However, every bird and every fire is different. Use a high-quality digital thermometer (like the ThermoPop) and look for these three signs of success:
- The Visual: Pierce the skin near the thigh. If the juices run clear (not pink or cloudy), you are in the ballpark.
- The Dark Meat: Probe the thickest part of the thigh, being careful not to hit the bone. You are looking for 175°F–180°F. Dark meat needs this higher temp to break down connective tissue and become tender.
- The White Meat: Probe the center of the breast. The USDA recommends 165°F.
The Pro Secret: If you want the juiciest turkey of your life, pull the bird when the breast hits 155°F. Place it on a warm platter and tent it loosely with foil for 30 minutes. Through “carryover cooking,” the internal temperature will continue to rise to 165°F while the bird rests, ensuring you don’t overcook the delicate white meat.
Spatchcock Turkey Cooking Estimates
Because the bird is flattened, it cooks significantly faster than a traditional roaster. Use this chart as a general guide for your Thanksgiving timeline when cooking at the 275°F (1 hr) / 350°F (Finish) method:
| Turkey Weight | Approx. Total Cook Time | When to Start Probing |
| 10–12 lbs | 1:45 – 2:10 hours | 1 hour 30 mins |
| 12–14 lbs | 2:15 – 2:30 hours | 2 hours |
| 14–16 lbs | 2:30 – 2:50 hours | 2 hours 15 mins |
| 18+ lbs | 3:00+ hours | 2 hours 45 mins |
Note: Always use your thermometer as the final authority, as weather and charcoal brand can affect Egg performance.
The Final Rest
No matter what weight your bird is, do not skip the rest. Giving the turkey 20–30 minutes on the counter allows the muscle fibers to relax and reabsorb all those juices you worked so hard to create. If you carve it too soon, all that moisture will end up on the cutting board instead of on the dinner plate.
Carving the Spatchcock Turkey
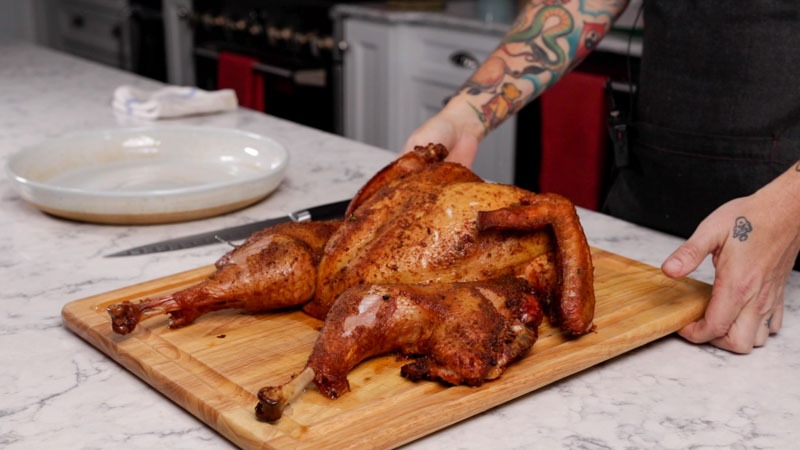
When it comes to the big reveal, the way you carve your spatchcock turkey is just as important as how you cooked it. Traditional whole-bird carving usually involves awkward slices while the bird sits upright, but a spatchcock bird is much more “user-friendly” on the cutting board.
The Anatomy of a Perfect Platter
By carving the bird in the kitchen rather than at the table, you ensure that every guest gets a perfect ratio of juicy meat and crispy skin. Here is my go-to method for a clean, professional look:
- Separate the Leg Quarters: Slice through the skin between the breast and the thigh. Since the bird is already flat, it’s easy to see the joint. Cut through the joint to remove the leg and thigh in one piece. You can then separate the drumstick from the thigh at the “knee” joint.
- Remove the Wings: Pull the wings away from the body and slice through the joint. These are the “chef’s snack” or a prize for the wing-lovers at the table.
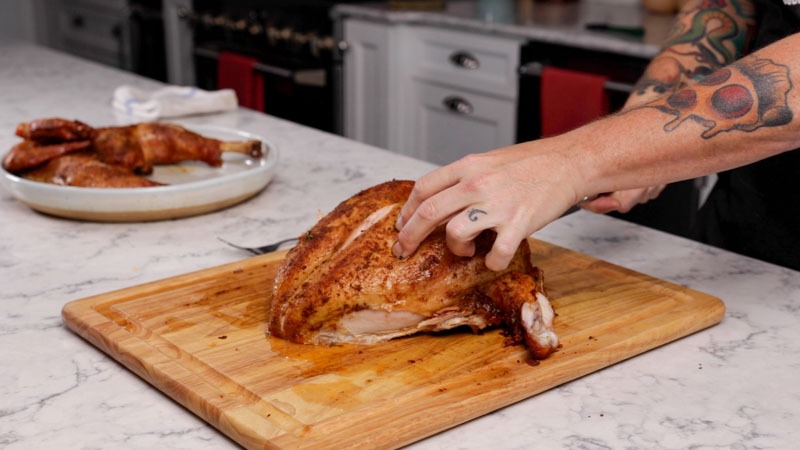
- The Breast Removal: This is the secret to great presentation. Instead of slicing thin slivers off a standing bird, find the breastbone (sternum) in the center. Cut straight down one side of the bone, following the curve of the ribcage, until the entire breast half comes away in one large piece. Repeat on the other side.
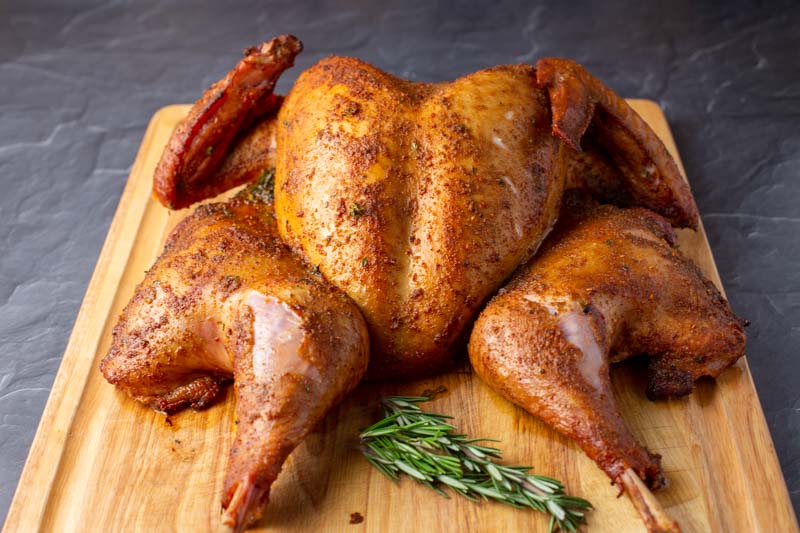
- The “Fan” Slice: Place the breast halves skin-side up on your board. Slice them crosswise into equal, thick medallions (about 1/2-inch thick). This keeps the skin attached to every single piece of meat.
Serving Your Masterpiece
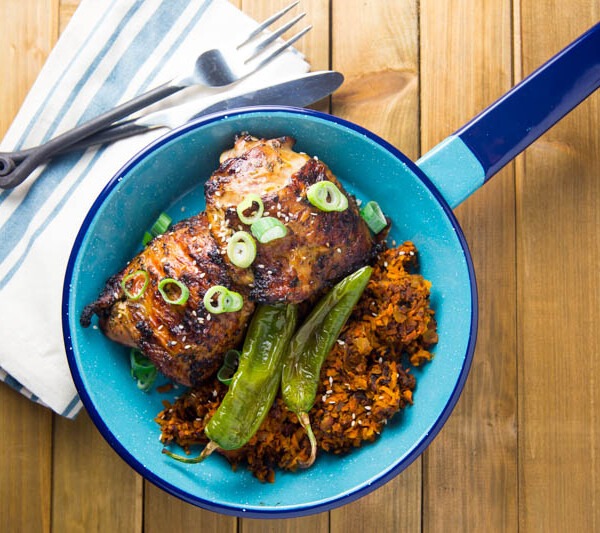
Once everything is carved, arrange the pieces on a large warmed serving platter. Place the sliced breast meat in the center, flanked by the drumsticks and thighs.
Pro Tip: Garnish the platter with fresh sprigs of rosemary, thyme, and maybe some halved pomegranates or orange slices for that “heavy hitter” holiday look.
Because you followed the 2-step temperature method and used the herb-butter glaze, you’ll notice the skin stays remarkably intact during carving. Serve it alongside your favorite gravy and that glass of Beaujolais, and get ready for the best Thanksgiving compliments you’ve ever received.

If you have made it this far congrats! You are the proud owner of a delicious spatchcock turkey.
Big Green Egg Spatchcock Turkey
Ingredients
- 14 pound fresh whole turkey, not brined
- 1 container of Dizzy Pig BBQ Mad Max Brine, You can use another brand (e.g., Lane's BBQ) or your own homemade version!
- 1 stick of butter
- 1 tsp fresh thyme, chopped
- 3/4 cup BBQ seasoning to taste
Instructions
- For this cook I went with a wet brine for the turkey using Dizzy Pig BBQ's Mad Max Brine. I have found wet brining a turkey provides the best combination of moisture and flavor.
- Start by pouring the brine in to a pot, adding water, and bringing it to a low boil.
- Pour the hot brine mixture in to cold water and place in the fridge allowing it to cool while spatchcocking the turkey.
- Now, let’s walk through how to spatchcock a turkey. Start with a whole turkey that has not been pre-brined. Make sure to read the ingredients list on the turkey you purchased as a lot of store bought turkeys will package the turkey in a saline solution to preserve it. If you have that kind of turkey DO NOT brine as it will be overly salty.
- Start by flipping the bird over so thew breast side is down. Find the backbone and using kitchen shears (e.g. OXO Poultry Shears) cut along each side of the backbone. Until you are able to remove the entire thing.
- Once the backbone has been removed (it should be saved for stock and gravy prep) flip the bird over so the breast is facing you and press down hard to break the breast plate. This is a critical step as it is what flattens the bird and creates an even cooking surface.
- When done, add the spatchcocked turkey to a brining bucket and pour the cold brining solution in. Place in to your refrigerator overnight.
- The next day, carefully remove the bird from the brining bucket, rinse, and pat dry with paper towels. Then apply your favorite BBQ rub to the outside of the turkey. For this cook I used Dizzy Pig’s Tsunami Spin.
- Set up your Big Green Egg for indirect cooking using the ConvEGGtor and preheat to 275°F. For this cook I used 2 handfuls of Pecan Wood Chips for a “kiss” of smokey flavor. Once preheated and the smoke is running clean, place the bird inside breast side up, ensuring the turkey is laying as flat as possible. For the first hour let the turkey roast without checking it.
- After the first hour bump the temperature up to 350°F. Next, take 1 stick of butter (melted) mixed with 1 tsp of chopped fresh thyme and glaze the outside of the bird. This will help with the browning.
- Depending on the size, the bird will be done between 2:15 – 2:30 hours total. But to ensure your bird is ready use a digital thermometer (like the Thermapop shown here) and probe the thigh and breast. You are looking for two things: first, if the juice runs clear the bird is done and second, if the thigh measures 180°F and breast measures 165°F you are done. Now, if you want a secret, you can pull the bird at 155°F and rest it 30 minutes as the carryover cooking will bring it up to a safe temp.
- Pull the turkey, place it on a cutting board, and rest up to 30 minutes before slicing and serving.
- Everyone has their own way to carve a turkey but what I do is separate the legs and wings first then remove each breast. I slice the breast in to equal pieces and place all of that on a serving platter.
Nutrition information is automatically calculated, so should only be used as an approximation.


Awesome post! You answered every question. 😎
Thanks Laura and Happy Thanksgiving!
Do you use a binder for the rub?
No, but you can!
What size egg did you use?
XL
Would this fit on a Large?
It should!
Awesome stuff. I just gave my turkey a brine bath and will pull her out tomorrow morning. I usually let her rest for a day in the fridge. Any thoughts on that approach? Also – rub: put it on before or after she dries out in the fridge? Tsunami Spin is awesome!!!
Mike that is a great approach and something I have done before with this recipe: https://thebbqbuddha.com/big-green-egg-thanksgiving-turkey/
Put the rub on after it dries in the fridge. You can use a little binder like olive oil or mayonnaise before you lay down the seasoning. You are right Tsunami Spin is amazing!
Pulling the turkey at 155–is that 155 at the thigh or the breast?
That would be the breast!
Love this recipe. This is the third year I have done the turkey this way. I get rave reviews every time.
Thanks for the great note!
what if you don’t want to brine the turkey need alternative please.
Forgo the brining but do everything else…
I have a Large BGE.
Would a Spatcock 17-18 lbs turkey fit?
Yes, you can fit an 18-pound spatchcock turkey on a Large Big Green Egg, but it’s going to be snug. The Large Egg gives you 262 square inches of cooking space, so you’ll want to position the turkey diagonally to make it work. Here’s how to handle it:
1. Test the Fit First
Before seasoning or setting up your grill, lay the spatchcocked turkey on the grate to make sure it fits. If it’s a little tight, you can trim the edges of the bird for better clearance.
2. Protect the Gasket
Spatchcocking flattens the bird, so while it won’t be too tall, the edges might touch the gasket. If that’s the case, cover the gasket with foil to avoid damage.
3. Set Up for Indirect Cooking
A heat diffuser like the ConvEGGtor is a must for even cooking. It’ll also keep flare-ups in check, which is key when you’re dealing with a big bird.
4. Airflow is Key
With a turkey this size, space can be tight, so be sure to leave room around the bird for proper airflow. This will help maintain stable temps and get that perfect, even cook.
5. Catch the Drippings
Use a drip pan under the turkey to catch all that flavor-packed juice. Bonus: you can use it for gravy later. Just make sure the pan doesn’t block airflow.
Chris,
I have made this turkey several times and is the only way I will cook a turkey and the only way my family wants it cooked. By far the best turkey I have ever had. Thanks for the recipe. This Thanksgiving I am excited to try your double smoked bourbon maple ham.
Thanks Gregg! Kind words. I’m doing that ham for our thanksgiving celebration. Great choice!
Great recipe! It was a hit. I’m on official turkey duty every year now.